How to Deploy Flask, React & PostgreSQL via Helm
Introduction
This guide walks you through how to deploy a Two-Tier App with Flask, React, PostgreSQL, and Helm on a local Kubernetes cluster. By the end, you’ll have a fully functional setup, leveraging Helm’s simplicity for Kubernetes resource management This deployment will take place on a local Kubernetes cluster created with Kind (Kubernetes in Docker) on an Ubuntu 20.04 desktop. The project demonstrates managing backend and frontend configurations, handling secrets, and deploying and migrating databases.
We’ll cover the environment setup, application workflow, deployment process, and necessary Kubernetes and Helm configurations to ensure seamless functionality.
Environment Setup
- Ubuntu 20.04 Desktop: Ensure you have a compatible development environment with Docker, Kubernetes (via Kind), and Helm installed.
- Docker: We’ll use Docker to containerize the application and push images to a registry.
- Kind (Kubernetes in Docker): Kind will manage the local Kubernetes cluster.
- Helm: We’ll create Helm charts for easy, reusable Kubernetes deployments.
Prerequisites
- Docker: Ensure Docker is installed and running.
- Kind: Install Kind for a local Kubernetes environment.
- Helm: Install Helm to simplify Kubernetes deployments
Application Workflow
Reactjs frontend Dockerisation
# Dockerfile for Flask Backend
FROM python:3.9-slim
WORKDIR /app
COPY requirements.txt .
RUN pip install -r requirements.txt
COPY . .
CMD ["flask", "run", "--host=0.0.0.0"]
The backend code is organized in the k8s/flask-backend folder of the repository https://github.com/rjshk013/medium-blog/.
Steps to Clone and Prepare the Backend Code
Clone the Repository: First, let’s clone the repository to access the backend code locally. Open a terminal on your local machine and run:
git clone https://github.com/rjshk013/medium-blog.git
cd medium-blog/k8s/flask-backend
Dockerize the Backend: Inside the swagger-backend folder, you’ll find a Dockerfile configured to build the Flask application. This Dockerfile will handle dependencies and setup, ready for deployment to Kubernetes.
2. React Frontend Dockerfile
# Dockerfile for React Frontend
FROM node:16-alpine as build
WORKDIR /app
COPY package.json ./
RUN npm install
COPY . .
RUN npm run build
# Serve with NGINX
FROM nginx:alpine
COPY --from=build /app/build /usr/share/nginx/html
COPY ./public/env.template.js /usr/share/nginx/html/env.template.js
COPY ./entrypoint.sh /entrypoint.sh
RUN chmod +x /entrypoint.sh
CMD ["/entrypoint.sh"]
The frontend application code is maintained in the k8s/reactjs-frontend folder of the GitHub repository.
The frontend’s Dockerfile is set up to build the React application and serve it via NGINX. The env.template.js file enables dynamic configuration of the backend URL at runtime.
3. Database Initialization
Initialize the database schema and create required tables and admin user data through a migration command.
Pushing Images to Docker Registry
After building Docker images, push them to a container registry (or use a local registry if preferred):
# Navigate to the backend folder
cd medium-blog/k8s/flask-backend
docker build -t your-username/flask-backend:latest .
docker push your-username/flask-backend:latest

# Navigate to the frontend folder
cd medium-blog/k8s/reactjs-frontend
docker build -t your-username/react-frontend:latest .
docker push your-username/react-frontend:latest
Helm Chart for Application Deployment
The Helm chart for this two-tier application is available in the GitHub repository (https://github.com/rjshk013/medium-blog/) under k8s/helmchart-twotierapp. This Helm chart is specifically configured to deploy both the frontend and backend components. Moreover, it efficiently manages environment variables and ensures the creation of necessary Kubernetes resources for a smooth and seamless deployment.
cd medium-blog/k8s/helmchart-twotierapp1. Chart Structure
The Helm chart directory structure:
├── Chart.yaml
├── charts
├── templates
│   ├── NOTES.txt
│   ├── _helpers.tpl
│   ├── deployment.yaml
│   ├── ingress.yaml
│   ├── postgres-deployment.yaml
│   ├── postgres-secrets.yaml
│   ├── postgres-service.yaml
│   ├── service.yaml
│   ├── serviceaccount.yaml
│   └── tests
│       └── test-connection.yaml
├── test-pod.yaml
└── values.yaml
2. values.yaml
This file contains customizable configurations:
replicaCount: 1

image:
  repository: rjshk013/react-frontend-app
  tag: latest
  pullPolicy: IfNotPresent

env:  # Move env to the top level
  REACT_APP_BACKEND_URL: "http://172.18.0.2:32001"

backend:
  repository: rjshk013/swagger-backend
  tag: latest
  env:
    POSTGRES_HOST: "mypostgres-service"
    POSTGRES_PORT: "5432"


postgresql:
  image: postgres:latest  # Official PostgreSQL image

# Define secret values for PostgreSQL credentials
secrets:
  postgres:
    POSTGRES_USER: "postgres"
    POSTGRES_PASSWORD: "admin"
    POSTGRES_DB: "postgres"
service:
  type: NodePort
  frontendPort: 80
  backendPort: 5000
  nodePort: 32000
  backendNodePort: 32001
  dbPort: 5432
serviceAccount:
  create: true          # Set to false if you don't need a ServiceAccount created
  name: ""              # Name of the ServiceAccount (if empty, Helm will use the default name)
  annotations: {}

ingress:
  enabled: false       # Set to true if you want to enable ingress
  annotations: {}      # You can add any annotations required for the ingress
  hosts:
    - host: chart-example.local
      paths:
        - path: /
          pathType: ImplementationSpecific
  tls: []              # TLS configuration (optional)
resources:
  limits:
    memory: "256Mi"
    cpu: "500m"
  requests:
    memory: "128Mi"
    cpu: "250m"
Expose the Backend via NodePort
This exposes the backend service on a specific port of each Kubernetes node. You can access it through the node’s IP and assigned port, which is externally reachable.
3. deployment.yaml Template
The deployment.yaml manages backend and frontend pods:
apiVersion: apps/v1
kind: Deployment
metadata:
  name: {{ .Release.Name }}-frontend
  labels:
    app: {{ .Release.Name }}-frontend
spec:
  replicas: {{ .Values.replicaCount }}
  selector:
    matchLabels:
      app: {{ .Release.Name }}-frontend
  template:
    metadata:
      labels:
        app: {{ .Release.Name }}-frontend
    spec:
      containers:
        - name: myfrontend-app
          image: "{{ .Values.image.repository }}:{{ .Values.image.tag }}"
          ports:
            - containerPort: {{ .Values.service.frontendPort }}
          env:  # Ensure `env` is under the container spec
            - name: REACT_APP_BACKEND_URL
              value: "{{ .Values.env.REACT_APP_BACKEND_URL }}"
---
apiVersion: apps/v1
kind: Deployment
metadata:
  name: {{ .Release.Name }}-backend
  labels:
    app: {{ .Release.Name }}-backend
spec:
  replicas: {{ .Values.replicaCount }}
  selector:
    matchLabels:
      app: {{ .Release.Name }}-backend
  template:
    metadata:
      labels:
        app: {{ .Release.Name }}-backend
    spec:
      nodeSelector:
        role: backend-db-node
      containers:
        - name: mybackend-app
          image: "{{ .Values.backend.repository }}:{{ .Values.backend.tag }}"
          ports:
            - containerPort: {{ .Values.service.backendPort }}
          env:
            - name: POSTGRES_USER
              valueFrom:
                secretKeyRef:
                  name: postgres-secrets
                  key: POSTGRES_USER
            - name: POSTGRES_PASSWORD
              valueFrom:
                secretKeyRef:
                  name: postgres-secrets
                  key: POSTGRES_PASSWORD
            - name: POSTGRES_HOST
              value: "{{ .Values.backend.env.POSTGRES_HOST }}"
            - name: POSTGRES_PORT
              value: "{{ .Values.backend.env.POSTGRES_PORT }}"
            - name: POSTGRES_DB
              valueFrom:
                secretKeyRef:
                  name: postgres-secrets
                  key: POSTGRES_DB
Managing Environment Variables with Kubernetes Secrets
Creating Secrets for PostgreSQL Credentials
apiVersion: v1
kind: Secret
metadata:
  name: postgres-secrets
  labels:
    app: {{ .Release.Name }}-db
type: Opaque
data:
  POSTGRES_USER: {{ .Values.secrets.postgres.POSTGRES_USER | b64enc }}
  POSTGRES_PASSWORD: {{ .Values.secrets.postgres.POSTGRES_PASSWORD | b64enc }}
  POSTGRES_DB: {{ .Values.secrets.postgres.POSTGRES_DB | b64enc }}
Install the Helm Chart: With the values.yaml configured, install the application to your Kubernetes cluster:
helm install twotierapp ./ -n two-tierappCheck the pods are created & running

Post-Deployment: After deployment, remember to run database migrations to set up tables and insert initial data for the backend.
flask db init<br>flask db migrate -m "Initial migration for User model"<br>flask db upgrade<br>flask insert_admin_user
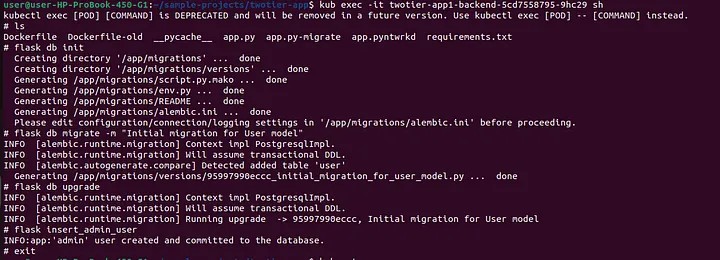
Additionally, check that the Kubernetes services are properly exposed using NodePort, as this will allow external access to the application components

Accessing the Frontend Application
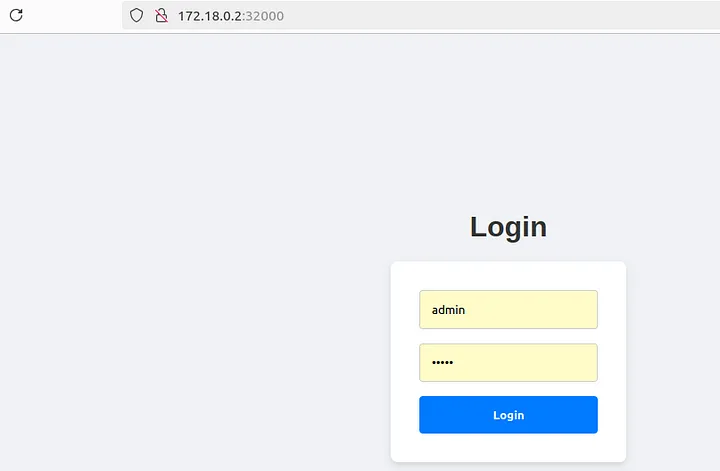
Open a browser and navigate to the NodePort of the frontend application. If you used a NodePort service for the frontend, you can find it from the kubectl get svc command
For example, if the frontend NodePort is exposed on http://<node-ip>:<nodeport>, enter this URL in your browser.In my case it is http://172.18.0.2:32000
Login with Admin Credentials:
- On the login page, use the credentials below to log in:
- Username:
admin - Password:
admin - After successful login, you will be directed to the welcome dashboard.
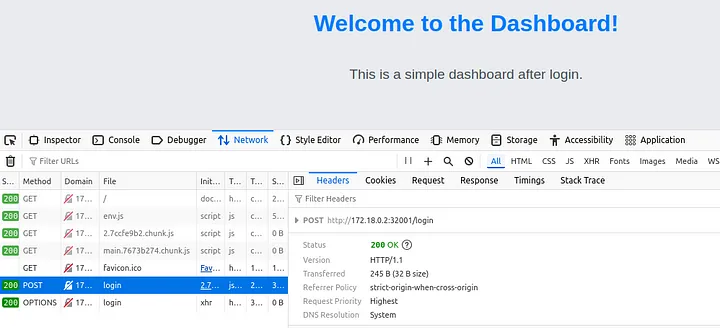
Inspecting Frontend-Backend Communication:
- To verify the frontend is properly communicating with the backend, open your browser’s Developer Tools (usually accessible with
F12orCtrl+Shift+I). - Go to the Network tab, then refresh the page or perform login actions.
- Look for requests to the backend URL (e.g.,
http://<backend-node-ip>:<backend-nodeport>). - Confirm that the responses are 200 OK or similar, indicating successful communication with the backend service.
Conclusion
This guide walks you through deploying a two-tier application on a local Kubernetes cluster using Kind and Helm, managing environment variables securely with Kubernetes secrets, and configuring runtime flexibility for frontend applications. With this setup, you have a foundation for scalable, containerized deployments and flexible configurations across environments.




One thought on “How to Deploy Flask, React & PostgreSQL via Helm”