How to Build a CI/CD Pipeline with Jenkins, SonarQube & Trivy
A hands-on DevOps project that brings together Jenkins, SonarQube, and Trivy — all running locally with Docker Compose — to create a cost-free and secure CI/CD pipeline.
🧭 Introduction
CI/CD is at the heart of modern DevOps. But what if you could build an end-to-end secure pipeline using only open-source tools — and run everything locally on a single Ubuntu server?
That’s exactly what I did ✅
In this tutorial, I’ll walk you through setting up a complete DevSecOps pipeline where:
- 🧠 Jenkins handles the automation
- 🧪 SonarQube ensures code quality
- 🛡️ Trivy scans for vulnerabilities
- 🐳 Docker Compose manages all containers
- 🖥️ Even the deployment host is the same server, making this setup incredibly efficient and minimal
No external VMs, no cloud cost, no complexity — just pure DevOps learning 💻✨
💻 System Requirements
- OS: Ubuntu 20.04+
- RAM: 8 GB+
- Tools: Docker, Docker Compose
- Internet access for pulling images
🧱 Step 1: Clone the Project & Launch Jenkins + SonarQube with Docker Compose
Before setting up our CI/CD magic, let’s get the project ready by cloning the repository and initializing the required directories and SSH keys.
🔁 1️⃣ Clone the Repository
Start by cloning the DevSecOps project repo that contains our pre-configured docker-compose.yaml and helper scripts:
git clone https://github.com/rjshk013/devops-projects.git
cd cicd-jenkins
🔐 2️⃣ Run start.sh to Prepare the Jenkins Agent
This script does two important things:
- 📁 Creates required directories (
jenkins_home,jenkins_agent,jenkins_agent_keys) - 🔑 Generates SSH key pairs for Jenkins master ↔ agent authentication
chmod +x setup.sh
sh setup.sh

✅ After this, your system is ready to launch the services!
🔍 How This Docker Compose Setup Works (All-in-One CI/CD Stack)
This Docker Compose file orchestrates a fully functional DevSecOps pipeline stack — all running locally, isolated in a shared network — and ready to automate builds, scans, and deployments 💥
version: "3.8"

services:
  # 🔧 Jenkins Master
  jenkins-master:
    image: jenkins/jenkins:lts-jdk17
    container_name: jenkins
    restart: unless-stopped
    user: 1000:1000
    ports:
      - "8080:8080"
      - "50000:50000"
    volumes:
      - jenkins_home:/var/jenkins_home:rw
      - /var/run/docker.sock:/var/run/docker.sock
      - /usr/bin/docker:/usr/bin/docker
    environment:
      - JAVA_OPTS=-Dhudson.security.csrf.GlobalCrumbIssuerStrategy=true -Djenkins.security.SystemReadPermission=true
    networks:
      - jenkins_network
    security_opt:
      - no-new-privileges:true
    read_only: true
    tmpfs:
      - /tmp:size=2G
    healthcheck:
      test: ["CMD-SHELL", "curl -f http://localhost:8080/login || exit 1"]
      interval: 1m30s
      timeout: 10s
      retries: 3

  # 🔧 Jenkins SSH Agent
  jenkins-agent:
    image: jenkins/ssh-agent
    container_name: jenkins-agent
    restart: unless-stopped
    expose:
      - "22"
    volumes:
      - /var/run/docker.sock:/var/run/docker.sock
      - /usr/bin/docker:/usr/bin/docker
      - jenkins_agent:/home/jenkins/agent:rw
      - type: bind
        source: ./jenkins_agent_keys
        target: /home/jenkins/.ssh
        read_only: true
    environment:
      - SSH_PUBLIC_KEY_DIR=/home/jenkins/.ssh
    networks:
      - jenkins_network
    security_opt:
      - no-new-privileges:true
    tmpfs:
      - /tmp:size=2G

  # 🧠 SonarQube
  sonarqube:
    container_name: sonarqube
    image: sonarqube:lts-community
    restart: unless-stopped
    depends_on:
      - sonar_db
    ports:
      - "9001:9000"
    environment:
      SONAR_JDBC_URL: jdbc:postgresql://sonar_db:5432/sonar
      SONAR_JDBC_USERNAME: sonar
      SONAR_JDBC_PASSWORD: sonar
    volumes:
      - sonarqube_conf:/opt/sonarqube/conf
      - sonarqube_data:/opt/sonarqube/data
      - sonarqube_extensions:/opt/sonarqube/extensions
      - sonarqube_logs:/opt/sonarqube/logs
      - sonarqube_temp:/opt/sonarqube/temp
    networks:
      - jenkins_network

  # 🐘 Postgres for SonarQube
  sonar_db:
    image: postgres:15
    restart: unless-stopped
    environment:
      POSTGRES_USER: sonar
      POSTGRES_PASSWORD: sonar
      POSTGRES_DB: sonar
    volumes:
      - sonar_db:/var/lib/postgresql
      - sonar_db_data:/var/lib/postgresql/data
    networks:
      - jenkins_network

# 🔗 Shared Network
networks:
  jenkins_network:
    driver: bridge

# 💾 Volumes
volumes:
  jenkins_home:
  jenkins_agent:
  sonarqube_conf:
  sonarqube_data:
  sonarqube_extensions:
  sonarqube_logs:
  sonarqube_temp:
  sonar_db:
  sonar_db_data:
🛠️ Jenkins Master (jenkins-master)
- 📦 Image: Uses
jenkins/jenkins:lts-jdk17 - 🔌 Ports:
8080: Jenkins web UI50000: For connecting inbound agents- 💾 Volumes:
jenkins_home: Persists Jenkins jobs, config, and plugins/var/run/docker.sock: Lets Jenkins build and run Docker containers/usr/bin/docker: Gives Jenkins CLI access to Docker commands- 🧪 Health Check:
- Automatically checks service availability via a
curllogin probe - 🔒 Hardened Settings:
read_only: true: Makes the container filesystem immutabletmpfs: Stores/tmpin RAM for better performance and safetyno-new-privileges: Prevents privilege escalation inside the container
⚙️ Jenkins SSH Agent (jenkins-agent)
- 📦 Image: Uses
jenkins/ssh-agent(for connecting back to master) - 🔐 SSH Access:
- Mounts SSH keys from
jenkins_agent_keysto enable secure agent communication - 💾 Volumes:
jenkins_agent: Stores agent workspace data/usr/bin/docker+ Docker socket: Enables builds inside the agent container- 🛡️ Security First:
read_only: true+tmpfs: Isolates temp files in RAMno-new-privileges: Blocks processes from elevating access
🧠 SonarQube (sonarqube)
- 📦 Image:
sonarqube:lts-community - 🌐 Port Mapping:
- Exposed as
localhost:9001 → container:9000 - 🔗 Connects to PostgreSQL (
sonar_db) - Configured via
SONAR_JDBC_URLand credentials - 💾 Volumes:
- Persist configuration, extensions, data, logs, and temp files
- 🔄 Depends On:
- Ensures PostgreSQL container starts before SonarQube
🐘 PostgreSQL Database (sonar_db)
- 📦 Image:
postgres:15 - 🎯 Purpose: Backend database for SonarQube code analysis data
- 🔐 Environment Variables:
- Sets DB name, user, and password for SonarQube integration
- 💾 Volumes:
sonar_dbandsonar_db_data: Persist DB schema and data
🔗 Common Docker Network: jenkins_network
All containers share a custom bridge network, enabling secure internal DNS resolution and private communication between services (like jenkins ↔ agent ↔ sonarqube ↔ postgres).
🐳 3️⃣ Launch Jenkins + SonarQube + PostgreSQL with Docker Compose
Now that everything is set, fire up the full stack:
docker-compose up -d

✅ Verify Container Status After Launch
Once you’ve started the stack using docker compose up -d, you’ll want to make sure everything is running properly.
🧪 Run this command to check the status of all containers:
docker ps

⏳ Give Jenkins Some Time…
⚠️ Note: Jenkins Master takes a bit of time to fully initialize — especially on the first run when it sets up plugins and internal directories.
⏲️ Wait 1–2 minutes, then run docker ps again.

You should see:
- 🟢
jenkinscontainer: showinghealthy - 🟢
jenkins-agentcontainer: up - 🧠
sonarqube: should also be healthy and accessible atlocalhost:9001
✅ Once all containers are up and healthy, you’re ready to configure Jenkins and start building pipelines!
🌐 Step 4: Access Jenkins Web Interface
Your Jenkins Master is now running — let’s unlock the power of automation! 🚀
🖥️ Open your browser and go to:
http://localhost:8080

You’ll be greeted by the Jenkins Setup Wizard 🧙♂️
- 🔐 Enter the initial admin password
To retrieve the initial admin password for login run the below command
docker exec -it jenkins cat /var/jenkins_home/secrets/initialAdminPassword

Follow the guided setup: install recommended plugins, create your admin user


Once it finished will ask for configure admin user.Click save & continue


Once you completed we can see the jenkins dashboard as below

🧱 Step 2: Configure jenkins agent for build
🔑 1️⃣ Add SSH Credentials for Jenkins Agent
Now let’s securely configure the SSH authentication so the Jenkins Master can talk to the Jenkins Agent 🚀
- Navigate to your Jenkins dashboard.
- Click on Manage Jenkins.
- Select Credentials.
- Under (global), click Add Credentials.
- Fill in the form:
- Kind: SSH Username with private key
- Scope: Global
- Username: jenkins
- Private Key: Enter directly
- Key: Paste the contents of the
id_rsafile located inside thejenkins_agent_keysfolder. This key is automatically generated during the setup process when you run thesetup.shscript.

- ID: can give some name to identify the credential,here i am giving build-agent
- Description: SSH key for Jenkins agent
- Click OK to save.

🔗 Step 2: Connect Agent to Jenkins Master
- In Jenkins, go to Manage Jenkins > Manage Nodes and Clouds.
- Click New Node.
- Enter a name (e.g.,
agent), select Permanent Agent, and click create

- Configure the node:
- Remote root directory:
/home/jenkins/agent - Labels:
agent - Launch method: Launch agents via SSH
- Host:
jenkins-agent(matches the Docker service name) - Credentials: Select the credential that you have created earlier
- Host Key Verification Strategy: Manually trusted key verification Strategy
- Click Save


Verify Connection:
- Jenkins will attempt to connect to the agent. If successful, the agent’s status will show as Connected.

Step 3:Configure Jenkins Agent SSH Key for Remote Host Access
Since we already generated the SSH key pair during the Jenkins setup (via setup.sh), we can reuse the same private key for connecting to the remote host.(in our case it is the same local ubuntu server where we running containers )
✅ Just copy the public key to your host machine’s authorized_keys.
On your host machine, run the following commands:
cat /home/user/devops-projects/cicd-jenkins/jenkins_agent_keys/id_rsa.pub >> ~/.ssh/authorized_keys
chmod 600 ~/.ssh/authorized_keys

🧠 This allows Jenkins (via the agent) to SSH into the host machine securely using the existing key —
Add SSH Credentials for Remote Host Deployment
These credentials allow Jenkins to SSH into your remote host and trigger Docker Compose commands during deployment.
➡️ Go to Manage Jenkins → Credentials → (Global) → Add Credentials
Then fill out the following fields:
- Kind: SSH Username with private key
- Scope: Global
- Username:
user(or your actual host system username) - Private Key: Enter directly → paste the content of
id_rsafromjenkins_agent_keysfolder (generated bysetup.sh) - ID (optional):
deploy-server-ssh - Description: Remote host SSH for Docker Compose deployment
🔌 Plugin Power-Up: Install Essential Jenkins Plugins 🚀
⚙️ Go to: Manage Jenkins → Plugins → Available Plugins
✅ Search and Install without restart for each listed plugin below.
1️⃣ Eclipse Temurin Installer
🧠 Installs and manages JDK versions for your build environments
2️⃣ SonarQube Scanner
🔍 Integrates Jenkins with SonarQube to analyze code quality and detect bugs
3️⃣ NodeJS Plugin
🌐 Allows Jenkins to install and use specific Node.js versions in pipelines
4️⃣ Docker Plugin Suite (Install all individually) 🐳
Enables full Docker support in Jenkins — from simple builds to full pipelines
- ✅ Docker Plugin
- ✅ Docker Commons
- ✅ Docker Pipeline
- ✅ Docker API
- ✅ Docker Build Step
5️⃣ SSH Agent Plugin
🔐 Use SSH credentials securely to connect and execute on remote machines

🧠 Step 4: Access & Secure Your SonarQube Dashboard
🎉 SonarQube is now up and running on port 9001
🔗 Open your browser and visit:
👉 http://localhost:9001/
🔐 Login using default credentials:
- Username:
admin - Password:
admin
⚠️ Important:
You’ll be prompted to change the default password on your first login.
Make sure to choose a strong one! 🔒

Step 5: Integrating Jenkins with SonarQube
🔐 1: Create a Global Token in SonarQube
- Log in to SonarQube with the admin user
- In the top right corner, click your username(Here it is Administrator)→ choose “My Account”.

- Go to the “Security” tab.
- Under Generate Tokens:
- Name: enter something like
jenkins-global-token - Type: leave it as User Token
- Expires In: choose
No expiration(recommended for CI usage)
- Click Generate, and copy the token (you won’t be able to see it again later).
✅ This token allows Jenkins to push analysis results to any project that the user has access to.

After previous step, you’ll see the generated token. Save it somewhere to not loose. We’ll need that for later.
🔐 Why Use a Global Token?
- 🔁 Reusable across all projects — no need to generate separate tokens per project
- 🧹 Easy to manage — one place to rotate/update
- ✅ Secure — stored in Jenkins as a credential (not hardcoded)
- ⚙️ Scalable — works even as your pipeline or project count grows
🧱 Step 2: Create the Project (Using the Global Token)
- Navigate to Projects → Create Project.
- Select Manually.

3.Fill:
- Project Key: blog-app
- Display Name: blog-app
- Main branch name: In my case it is main.But in some projects it could be master or dev as well

4.On the next screen, when you’re asked:
How do you want to analyze your project?
✅ Choose:Locally
- It will now prompt:
Use existing token
🔐 Paste your global token here
🟢 DO NOT click Generate Token — instead, choose “Use existing token” and paste the global one you created in Step 1.
This completes the project setup and links your global token to it.


Note: You can see the Run analysis on your project options after giving the token.Just ignore the further steps .Will add the necessary commands in Jenkinsfile
🧾 3. Add SonarQube Token to Jenkins Credentials
- In Jenkins, go to
Manage Jenkins>Credentials. - Select the appropriate domain (e.g.,
(global)). - Click Add Credentials.
- Choose Secret text as the kind.
- Paste the SonarQube token into the
Secretfield that we created from the step Create a Global Token in SonarQube - Provide an ID (e.g., sonar-token) and a description.
- Click Create to save.

⚙️ 4.Configure SonarQube Server in Jenkins
- Navigate to
Manage Jenkins>Configure System. - Scroll down to the SonarQube servers section.
- Click Add SonarQube.
- Provide a name for the server (e.g. sonar-server).
- Enter the SonarQube server URL (
http://sonarqube:9000).
✅ Use the Docker container name
sonarqube— this works because both Jenkins and SonarQube are running on the same Docker Compose network (jenkins_network), and Docker handles the DNS resolution automatically
6.Server authentication token:
Select the credential ID you created earlier — e.g., sonar-token
7.Check Enable injection of SonarQube server configuration as build environment variables.
✅ “Enable injection of SonarQube server configuration as build environment variables”
When checked, Jenkins automatically injects environment variables like:
SONAR_HOST_URL
SONAR_AUTH_TOKEN
SONAR_SCANNER_HOMEThese can then be used inside shell scripts or pipeline steps without hardcoding.Click Save to apply the changes.

6. Installing Required Tools in Jenkins
To make Jenkins ready for CI/CD magic ✨, we need to equip it with essential tools. These tools empower Jenkins to build, test, scan, and deploy applications across the pipeline.
📍 Navigate to:
Jenkins Dashboard → Manage Jenkins → Global Tool Configuration
Now, configure the following:
🔍 1. 🧪 SonarQube Scanner
✅ Required for performing static code analysis on your project directly from Jenkins
🔧 Steps to configure:
Navigate to the SonarQube Scanner section → Click ➕ Add SonarQube Scanner
🏷️ Name: sonar-scanner
✅ Check: Install automatically
🔽 Installer source: Install from Maven Central
📌 Version: 7.0.2.4839 (or latest available)
📌 Jenkins will now auto-download and manage the SonarQube Scanner version needed for your pipeline.
🧠 This ensures that your pipeline always has a ready-to-go scanner for SonarQube analysis without needing to install anything manually on your host.

2.☕ JDK 21 (Temurin)
✅ Required to compile Java-based projects and run tools like SonarQube Scanner in Jenkins
🔧 Steps to configure:
- Navigate to the JDK section → Click ➕ Add JDK
- 🏷️ Name:
jdk21 - ✅ Check: Install automatically
- 🔽 Installer source: Install from adoptium.net
- 📌 Select version:
21.0.4(or latest available under JDK 21)
🧠 This setup ensures Jenkins downloads and uses Java 21 from the official Adoptium build

3.🟩 NodeJS 21.0.0
✅ Required for building frontend applications (React, Vue, Angular) or running JavaScript-based tools in Jenkins
🔧 Steps to configure:
- Scroll to the NodeJS section → Click ➕ Add NodeJS
- 🏷️ Name:
node21 - ✅ Check: Install automatically
- 🔽 Installer source: Install from nodejs.org
- 📌 Select version:
21.0.0
🧠 This configuration allows Jenkins to download and manage Node.js v21.0.0 directly from the official Node.js website

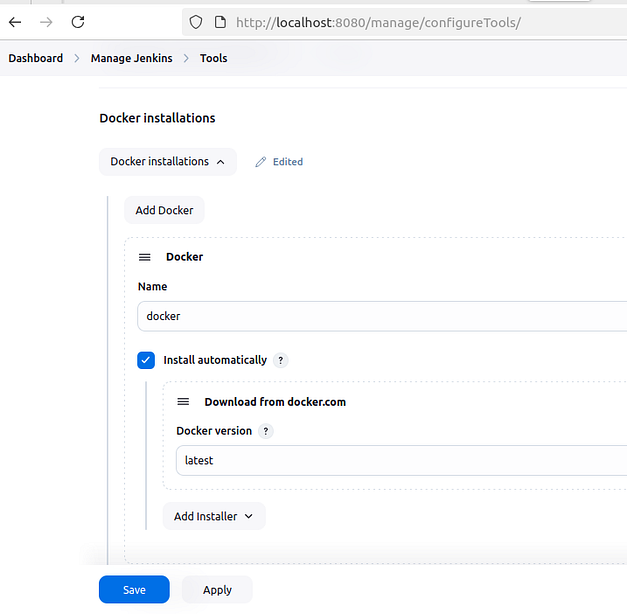
4.🐳 Docker (Latest)
✅ Essential for building, running, and scanning Docker containers directly from Jenkins pipelines
🔧 Steps to configure:
- Scroll to the Docker section → Click ➕ Add Docker
- 🏷️ Name:
docker - ✅ Check: Install automatically
- 🔽 Installer source: Download from docker.com
- 📌 Select version: (latest available or your preferred Docker version)
🧠 With this setup, Jenkins automatically installs Docker from the official source — no manual setup or system-level install required.
- Ensure Docker is already installed on your system (
/usr/bin/docker)
📌 You’ve already mounted the Docker socket in your Jenkins Compose file, so this config links Jenkins with the host Docker engine.
Apply and Save:
- Once all tools are configured, click Apply and Save.
7.Configure Essential Credentials in Jenkins for Secure CI/CD
🧾 1. 🔐 Generate a Docker Hub Access Token
Go to: Docker Hub → Account Settings → Security → Access Tokens
- Click ➕ “New Access Token”
- Give it a meaningful name (e.g.,
jenkins-ci) - Click Generate
- 📋 Copy the token (you won’t see it again!)

🧰 2. 💼 Add the Token to Jenkins Credentials
Go to your Jenkins Dashboard:
➡️ Manage Jenkins → Credentials → Global Credentials (unrestricted) → Add Credentials
- 👇 Select: Kind:
Secret text - ✏️ Secret: (Paste the Docker token here)
- 🏷️ ID:
docker-hub-token(or any unique identifier) - 💬 Description:
Docker Hub Personal Access Token for Jenkins
✅ Create it!

🛠️ Step-8:Grant Docker Access to Jenkins
To enable Jenkins (inside the container) to communicate with Docker on the host:
sudo chmod 666 /var/run/docker.sock

⚠️ Why this is needed?
This sets read/write permissions on the Docker socket so Jenkins containers can:
- 🐳 Build Docker images
- 🔍 Scan them with Trivy
- 🚀 Push to Docker Hub
💡 Note: This is safe for local testing environments, but not recommended for production.
🌐 About the Application: Wanderlust — A 3-Tier Web App
🧭 Wanderlust is a lightweight 3-tier web application designed to demonstrate full CI/CD automation using open-source DevOps tools. It features:
📦 Architecture:
- Frontend: A modern web UI built with ReactJS (Node.js 21), offering a clean and responsive interface for user interactions.
- Backend: A RESTful API developed using Node.js and Express.js, handling business logic and communication with the database.
- Database: MongoDB used as the NoSQL data store for posts or travel-related content.
🔁 Set Up Your Jenkins CI/CD Pipeline — Automation Begins Here!
Now that your DevOps environment is all set 🎯, it’s time to automate your entire workflow — from code checkout to deployment — using a Jenkins pipeline.
💡 What will this pipeline do?
✅ Clone your code from GitHub
✅ Run static code analysis via SonarQube
✅ Perform vulnerability scans with Trivy
✅ Build & push Docker images
✅ Deploy the app — hands-free!
📌 8.Let’s Create the Pipeline Job
🖥️ Navigate to Jenkins Dashboard:
- ➕ Click on “New Item”
- 🏷️ Name your project — e.g.,
wanderlust-deploy - 🧱 Choose “Pipeline” as the project type
- ✅ Click OK to continue

Define Pipeline Syntax:
- In the Pipeline section, select Pipeline script and add the following pipeline code:
pipeline {
    agent { label 'agent' }

    tools {
        jdk 'jdk21'
        nodejs 'node21'
    }

    environment {
        IMAGE_TAG = "${BUILD_NUMBER}"
        BACKEND_IMAGE = "rjshk013/wanderlust-backend"
        FRONTEND_IMAGE = "rjshk013/wanderlust-frontend"
    }

    stages {
        stage('SCM Checkout') {
            steps {
                git branch: 'main', url: 'https://github.com/rjshk013/devops-projects.git'
            }
        }

        stage('Install Dependencies') {
            steps {
                dir('wanderlust-3tier-project/backend') {
                    sh "npm install || true"
                }
                dir('wanderlust-3tier-project/frontend') {
                    sh "npm install"
                }
            }
        }

        stage('Run SonarQube') {
            environment {
                scannerHome = tool 'sonar-scanner'
            }
            steps {
                withSonarQubeEnv('sonar-server') {
                    sh """
                        ${scannerHome}/bin/sonar-scanner \
                        -Dsonar.projectKey=blog-app \
                        -Dsonar.projectName=blog-app \
                        -Dsonar.sources=wanderlust-3tier-project
                    """
                }
            }
        }

        stage('Docker Build') {
            steps {
                dir('wanderlust-3tier-project') {
                    sh '''
                        docker build -t ${BACKEND_IMAGE}:${IMAGE_TAG} ./backend
                        docker build -t ${FRONTEND_IMAGE}:${IMAGE_TAG} ./frontend
                    '''
                }
            }
        }

        stage('Scan with Trivy') {
            steps {
                script {
                    def images = [
                        [name: "${BACKEND_IMAGE}:${IMAGE_TAG}", output: "trivy-backend.txt"],
                        [name: "${FRONTEND_IMAGE}:${IMAGE_TAG}", output: "trivy-frontend.txt"]
                    ]

                    for (img in images) {
                        echo "🔍 Scanning ${img.name}..."
                        sh """
                            mkdir -p wanderlust-3tier-project
                            docker run --rm \
                                -v /var/run/docker.sock:/var/run/docker.sock \
                                -v \$HOME/.trivy-cache:/root/.cache/ \
                                -v \$WORKSPACE/wanderlust-3tier-project:/scan-output \
                                aquasec/trivy image \
                                --scanners vuln \
                                --severity HIGH,CRITICAL \
                                --exit-code 0 \
                                --format table \
                                ${img.name} > wanderlust-3tier-project/${img.output}
                        """
                    }
                }
            }
        }

        stage('Push to Docker Hub') {
            steps {
                withCredentials([string(credentialsId: 'docker-hub-token', variable: 'DOCKER_TOKEN')]) {
                    sh '''
                        echo "${DOCKER_TOKEN}" | docker login -u rjshk013 --password-stdin
                        docker push ${BACKEND_IMAGE}:${IMAGE_TAG}
                        docker push ${FRONTEND_IMAGE}:${IMAGE_TAG}
                    '''
                }
            }
        }

        stage('Remote Deploy on Host with Docker Compose') {
            steps {
                sshagent(credentials: ['deploy-server-ssh']) {
                    sh '''
                        echo "🚀 Deploying on host with docker compose..."
                        ssh -o StrictHostKeyChecking=no user@172.18.0.1 '
                            cd /home/user/devops-projects/wanderlust-3tier-project &&
                            docker compose build &&
                            docker compose up -d
                        '
                    '''
                }
            }
        }
    }
    post {
        always {
            archiveArtifacts artifacts: 'wanderlust-3tier-project/trivy-*.txt', fingerprint: true
        }
    }
}
🛠️ Understanding the Jenkinsfile (Wanderlust CI/CD Pipeline)
This Jenkinsfile automates the complete build → scan → deploy lifecycle of your Wanderlust project.
Here’s a step-by-step overview of what it does:

🔥 Key Highlights
- Secure Build: Code quality is validated by SonarQube before proceeding to deployment ✅
- Security First: Images are scanned by Trivy before pushing to Docker Hub 🛡️
- Fully Automated: No manual steps — from Git pull to live deployment 🚀
- Secrets Handling: Docker Hub credentials and SonarQube token are injected via Jenkins Credentials Manager 🔒

🔧 9.Update Jenkinsfile with Your Values
Before using the pipeline, replace the following placeholders with your own values:
- rjshk013 → your actual Docker Hub username
https://github.com/rjshk013/devops-projects.git→ use the provided repo or your own cloned GitHub repo- user@172.18.0.1-Replace with your host username & ip
That’s it — just plug in your details and you’re good to go! 🚀
🚀 1️⃣0️⃣ Triggering the Pipeline & Viewing Results
Once your Jenkins pipeline is fully configured, it’s time to fire it up! 💥
🛠️ Steps to Run the Pipeline:
🔘 Go to the Jenkins Dashboard and click on your job (e.g., wanderlust-deploy).
▶️ Click “Build Now” on the left panel to trigger the pipeline.
📜 Navigate to “Build History”, and click on the latest build number (e.g., #1).
📈 In the build details page:
- ✅ Click Pipeline Steps or Pipeline Overview to visualize each stage.
- 🖥️ Click Console Output to follow the logs in real-time — great for debugging and validation.


✅ 1️⃣1️⃣ Post-Pipeline Verification: Confirm Everything Worked! 🕵️♂️
After the pipeline runs successfully, it’s time to verify each key milestone to ensure your CI/CD process worked perfectly.
🐳 Docker Image Push Confirmation
✅ Go to your Docker Hub repository.
🔍 Navigate to:
wanderlust-backendwanderlust-frontend
📌 Check if the latest image tags (build numbers) are successfully listed and match the ones from the Jenkins pipeline.

🧠 SonarQube Code Quality Analysis
📍 Open your browser and go to:http://localhost:9001 (or your configured SonarQube URL)
📊 Navigate to:
Projects→blog-app
✅ You should see a recent analysis with quality gate status, bugs, code smells, duplications, etc.


🛡️ Trivy Vulnerability Scan
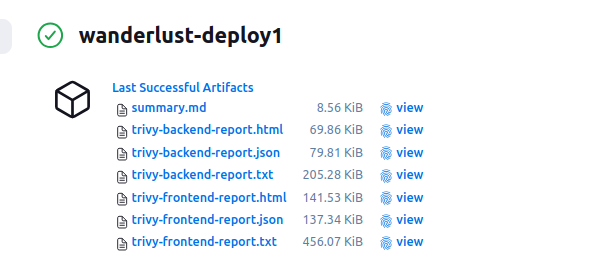
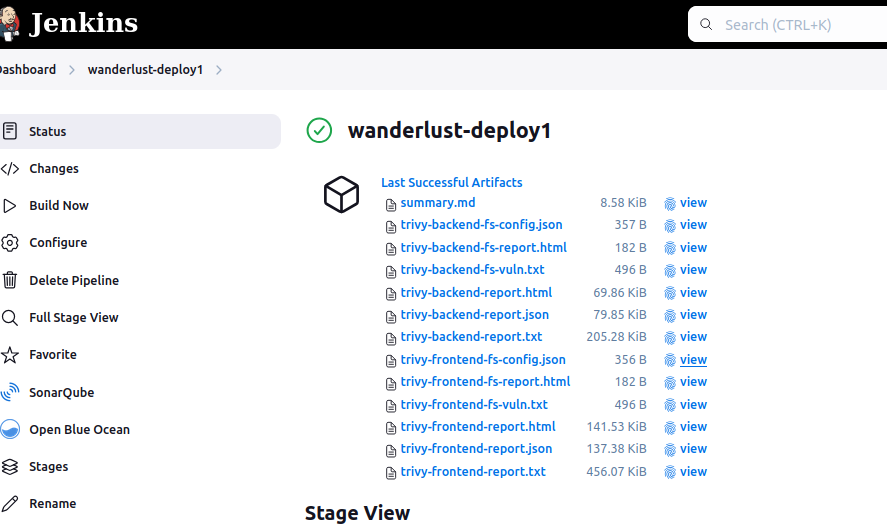
📂 Go back to Jenkins UI → your job → latest build → Artifacts
📎 You’ll find files like:
trivy-backend.txttrivy-frontend.txt
🔍 Open them and look for:
- Severity levels:
CRITICAL,HIGH - Confirm no critical issues OR review and mitigate them accordingly.

🚀 UPDATE: Enhanced Container Vulnerability Scanning with Trivy
From Basic to Comprehensive: A Major Security Reporting Upgrade
The original Trivy scanning configuration in our pipeline provided basic vulnerability detection but lacked advanced reporting features. Our new implementation dramatically improves readability, analysis capabilities, and overall security insights.
✨ Key Improvements
- Multi-format reporting: Generate HTML, text, and JSON formats simultaneously
- Organized report structure: Separate reports by container type (frontend/backend)
- Improved readability: HTML reports for visual analysis
- Automated summary: Markdown summary highlighting critical findings
- Better organization: Dedicated reports directory with consistent naming
Before: Basic text output with limited readability and no summary
stage('Scan with Trivy') {
    steps {
        script {
            def images = [
                [name: "${BACKEND_IMAGE}:${IMAGE_TAG}", output: "trivy-backend.txt"],
                [name: "${FRONTEND_IMAGE}:${IMAGE_TAG}", output: "trivy-frontend.txt"]
            ]
            for (img in images) {
                echo "🔍 Scanning ${img.name}..."
                sh """
                    mkdir -p wanderlust-3tier-project
                    docker run --rm \
                        -v /var/run/docker.sock:/var/run/docker.sock \
                        -v \$HOME/.trivy-cache:/root/.cache/ \
                        -v \$WORKSPACE/wanderlust-3tier-project:/scan-output \
                        aquasec/trivy image \
                        --scanners vuln \
                        --severity HIGH,CRITICAL \
                        --exit-code 0 \
                        --format table \
                        ${img.name} > wanderlust-3tier-project/${img.output}
                """
            }
        }
    }
}
After: Comprehensive multi-format reporting with automated summary
stage('Scan with Trivy') {
    steps {
        script {
            def trivyDir = "${WORKSPACE}/trivy-reports"

            // Create reports directory
            sh "mkdir -p ${trivyDir}"

            // Define scan configurations
            def images = [
                [name: "${BACKEND_IMAGE}:${IMAGE_TAG}", type: "backend"],
                [name: "${FRONTEND_IMAGE}:${IMAGE_TAG}", type: "frontend"]
            ]

            // Run scans with multiple output formats
            for (img in images) {
                echo "🔍 Scanning ${img.name}..."

                // HTML Report - Highly readable in browser
                sh """
                    docker run --rm \
                        -v /var/run/docker.sock:/var/run/docker.sock \
                        -v \$HOME/.trivy-cache:/root/.cache/ \
                        -v ${trivyDir}:/reports \
                        aquasec/trivy image \
                        --scanners vuln \
                        --severity HIGH,CRITICAL \
                        --exit-code 0 \
                        --format template \
                        --template '@/contrib/html.tpl' \
                        ${img.name} > ${trivyDir}/trivy-${img.type}-report.html
                """

                // Table format for console and archive
                sh """
                    docker run --rm \
                        -v /var/run/docker.sock:/var/run/docker.sock \
                        -v \$HOME/.trivy-cache:/root/.cache/ \
                        -v ${trivyDir}:/reports \
                        aquasec/trivy image \
                        --scanners vuln \
                        --severity HIGH,CRITICAL \
                        --exit-code 0 \
                        --format table \
                        ${img.name} > ${trivyDir}/trivy-${img.type}-report.txt
                """

                // JSON format for potential programmatic processing
                sh """
                    docker run --rm \
                        -v /var/run/docker.sock:/var/run/docker.sock \
                        -v \$HOME/.trivy-cache:/root/.cache/ \
                        -v ${trivyDir}:/reports \
                        aquasec/trivy image \
                        --scanners vuln \
                        --severity HIGH,CRITICAL \
                        --exit-code 0 \
                        --format json \
                        ${img.name} > ${trivyDir}/trivy-${img.type}-report.json
                """
            }

            // Generate combined summary report
            sh """
                echo "# Trivy Vulnerability Summary Report" > ${trivyDir}/summary.md
                echo "## Images Scanned" >> ${trivyDir}/summary.md
                echo "- ${BACKEND_IMAGE}:${IMAGE_TAG}" >> ${trivyDir}/summary.md
                echo "- ${FRONTEND_IMAGE}:${IMAGE_TAG}" >> ${trivyDir}/summary.md
                echo "\\n## Backend Vulnerabilities" >> ${trivyDir}/summary.md
                echo '```' >> ${trivyDir}/summary.md
                grep -A 10 "CRITICAL\\|HIGH" ${trivyDir}/trivy-backend-report.txt | head -20 >> ${trivyDir}/summary.md
                echo "\\n... (See full report for more details)" >> ${trivyDir}/summary.md
                echo '```' >> ${trivyDir}/summary.md
                echo "\\n## Frontend Vulnerabilities" >> ${trivyDir}/summary.md
                echo '```' >> ${trivyDir}/summary.md
                grep -A 10 "CRITICAL\\|HIGH" ${trivyDir}/trivy-frontend-report.txt | head -20 >> ${trivyDir}/summary.md
                echo "\\n... (See full report for more details)" >> ${trivyDir}/summary.md
                echo '```' >> ${trivyDir}/summary.md
            """
        }
    }
}
💡 Benefits of This Upgrade
- Enhanced visibility: HTML reports provide clear visualization of vulnerabilities
- Better decision making: Prioritized view of HIGH and CRITICAL issues
- Automation-friendly: JSON output enables programmatic analysis and integration
- Quick executive summaries: Markdown summary highlights the most critical findings
- Improved DevOps workflow: Consistent report location and naming
🔍 How It Works
The new configuration runs three separate Trivy scans for each container image:
- HTML report: Beautiful, browser-viewable vulnerability analysis
- Text report: Traditional console output for quick review
- JSON report: Structured data for automation and integrations
🛡️ NEW: Adding Source Code Security Scanning with Trivy Filesystem Scanner
Moving Security Left: Detecting Vulnerabilities Before They Reach Your Containers
While scanning container images is crucial, the best security starts at the source. By adding filesystem scanning to our pipeline, we can identify vulnerabilities in our application dependencies and configuration files before they’re packaged into containers.
This “shift-left” approach to security helps catch issues earlier in the development lifecycle, reducing both risk and remediation costs.
🔍 What Does Trivy Filesystem Scanning Find?
- Dependency Vulnerabilities: Detects known CVEs in package.json, package-lock.json, and other dependency files
- Misconfigurations: Identifies security issues in configuration files like Dockerfiles and YAML
- License Violations: Flags dependencies with restrictive or non-compliant licenses
- Secrets Detection: Identifies hardcoded credentials, API keys, and other sensitive data
💻 Implementation: The Trivy Filesystem Scan Stage
Add this stage to your Jenkins pipeline before the Docker Build stage:
        stage('Trivy Filesystem Scan') {
            steps {
                script {
                    def trivyDir = "${WORKSPACE}/trivy-reports"
                    sh "mkdir -p ${trivyDir}"

                    // Define targets for filesystem scanning
                    def fsTargets = [
                        [path: "${WORKSPACE}/wanderlust-3tier-project/backend", name: "backend-fs"],
                        [path: "${WORKSPACE}/wanderlust-3tier-project/frontend", name: "frontend-fs"]
                    ]

                    // Run filesystem scans for source code vulnerabilities
                    for (target in fsTargets) {
                        echo "🔍 Scanning filesystem at ${target.path}..."

                        // Scan for vulnerabilities in dependencies
                        sh """
                            docker run --rm \
                                -v ${target.path}:/target \
                                -v ${trivyDir}:/reports \
                                aquasec/trivy fs \
                                --security-checks vuln \
                                --severity HIGH,CRITICAL \
                                --exit-code 0 \
                                --format table \
                                /target > ${trivyDir}/trivy-${target.name}-vuln.txt
                        """

                        // Scan for security issues in configuration files
                        sh """
                            docker run --rm \
                                -v ${target.path}:/target \
                                -v ${trivyDir}:/reports \
                                aquasec/trivy fs \
                                --security-checks config \
                                --severity HIGH,CRITICAL \
                                --exit-code 0 \
                                --format json \
                                /target > ${trivyDir}/trivy-${target.name}-config.json
                        """

                        // Generate an HTML report for easier reading
                        sh """
                            docker run --rm \
                                -v ${target.path}:/target \
                                -v ${trivyDir}:/reports \
                                aquasec/trivy fs \
                                --security-checks vuln,config \
                                --severity HIGH,CRITICAL \
                                --exit-code 0 \
                                --format template \
                                --template '@/contrib/html.tpl' \
                                /target > ${trivyDir}/trivy-${target.name}-report.html
                        """
                    }

                    // Add filesystem scan summary to the main report
                    sh """
                        echo "\\n## Source Code Vulnerability Scan" >> ${trivyDir}/summary.md
                        echo "### Backend Source Vulnerabilities" >> ${trivyDir}/summary.md
                        echo '```' >> ${trivyDir}/summary.md
                        grep -A 10 "CRITICAL\\|HIGH" ${trivyDir}/trivy-backend-fs-vuln.txt | head -20 >> ${trivyDir}/summary.md
                        echo "\\n... (See full report for more details)" >> ${trivyDir}/summary.md
                        echo '```' >> ${trivyDir}/summary.md

                        echo "\\n### Frontend Source Vulnerabilities" >> ${trivyDir}/summary.md
                        echo '```' >> ${trivyDir}/summary.md
                        grep -A 10 "CRITICAL\\|HIGH" ${trivyDir}/trivy-frontend-fs-vuln.txt | head -20 >> ${trivyDir}/summary.md
                        echo "\\n... (See full report for more details)" >> ${trivyDir}/summary.md
                        echo '```' >> ${trivyDir}/summary.md
                    """
                }
            }
        }
🧠 How It Works
The filesystem scan stage performs three distinct types of scans on both frontend and backend source code directories:
- Vulnerability Scan: Searches for known vulnerabilities in application dependencies
- Outputs results to a readable text file
- Only reports HIGH and CRITICAL severity issues to reduce noise
- Configuration Scan: Analyzes configuration files for security issues
- Outputs results in JSON format for potential programmatic processing
- Checks Dockerfiles, YAML files, and other config files for best practices
- Combined HTML Report: Creates a comprehensive, browser-friendly report
- Combines both vulnerability and configuration scanning
- Provides an easy-to-navigate interface for reviewing findings
All scan results are added to the existing summary report, providing a complete view of both source code and container vulnerabilities in one place.
📊 Complete Security Workflow
With this addition, our pipeline now provides comprehensive security in a layered approach:
- Source Code Analysis: SonarQube scans for quality issues and bugs
- Dependency Scanning: Trivy filesystem scan finds vulnerable packages
- Configuration Checks: Trivy detects misconfigurations in project files
- Container Scanning: Trivy image scan identifies vulnerabilities in the final containers
This multi-layered security approach gives you confidence that your application is protected at every stage of the development lifecycle.
🔐 Sample Filesystem Scan Results
When your pipeline runs, you’ll see scan results like this for your source code:
Report Summary

┌──────────┬────────┬─────────────────┐
│ Target   │ Type   │ Vulnerabilities │
├──────────┼────────┼─────────────────┤
│   -      │  -     │        -        │
└──────────┴────────┴─────────────────┘
Legend:
- '-': Not scanned
- '0': Clean (no security findings detected)
The clean report above indicates no vulnerabilities were found—great news! But if issues are detected, they’ll be displayed in an easy-to-read format with severity levels, affected packages, and available fixes.
🛠️ Implementation Notes
Simply replace your existing Trivy stage with this enhanced version to immediately benefit from the improved reporting capabilities. All reports will be saved to the trivy-reports directory in your workspace.
⭐ JUST UPDATED: The complete enhanced pipeline is now available in our GitHub repository!
# Clone the repo to get the latest security scanning improvements
git clone https://github.com/rjshk013/devops-projects
cd wanderlust-3tier-project

# Check out the new Trivy configuration in Jenkinsfile_trivyfull_report file
🧪 1️⃣2️⃣ Test the Deployed Application Locally
🚀 Once your CI/CD pipeline has completed successfully, your application is now live and accessible on your host machine. Here’s how to verify:
🌐 Access Frontend:
🔗 Open your browser and go to:http://localhost:5173/
You should see your React-based frontend app running 🎉

🛠️ Access Backend (API):
🔗 Open another tab and hit:http://localhost:5000/

🐳 Verify Running Containers on Host Machine
To ensure both your frontend and backend services are up and running after deployment, run the following command on your host terminal:
docker ps

🔗 GitHub Repository
🗂️ You can find the complete source code, Jenkinsfile, Docker Compose setup, and scripts used in this article right here:
👉 GitHub — Wanderlust 3-Tier DevSecOps CI/CD Project
✅ Conclusion: Your DevSecOps Lab Is Now Live 🚀
You’ve just built a real-world CI/CD pipeline that:
- 🔧 Automates code building and testing with Jenkins
- 🧠 Ensures code quality through SonarQube
- 🛡️ Scans for vulnerabilities using Trivy
- 🐳 Runs entirely in Docker Compose
- 🖥️ Deploys applications seamlessly on the same local server
And the best part? You did it all with zero cloud cost — 100% open-source, local, and production-grade ready! 💯
🎯 What’s Next?
- ✅ Optimized pipeline speed using parallel stages in Jenkins
✅ Reduced Docker image sizes with multistage builds
✅ Upgraded security scanning by replacing Trivy with Snyk for deep dependency and container vulnerability checks
This setup isn’t just a tutorial — it’s a launchpad into real-world DevOps workflows. Now you’re equipped to experiment, expand, and evolve your own secure software delivery system 🔐💻