Part 2: How to build CI/CD with Jenkins & Snyk
🚀 Introduction
🔄 In Part 1 of this series, we built a solid CI/CD pipeline using Jenkins, SonarQube, and Trivy to automate build, test, and security scanning.
🔥 In this part, we’re shifting gears from basic automation to production-grade CI/CD by introducing:
- ⏱️ Parallelized Jenkins pipeline stages to speed up builds
- 🐳 Multistage Dockerfiles to reduce image size and improve performance
- 🛡️ Snyk Integration for comprehensive dependency and image vulnerability scanning
Let’s elevate your DevOps workflow to the next level!
⚙️ 1. Pipeline Optimization with Parallel Stages
By default, Jenkins runs everything sequentially. But why wait?
We can install dependencies, run Snyk scans, and build Docker images in parallel using the parallel {} block.
✅ Example: Parallel Dependency Installation
stage('Install Dependencies') {
  steps {
    parallel (
      backend: {
        dir('backend') {
          sh 'npm install'
        }
      },
      frontend: {
        dir('frontend') {
          sh 'npm install'
        }
      }
    )
  }
}
📉 This instantly reduced my pipeline time by 30–40%.
🐳 2. Build Lean Images with Multistage Dockerfiles
Large Docker images = security risk + slow deploys.
🚀 Before: Single-stage Dockerfile (bloated)
# Use a specific version of node
FROM node:21

# Set the working directory
WORKDIR /app

# Copy package.json and package-lock.json first to leverage Docker cache
COPY package*.json ./

# Install dependencies
RUN npm install

# Now copy the rest of your application code
COPY . .

# Use a non-root user to run your container for better security
RUN adduser --disabled-password --gecos "" appuser && chown -R appuser /app
USER appuser

# Expose the port your app runs on
EXPOSE 5000

# Command to start your application
CMD ["npm", "start"]
✅ After: Multistage Dockerfile (lean, clean)
# =====================
# Stage 1: Build stage
# =====================
FROM node:21 as build

WORKDIR /app

# Copy only necessary files to install dependencies
COPY package*.json ./

# Install all dependencies (including dev)
RUN npm install

# Copy the rest of the application code
COPY . .

# ==========================
# Stage 2: Production stage
# ==========================
FROM node:21-slim

WORKDIR /app

# Copy only necessary files from the build stage
COPY --from=build /app ./

# Install only production dependencies
RUN npm install --omit=dev

# Copy environment configuration file (optional if used during build)
#COPY .env.sample .env

# Create non-root user for better security
RUN adduser --disabled-password --gecos "" appuser && chown -R appuser /app
USER appuser

EXPOSE 5000

CMD ["npm", "start"]
⏱️ Build faster, deploy lighter, and reduce image size by ~60%.
Current Frontend Dockerfile
# Use a specific version of node
FROM node:21

# Set the working directory
WORKDIR /app

# Copy only the necessary files first (e.g., package.json) to leverage Docker cache
COPY package*.json ./

# Install dependencies
RUN npm install

# Copy the rest of your application code
COPY . .

# Use a non-root user to run your container
RUN adduser --disabled-password --gecos "" appuser && chown -R appuser /app
USER appuser

# Expose the port the app runs on
EXPOSE 5173

# Command to run your application
CMD ["npm", "run", "dev", "--", "--host"]
After Multistage build Dockerfile look like
# -------- Stage 1: Dependencies --------
FROM node:21-alpine AS deps
WORKDIR /app

# Copy package files
COPY package*.json ./

# Install dependencies
RUN npm ci --include=dev --prefer-offline --no-audit

# -------- Stage 2: Runtime (Development Server) --------
FROM node:21-alpine AS runtime
WORKDIR /app

# Copy package files
COPY package*.json ./

# Copy node_modules from deps stage
COPY --from=deps /app/node_modules ./node_modules

# Copy ALL source files (maintains exact same structure)
COPY . .

# Set permissions
RUN chown -R node:node /app
USER node

EXPOSE 5173
CMD ["npm", "run", "dev", "--", "--host"]
Measuring Build & Scan Time (Before Optimizations)
Before jumping into parallel execution and multi-stage Docker builds, it’s smart to measure baseline performance. This helps you quantify improvements.
📊 Track & Visualize Jenkins Build Duration
✅ 1. Pipeline Stage View Plugin
Best For: Visualizing per-stage execution time directly in the Jenkins UI.
Why It’s Useful:
- 📈 Clearly displays how long each pipeline stage takes.
- 🔍 Makes it easy to identify slow stages (e.g., security scans or image builds).
- 🧑💻 Especially handy when experimenting with parallel stages or multi-stage Docker builds.
- ⚙️ No extra configuration required in declarative pipelines — just works out of the box.
🛠️ How to Install:
- Navigate to Manage Jenkins → Plugin Manager
- Go to the Available tab and search for:Pipeline: Stage View Plugin
- Click Install without Restart.

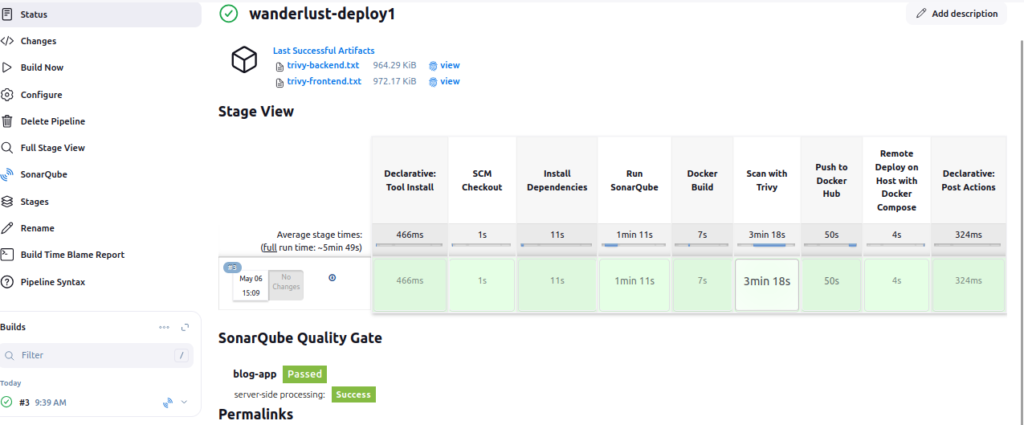
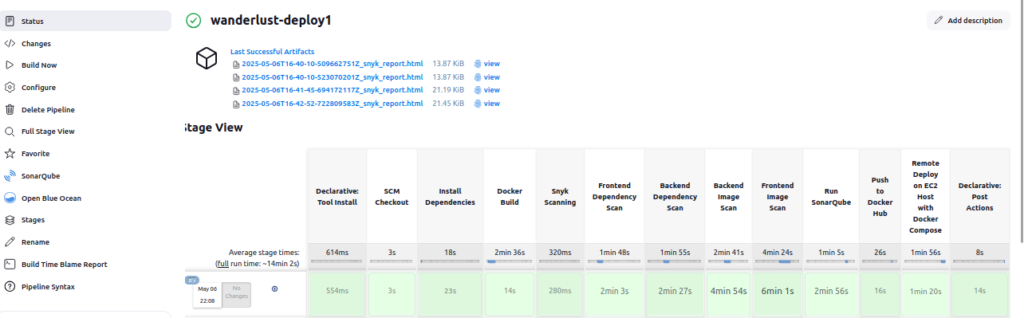
⏱️ 1. Check Jenkins Build Duration
- 1. Check Jenkins Build Duration
After running a pipeline build, you can quickly analyze how much time each stage took using the Pipeline Stage View plugin.
🔍 Steps to View Stage-Wise Build Time:
Go to your Jenkins job (e.g.,wanderlust-deploy1).
In the left sidebar, click on “Full Stage View”.
You’ll see a graphical view of:
Each pipeline stage (e.g., Build, Test, Scan, Deploy)
Time taken by each stage (in seconds/minutes)
Color-coded status (✅ Passed, ❌ Failed)
fter applying multistage builds, we’ll check again to see the size reduction.
🛡️ 3. Replace Trivy with Snyk for Complete Security
While Trivy is great for scanning images, Snyk adds dependency scanning, better dashboards, and Git integration.
🔧 Step-by-Step: Integrate Snyk with Jenkins
🧑💻 1️⃣ Create a Snyk Account & Retrieve Your API Token
To scan your code and Docker images from Jenkins using Snyk, you’ll need a personal API token from your Snyk account. Here’s how to get it:
📌 Step-by-Step:
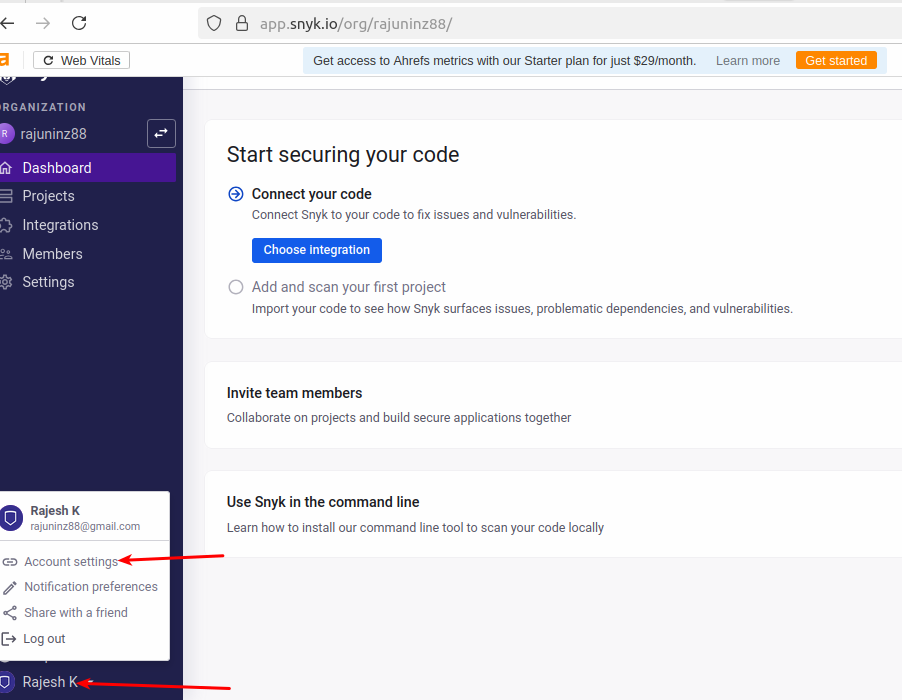
- 🔗 Go to https://snyk.io and sign up using your Google account or email.
- Once signed in, navigate to the bottom-left corner of your Snyk dashboard.
- Click on your profile name/email (e.g., Rajesh K) and select “Account settings” from the dropdown.
📸 Refer screenshot 1 below.
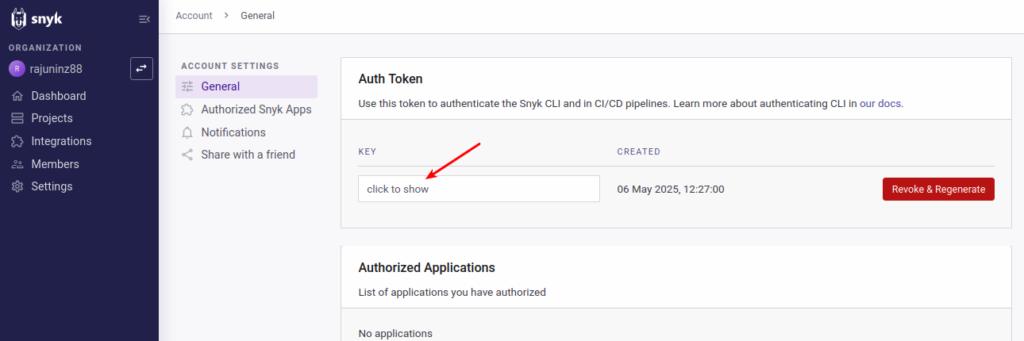
- You’ll be taken to the Account → General page.
- Scroll down to the “Auth Token” section.
Click on the button that says “click to show” under theKEYfield.
📸 Refer screenshot 2 below.
- Once clicked, it will reveal your Snyk API Token — a long alphanumeric key.
📸 Refer screenshot 3 below.
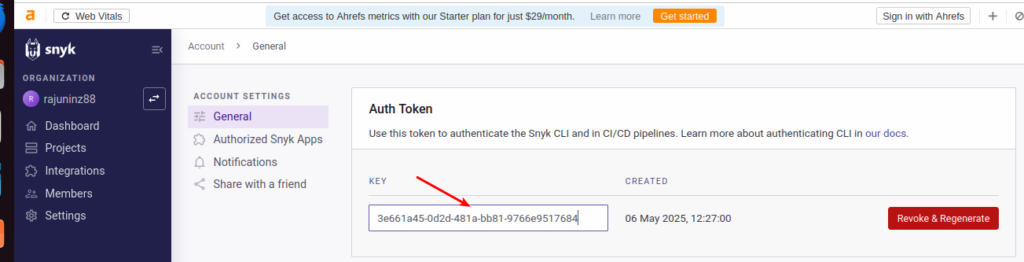
- ✅ Copy this token — it will be used to configure Jenkins.
✅ Make sure you treat this token like a password. It authenticates your CLI and Jenkins integration with Snyk.
⚙️ 2. Install Snyk Plugin
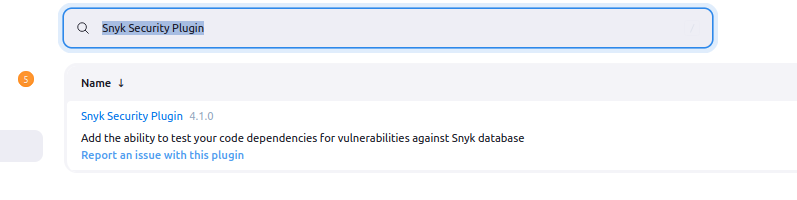
- 🧩 Step A: Install the Snyk Security Plugin
- Open your Jenkins dashboard and navigate to:
Manage Jenkins → Plugin Manager - Click the Available tab.
- Search for “Snyk Security Plugin”
- Check the box and click Install without restart
- 📦 This plugin allows Jenkins to run Snyk scans natively in pipeline stages using the
snykSecurityblock.
🔐 Step B: Add Your Snyk API Token as a Credential
- Go to Manage Jenkins → Credentials → (Global) → Add Credentials
- Set the Kind to: “Snyk API Token” (📌 Not “Secret Text”)
- Enter the following:
- ID:
snyk-api - Description:
Snyk API Token for CI/CD Scans - Token: Paste your API token from the Snyk dashboard
- ID:
- Click Create
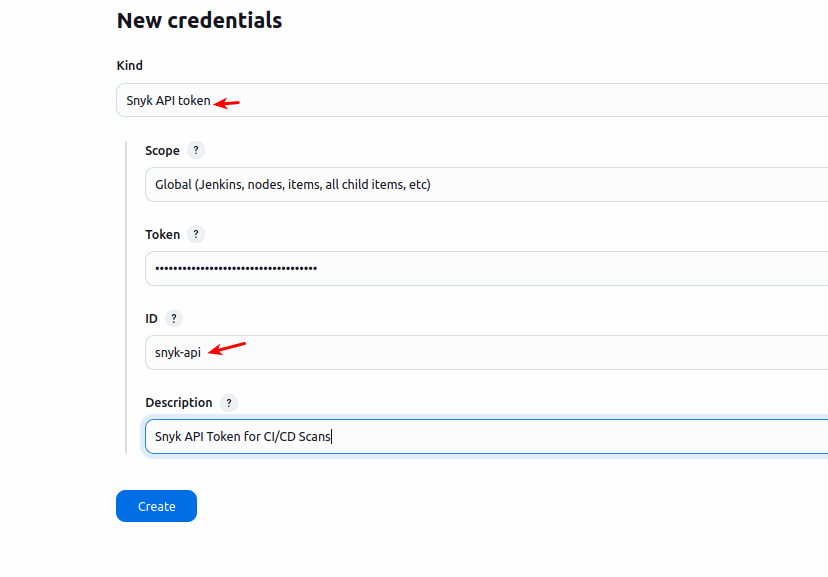
✅ With this, your Jenkins instance is now securely integrated with Snyk and ready to scan your source code and Docker images.
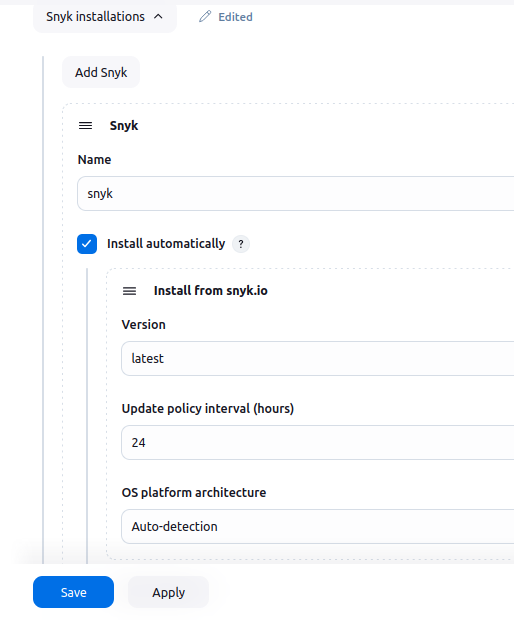
🧰 3️⃣ Configure the Snyk CLI Tool in Jenkins (One-Time Setup)
This step ensures Jenkins downloads and uses the Snyk CLI automatically when your pipeline runs.
📍 Where to Configure:
Navigate to:Jenkins → Manage Jenkins → Global Tool Configuration → Snyk installations
🛠️ Configuration:
- Name:
snyk
(Make sure this matches what you use insnykSecurity(snykInstallation: 'snyk', ...)) - ✅ Check: “Install automatically”
- Version:
latest - Update policy interval:
24 - OS platform architecture:
Auto-detection(default and recommended)
✅ Why This Matters:
Ensures compatibility with the snykSecurity pipeline steps
No manual CLI installation needed on Jenkins agents
Always uses the latest version of the Snyk CLI
✅ 4. Use in Jenkinsfile
snykSecurity(
  snykInstallation: 'snyk',
  snykTokenId: 'snyk-api',
  targetFile: 'package.json',
  projectName: 'my-backend-src',
  failOnIssues: false,
  additionalArguments: "--severity-threshold=high"
)
Stage: Snyk Scanning (Parallel Block)
This stage runs four Snyk scans in parallel, significantly improving performance by reducing total pipeline time.
✅ 1. Frontend Dependency Scan
dir('wanderlust-3tier-project/frontend') {
    snykSecurity(
        snykInstallation: 'snyk',
        snykTokenId: 'snyk-api',
        targetFile: 'package.json',
        projectName: 'wanderlust-frontend-src',
        failOnIssues: false,
        additionalArguments: "--severity-threshold=critical"
    )
}
Purpose: Scans package.json in the frontend directory for vulnerable open-source dependencies.
FailOnIssues: false to avoid breaking the build if issues are found.
Threshold: Only fails on critical vulnerabilities (if failOnIssues were true).
projectName: Helps uniquely identify the scan in the Snyk dashboard.
✅ 2. Backend Dependency Scan
dir('wanderlust-3tier-project/backend') {
    snykSecurity(
        snykInstallation: 'snyk',
        snykTokenId: 'snyk-api',
        targetFile: 'package.json',
        projectName: 'wanderlust-backend-src',
        failOnIssues: false,
        additionalArguments: "--severity-threshold=critical"
    )
}
Same logic as the frontend scan, but scoped to the backend source dependencies.
🐳 3. Backend Image Scan
snykSecurity(
    snykInstallation: 'snyk',
    snykTokenId: 'synk-api',
    failOnIssues: false,
    projectName: 'wanderlust-backend-image',
    additionalArguments: "--docker ${BACKEND_IMAGE}:${IMAGE_TAG} --severity-threshold=critical"
)
Scans the built Docker image of the backend (rjshk013/wanderlust-backend:<tag>).
Checks for vulnerabilities in the OS layer and image dependencies.
--severity-threshold=critical filters out less severe issues.
🐳 4. Frontend Image Scan
snykSecurity(
    snykInstallation: 'snyk',
    snykTokenId: 'snyk-api',
    failOnIssues: false,
    projectName: 'wanderlust-frontend-image',
    additionalArguments: "--docker ${FRONTEND_IMAGE}:${IMAGE_TAG} --severity-threshold=critical"
)
Here is the final full Pipeline script
pipeline {
    agent { label 'agent' }

    tools {
        jdk 'jdk21'
        nodejs 'node21'
    }

    environment {
        IMAGE_TAG = "${BUILD_NUMBER}"
        BACKEND_IMAGE = "rjshk013/wanderlust-backend"
        FRONTEND_IMAGE = "rjshk013/wanderlust-frontend"
    }

    stages {

        stage('SCM Checkout') {
            steps {
                git branch: 'main', url: 'https://github.com/rjshk013/devops-projects.git'
            }
        }

        stage('Install Dependencies') {
            steps {
                parallel (
                    backend: {
                        dir('wanderlust-3tier-project/backend') {
                            sh "npm install || true"
                        }
                    },
                    frontend: {
                        dir('wanderlust-3tier-project/frontend') {
                            sh "npm install"
                        }
                    }
                )
            }
        }

        stage('Docker Build') {
            steps {
                dir('wanderlust-3tier-project') {
                    sh '''
docker build -f Dockerfile_multi-stage -t ${BACKEND_IMAGE}:${IMAGE_TAG} ./backend
docker build -f Dockerfile_multi-stage -t ${FRONTEND_IMAGE}:${IMAGE_TAG} ./frontend
                    '''
                }
            }
        }

        stage('Snyk Scanning') {
            parallel {

                stage('Frontend Dependency Scan') {
                    steps {
                        dir('wanderlust-3tier-project/frontend') {
                            snykSecurity(
                                snykInstallation: 'snyk',
                                snykTokenId: 'snyk-api',
                                targetFile: 'package.json',
                                projectName: 'wanderlust-frontend-src',
                                failOnIssues: false,
                                additionalArguments: "--severity-threshold=critical"
                            )
                        }
                    }
                }

                stage('Backend Dependency Scan') {
                    steps {
                        dir('wanderlust-3tier-project/backend') {
                            snykSecurity(
                                snykInstallation: 'snyk',
                                snykTokenId: 'snyk-api',
                                targetFile: 'package.json',
                                projectName: 'wanderlust-backend-src',
                                failOnIssues: false,
                                additionalArguments: "--severity-threshold=critical"
                            )
                        }
                    }
                }

                stage('Backend Image Scan') {
                    steps {
                        snykSecurity(
                            snykInstallation: 'snyk',
                            snykTokenId: 'snyk-api',
                            failOnIssues: false,
                            projectName: 'wanderlust-backend-image',
                            additionalArguments: "--docker ${BACKEND_IMAGE}:${IMAGE_TAG} --severity-threshold=critical"
                        )
                    }
                }

                stage('Frontend Image Scan') {
                    steps {
                        snykSecurity(
                            snykInstallation: 'snyk',
                            snykTokenId: 'snyk-api',
                            failOnIssues: false,
                            projectName: 'wanderlust-frontend-image',
                            additionalArguments: "--docker ${FRONTEND_IMAGE}:${IMAGE_TAG} --severity-threshold=critical"
                        )
                    }
                }
            }
        }

        stage('Run SonarQube') {
            environment {
                scannerHome = tool 'sonar-scanner'
            }
            steps {
                withSonarQubeEnv('sonar-server') {
                    sh """
                        ${scannerHome}/bin/sonar-scanner \
                        -Dsonar.projectKey=blog-app \
                        -Dsonar.projectName=blog-app \
                        -Dsonar.sources=wanderlust-3tier-project
                    """
                }
            }
        }

        stage('Push to Docker Hub') {
            steps {
                withCredentials([string(credentialsId: 'docker-hub-token', variable: 'DOCKER_TOKEN')]) {
                    sh '''
                        echo "${DOCKER_TOKEN}" | docker login -u rjshk013 --password-stdin
                        docker push ${BACKEND_IMAGE}:${IMAGE_TAG}
                        docker push ${FRONTEND_IMAGE}:${IMAGE_TAG}
                    '''
                }
            }
        }

        stage('Remote Deploy on EC2 Host with Docker Compose') {
            steps {
                sshagent(credentials: ['deploy-server-ssh']) {
                    sh '''
                        echo "🚀 Deploying on EC2 instance with docker compose..."
                        ssh -o StrictHostKeyChecking=no user@172.18.0.1 '
                            cd /home/user/devops-projects/wanderlust-3tier-project &&
                            docker compose pull &&
                            docker compose up -d
                        '
                    '''
                }
            }
        }
    }


post {
    always {
        echo '📦 Pipeline execution completed'
        deleteDir()
    }
    success {
        echo "✅ Wanderlust pipeline succeeded: Build #${BUILD_NUMBER}"
    }
    failure {
        echo "❌ Wanderlust pipeline failed: Build #${BUILD_NUMBER}"
    }
}
}
✅ Final Pipeline Flow
- 🔀 Parallel install and scan stages
- 🐳 Multistage build for backend & frontend
- 🛡️ Snyk scan for both code & containers
🐳 Docker Image Size After Multistage Build
After applying multistage builds to both frontend and backend Dockerfiles, we checked the image size using below command on our host machine or jenkins agent container
docker images


📉 Result:
The image size has been significantly reduced, confirming the effectiveness of multistage optimization by eliminating unnecessary dependencies and build artifacts from the final image.
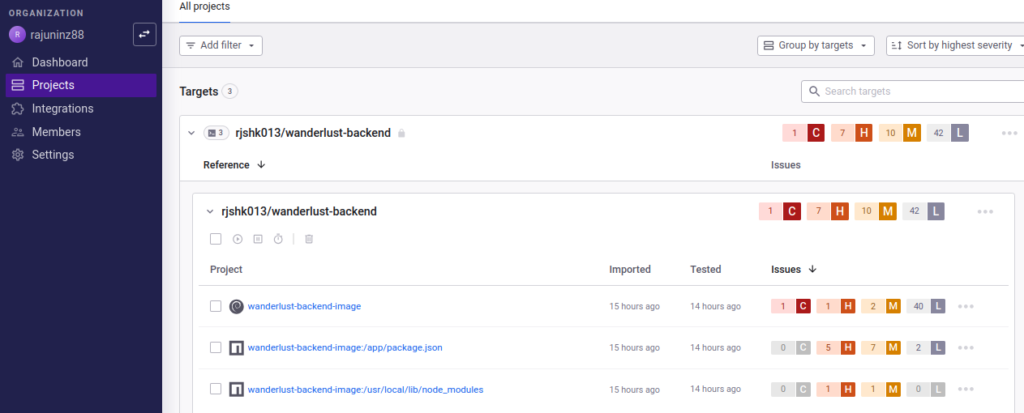
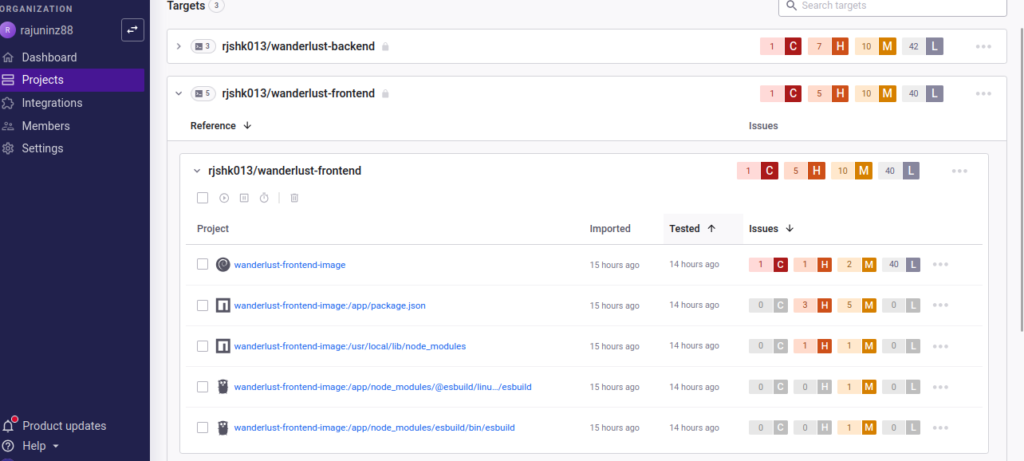
🔍 Snyk Dashboard Insights After CI/CD Run
Once our Jenkins pipeline completes the dependency and image scans for both backend and frontend using the Snyk Security Plugin, the vulnerabilities are automatically reflected in the Snyk dashboard:
📊 Project Segmentation
The dashboard intelligently groups the scanned artifacts:
wanderlust-backend-imagewanderlust-frontend-image- Path-based:
/app/package.json/usr/local/lib/node_modules- other specific build locations (like
esbuild)
📌 Key Highlights from the Report:
📁 wanderlust-backend-image
- 1 Critical, 7 High, 10 Medium, 42 Low severity vulnerabilities
- Deep analysis of Docker layers, package.json, and node_modules directories
📁 wanderlust-frontend-image
- Similar breakdown: 1 Critical, 5 High, 10 Medium, 40 Low
- Even detects vulnerabilities in build-time binaries (e.g.,
esbuild)
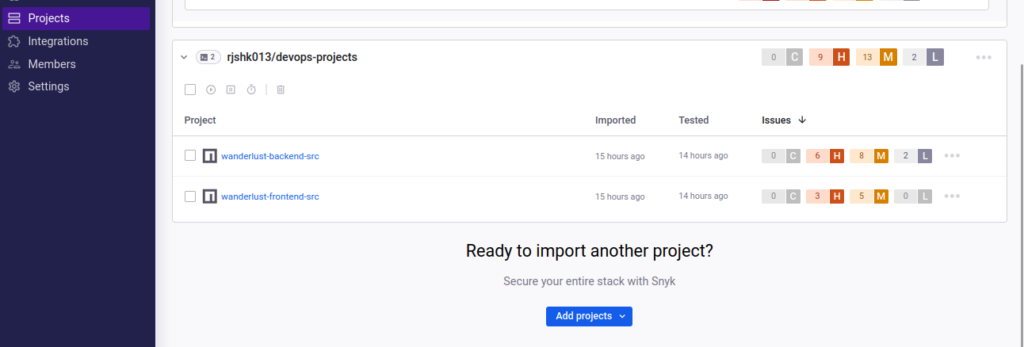
🧩 Source Code Scan
- Source repositories like
wanderlust-backend-srcandwanderlust-frontend-srcscanned viapackage.json - Backend source has 6 high-severity issues; frontend source has 3
🔮 What’s Coming in Part 3?
In the next blog post, I’ll cover:
- 📈 Visual build metrics using dashboards for performance insights
🔔 Slack and email notifications to keep teams informed in real time
🐳 Advanced Docker optimizations using layer caching to reduce build time
🛡️ Security and performance best practices for production-grade pipelines
🔗 Part 1 Recap: How I built a CI/CD pipeline with Jenkins, SonarQube & Trivy
💬 Drop your thoughts or ask questions in the comments — and follow for Part 3!


One thought on “Part 2: How to build CI/CD with Jenkins & Snyk”