How to Deploy React app with flask on k8s using helm-part 1
🔍 Introduction
Want to build better apps using containers? This guide will show you how to set up a complete web application using modern tools that the pros use. You’ll learn how to deploy a React frontend 💻, Flask backend ⚙️, and PostgreSQL database 🗄️ all working together on your own computer.
This isn’t just theory – you’ll create a real working system using Kubernetes ☸️ (the most popular container platform) and Helm ⎈ (a tool that makes Kubernetes easier). By the end, you’ll understand how the pieces fit together and be ready to deploy similar apps in real-world settings.
✨ What you’ll learn:
- 🔌 How to connect your frontend and backend services
- 🔐 How to store database passwords securely
- 📦 How to package your app for easy deployment
- 🛠️ How to fix common problems in multi-part applications
- 🏢 How to use the same tools that big companies use
🛠️ Environment Setup
- Ubuntu 20.04 Desktop 🖥️: Your computer setup where all the magic happens
- Docker 🐳: The tool that packages your app into containers
- Kind 🕸️: A mini version of Kubernetes that runs right on your computer
- Helm ⎈: A helper that makes deploying to Kubernetes much simpler
📋 Prerequisites
- Docker 🐳: Make sure it’s installed and running
- Kind ☸️: You’ll need this to create your test Kubernetes environment
- Helm ⎈: This will help you deploy your app more easily
Ready to build something cool? 💪 Let’s start by setting up everything you need on your computer.
!🔄 Application Workflow
Our application consists of three main parts that work together to create a complete user experience:
⚙️ Flask Backend
- Acts as the brain of our application 🧠
- Handles login requests and talks to our PostgreSQL database
- Provides API endpoints for:
- 🔐 User authentication
- 📊 Welcome dashboard data
💻 ReactJS Frontend
- Creates what users actually see and interact with 👀
- Features:
- 🔑 Clean login page
- 🏠 Welcome dashboard after successful login
- Smart configuration:
- 🔌 Connects to backend using
env.template.js - 🌐 Can be easily updated for different environments without rebuilding
- 🔌 Connects to backend using
🗄️ PostgreSQL Database
- Securely stores all our important data 📝
- Contains:
- 👤 User credentials
- 📈 Dashboard information
- Security-focused:
- 🔒 Credentials managed via Kubernetes Secrets
- ⚠️ Protected from unauthorized access
The beauty of this setup is how these components work together seamlessly while remaining independently scalable – a true microservices architecture! 🚀
🚀 Step 1: Clone the Repository
To begin, clone the GitHub repository that contains both backend and frontend code:
git clone https://github.com/rjshk013/medium-blog.git
cd medium-blog
🔍 Step 2: Understand the Folder Structure
Inside the cloned repo:
- 🐍 Backend (Flask) code lives in:
k8s/flask-backend - ⚛️ Frontend (ReactJS) code lives in:
k8s/reactjs-frontend
Let’s package our application into containers so they can run anywhere! We’ll create two separate containers – one for our backend and one for our frontend.
⚙️ Backend Container: Flask API
# Dockerfile for Flask Backend
FROM python:3.9-slim
WORKDIR /app
COPY requirements.txt .
RUN pip install -r requirements.txt
COPY . .
CMD ["flask", "run", "--host=0.0.0.0"]
What’s happening here? 🧐
- 📦 We start with a slim Python image
- 📁 Create a workspace folder called
/app - 📝 Copy our requirements list and install dependencies
- 📋 Copy all our code into the container
- 🚀 Set up the command to start our Flask server
💻 Frontend Container: React UI
# Dockerfile for React Frontend
FROM node:16-alpine as build
WORKDIR /app
COPY package.json ./
RUN npm install
COPY . .
RUN npm run build

# Serve with NGINX
FROM nginx:alpine
COPY --from=build /app/build /usr/share/nginx/html
CMD ["nginx", "-g", "daemon off;"]
What’s happening here? 🧐
- 🏗️ Build stage:
- Start with Node.js Alpine image
- Install dependencies from package.json
- Build our React app into static files
- 🌐 Final stage:
- Use tiny NGINX image to serve our app
- Copy only the built files from previous stage
- Run NGINX web server
This creates a super efficient container that just serves our React files!
🔄 How They Talk to Each Other
📱 User accesses the frontend
- React app loads in their browser
- App reads configuration from config.js
🔍 React needs data
- Makes API calls to backend URL (from config.js)
- Example:
fetch('http://mybackend-service:5000/login')
⚙️ Backend processes request
- Flask API receives the request
- Connects to PostgreSQL database
- Returns data as JSON
📊 Frontend displays results
- React updates the UI with received data
- User sees the login confirmation or dashboard
🚀 Building and Pushing Our Images
# Build and tag our images
docker build -t rjshk013/react-frontend:v1.0.0 .
docker build -t rjshk013/flask-backend:v1.0.0 .

docker push  rjshk013/react-frontend:v1.0.0
docker push rjshk013/flask-backend:v1.0.0
Now that we’ve containerized our application, let’s explore how the frontend connects to our backend through Kubernetes!
📄 Analyzing Our index.html
<!DOCTYPE html>
<html lang="en">
<head>
  <meta charset="UTF-8">
  <meta name="viewport" content="width=device-width, initial-scale=1.0">
  <meta http-equiv="X-UA-Compatible" content="ie=edge">
  <title>React App</title>
  <!-- Include the configuration file -->
  <script src="%PUBLIC_URL%/config.js"></script>
</head>
<body>
  <div id="root"></div>
</body>
</html>
What’s special here? 🧐
The magic happens in this line:
<script src="%PUBLIC_URL%/config.js"></script>
This loads our configuration file before the React app starts. The %PUBLIC_URL% is a placeholder that Create React App replaces with the correct path when building.
🔄 How ConfigMap Connects to React
1.Kubernetes creates config.js from our ConfigMap:
apiVersion: v1
kind: ConfigMap
metadata:
  name: {{ .Release.Name }}-frontend-config
data:
  config.js: |
window.REACT_APP_BACKEND_URL = "{{ .Values.frontend.config.REACT_APP_BACKEND_URL }}";2.We mount this file into our container:
volumeMounts:
- name: config-volume
mountPath: /usr/share/nginx/html/config.js
subPath: config.js
index.html loads config.js when the page loads
React code uses the configuration:
// In your React components
fetch(`${window.REACT_APP_BACKEND_URL}/login`, {
  method: 'POST',
  // other fetch options
})
This creates a flexible connection that we can update without rebuilding our containers!
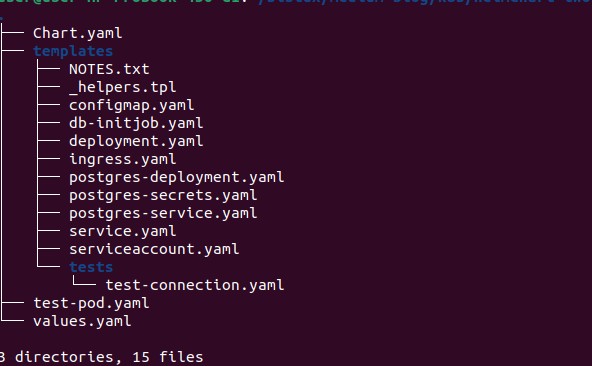
📂 Understanding Our Helm Chart Structure
Helm charts are located in helmchart-twotierapp folder
cd k8s/helmchart-twotierapp
⚙️ values.yaml – The Central Configuration
replicaCount: 1

image:
  repository: rjshk013/react-frontend
  tag: v1.0.0
  pullPolicy: IfNotPresent


frontend:
  config:
    REACT_APP_BACKEND_URL: "http://172.18.0.2:32001"
backend:
  repository: rjshk013/flask-backend
  tag: v1.0.0
  env:
    POSTGRES_HOST: "mypostgres-service"
    POSTGRES_PORT: "5432"


postgresql:
  image: postgres:latest  # Official PostgreSQL image

# Define secret values for PostgreSQL credentials
secrets:
  postgres:
    POSTGRES_USER: "postgres"
    POSTGRES_PASSWORD: "admin"
    POSTGRES_DB: "postgres"
service:
  type: NodePort
  frontendPort: 80
  backendPort: 5000
  # frontendnodePort: 32000
  backendNodePort: 32001
  dbPort: 5432
serviceAccount:
  create: true          # Set to false if you don't need a ServiceAccount created
  name: ""              # Name of the ServiceAccount (if empty, Helm will use the default name)
  annotations: {}

ingress:
  enabled: false       # Set to true if you want to enable ingress
  annotations: {}      # You can add any annotations required for the ingress
  hosts:
    - host: chart-example.local
      paths:
        - path: /
          pathType: ImplementationSpecific
  tls: []              # TLS configuration (optional)
resources:
  limits:
    memory: "256Mi"
    cpu: "500m"
  requests:
    memory: "128Mi"
    cpu: "250m"
Our values.yaml file works like a control panel for our entire application. Let’s break down the key sections:
🔢 Deployment Controls
replicaCount: 1
➡️ This sets how many copies of each component we run. Setting it to 2 or higher would give us better reliability.
🖼️ Container Images
image:
  repository: rjshk013/react-frontend
  tag: v1.0.0
  pullPolicy: IfNotPresent
➡️ Defines where to find our frontend container image and which version to use. IfNotPresent means only download if needed.
🔌 Frontend Configuration
frontend:
  config:
    REACT_APP_BACKEND_URL: "http://172.18.0.2:32001"
➡️ This is used to create our ConfigMap, telling the React app where to find the backend API. The IP and port here point to our backend.
⚠️ Important Note: For this demo, we’re using a local Kind (Kubernetes in Docker) cluster, where services are exposed via NodePort and we know the specific node IPs. That’s why we’re using a static IP (172.18.0.2) in our configuration. In a production environment, you would typically use DNS names, LoadBalancers, or Ingress Controllers instead of hardcoded IPs. This approach is simplified for demonstration purposes.
⚙️ Backend Settings
backend:
  repository: rjshk013/flask-backend
  tag: v1.0.0
  env:
    POSTGRES_HOST: "mypostgres-service"
    POSTGRES_PORT: "5432"
🗄️ Database Configuration
postgresql:
  image: postgres:latest
➡️ Specifies which PostgreSQL image to use for our database.
🔐 Security Settings
secrets:
  postgres:
    POSTGRES_USER: "postgres"
    POSTGRES_PASSWORD: "admin"
    POSTGRES_DB: "postgres"
➡️ Database credentials that get stored as Kubernetes Secrets. In production, you’d use stronger passwords!
🌐 Network Configuration
service:
type: NodePort
frontendPort: 80
backendPort: 5000
backendNodePort: 32001
dbPort: 5432
➡️ Defines how traffic flows:
NodePortmakes services accessible from outside the clusterfrontendPort: Port inside the container (80 for HTTP)backendPort: Flask API port (5000)backendNodePort: Fixed external port (32001) for the backenddbPort: PostgreSQL port (5432)
👤 Access Controls
serviceAccount:
create: true
name: “”
annotations: {}
➡️ Kubernetes identity settings (mostly using defaults here).
🚪 External Access
ingress:
  enabled: false
  # other settings...
➡️ Currently disabled, but could be used to set up more sophisticated external access using an Ingress Controller.
📊 Resource Management
resources:
  limits:
    memory: "256Mi"
    cpu: "500m"
  requests:
    memory: "128Mi"
    cpu: "250m"
➡️ Performance settings:
limits: Maximum resources containers can userequests: Resources guaranteed to each container
📑 Understanding Our Kubernetes Templates
Let’s analyze the key YAML files in our Helm chart to understand how our two-tier application works:
🚀 1. deployment.yaml: Defining Our Application Pods
apiVersion: apps/v1
kind: Deployment
metadata:
  name: {{ .Release.Name }}-frontend
  labels:
    app: {{ .Release.Name }}-frontend
spec:
  replicas: {{ .Values.replicaCount }}
  selector:
    matchLabels:
      app: {{ .Release.Name }}-frontend
  template:
    metadata:
      labels:
        app: {{ .Release.Name }}-frontend
    spec:
      containers:
        - name: myfrontend-app
          image: "{{ .Values.image.repository }}:{{ .Values.image.tag }}"
          ports:
            - containerPort: {{ .Values.service.frontendPort }}

          volumeMounts:
            - name: config-volume
              mountPath: /usr/share/nginx/html/config.js
              subPath: config.js
      volumes:
        - name: config-volume
          configMap:
            name: {{ .Release.Name }}-frontend-config
What this does:
- Creates pods for our React frontend application
- Uses our specified container image
- The special part: mounts our ConfigMap as a JavaScript file!
- This lets our React app know where to find the backend
---
apiVersion: apps/v1
kind: Deployment
metadata:
  name: {{ .Release.Name }}-backend
  labels:
    app: {{ .Release.Name }}-backend
spec:
  replicas: {{ .Values.replicaCount }}
  selector:
    matchLabels:
      app: {{ .Release.Name }}-backend
  template:
    metadata:
      labels:
        app: {{ .Release.Name }}-backend
    spec:
      nodeSelector:
        role: backend-db-node
      containers:
        - name: mybackend-app
          image: "{{ .Values.backend.repository }}:{{ .Values.backend.tag }}"
          ports:
            - containerPort: {{ .Values.service.backendPort }}
          env:
            - name: POSTGRES_USER
              valueFrom:
                secretKeyRef:
                  name: postgres-secrets
                  key: POSTGRES_USER
            - name: POSTGRES_PASSWORD
              valueFrom:
                secretKeyRef:
                  name: postgres-secrets
                  key: POSTGRES_PASSWORD
            - name: POSTGRES_HOST
              value: "{{ .Values.backend.env.POSTGRES_HOST }}"
            - name: POSTGRES_PORT
              value: "{{ .Values.backend.env.POSTGRES_PORT }}"
            - name: POSTGRES_DB
              valueFrom:
                secretKeyRef:
                  name: postgres-secrets
                  key: POSTGRES_DB
What this does:
- Creates pods for our Flask backend API
- The
nodeSelectorensures backend runs on the same node as the database - Uses Kubernetes Secrets for sensitive database credentials
- Configures database connection details via environment variables
How to label the kind node for both backend & db pods
# List all nodes
kubectl get nodes -o wide

# Show node labels
kubectl get nodes --show-labels
#label the specific node with the role .here 172.18.0.2 node will be labelled
kubectl label nodes kind-worker role=backend-db-node
⚙️ 2. configmap.yaml: Dynamic Configuration
apiVersion: v1
kind: ConfigMap
metadata:
  name: {{ .Release.Name }}-frontend-config
  labels:
    app: {{ .Release.Name }}-frontend
data:
  config.js: |
    window.REACT_APP_BACKEND_URL = "{{ .Values.frontend.config.REACT_APP_BACKEND_URL }}";
    // Add any other configuration variables here
What this does:
- Creates a JavaScript file that our frontend loads at startup
- Sets a global variable with our backend URL
- The value comes from our Helm values.yaml
- Allows changing the backend URL without rebuilding the container!
🔄 3. db-init.yaml: Database Setup Automation
apiVersion: batch/v1
kind: Job
metadata:
  name: {{ .Release.Name }}-db-init
  annotations:
    "helm.sh/hook": post-install,post-upgrade
    "helm.sh/hook-weight": "-5"
    "helm.sh/hook-delete-policy": hook-succeeded
spec:
  # ...
What this does:
- Creates a one-time task that runs after installation/upgrade
- The job gets deleted after successful completion
- Uses Helm hooks to control when it runs
containers:
  - name: db-init
    # ...
    args:
      - |
        # Use Flask/Python to check PostgreSQL
        echo "Waiting for PostgreSQL to be ready using SQLAlchemy..."
        python -c "
        # Python script that checks database connection
        # ...
        "

        # Initialize database schema
        cd /app
        flask db init
        flask db migrate -m "Initial migration from Kubernetes job"
        flask db upgrade
        flask insert_admin_user
What this does:
- First waits for PostgreSQL to be available using the same connection method as Flask
- Then runs database migrations to create tables
- Finally creates an initial admin user
- All automatically when you deploy the application!
💡 Key Design Patterns
- 📦 ConfigMap for Frontend Configuration: Allows changing backend URL without rebuilding frontend image
- 🔒 Secrets for Database Credentials: Keeps sensitive data separate from application code
- 🎯 Node Co-location: Ensures backend and database run on the same node for optimal performance
- 🔄 Automated Database Setup: Uses Kubernetes Jobs with Helm hooks for seamless initialization
- 🔌 Environment Variables: Configures backend database connection dynamically
These patterns create a flexible, maintainable Kubernetes deployment that can be easily adapted to different environments! 🚀
Let’s continue exploring our Helm chart templates:
🗄️ postgres-deployment.yaml: Database Deployment
apiVersion: apps/v1
kind: Deployment
metadata:
  name: {{ .Release.Name }}-postgres
  labels:
    app: {{ .Release.Name }}-db
spec:
  replicas: 1
  selector:
    matchLabels:
      app: {{ .Release.Name }}-db
  template:
    metadata:
      labels:
        app: {{ .Release.Name }}-db
    spec:
      nodeSelector:
        role: backend-db-node
      containers:
        - name: postgres
          image: {{ .Values.postgresql.image }}
          ports:
            - containerPort: {{ .Values.service.dbPort }}
          env:
            - name: POSTGRES_USER
              valueFrom:
                secretKeyRef:
                  name: postgres-secrets
                  key: POSTGRES_USER
            - name: POSTGRES_PASSWORD
              valueFrom:
                secretKeyRef:
                  name: postgres-secrets
                  key: POSTGRES_PASSWORD
            - name: POSTGRES_HOST
              value: "{{ .Values.backend.env.POSTGRES_HOST }}"
            - name: POSTGRES_PORT
              value: "{{ .Values.backend.env.POSTGRES_PORT }}"
            - name: POSTGRES_DB
              valueFrom:
                secretKeyRef:
                  name: postgres-secrets
                  key: POSTGRES_DB
What this does:
- Creates a PostgreSQL database deployment
- Uses the
nodeSelectorto ensure the database runs on the same node as the backend - Uses the standard PostgreSQL image from Docker Hub
- Configured with environment variables for database credentials
🔐 postgres-secrets.yaml: Secure Credentials
apiVersion: v1
kind: Secret
metadata:
  name: postgres-secrets
  labels:
    app: {{ .Release.Name }}-db
type: Opaque
data:
  POSTGRES_USER: {{ .Values.secrets.postgres.POSTGRES_USER | b64enc }}
  POSTGRES_PASSWORD: {{ .Values.secrets.postgres.POSTGRES_PASSWORD | b64enc }}
  POSTGRES_DB: {{ .Values.secrets.postgres.POSTGRES_DB | b64enc }}
What this does:
- Creates encrypted Kubernetes Secrets for database credentials
- Values come from our Helm values.yaml file
- The
b64encfunction automatically base64-encodes the values (required for Kubernetes Secrets) - Both backend and database pods use these secrets for authentication
🌐 service.yaml: Network Communication
apiVersion: v1
kind: Service
metadata:
  name: myfrontend-service
  labels:
    app.kubernetes.io/managed-by: Helm
  annotations:
    meta.helm.sh/release-name: {{ .Release.Name }}
    meta.helm.sh/release-namespace: {{ .Release.Namespace }}
spec:
  type: {{ .Values.service.type }}
  ports:
    - port: {{ .Values.service.frontendPort }}
      targetPort: 80
      protocol: TCP
      # {{- if eq .Values.service.type "NodePort" }}
      # nodePort: {{ .Values.service.frontendNodePort }}  # Using your preferred name
      # {{- end }}
  selector:
    app: {{ .Release.Name }}-frontend
---
apiVersion: v1
kind: Service
metadata:
  name: mybackend-service
  labels:
    app.kubernetes.io/managed-by: Helm
  annotations:
    meta.helm.sh/release-name: {{ .Release.Name }}
    meta.helm.sh/release-namespace: {{ .Release.Namespace }}
spec:
  type: {{ .Values.service.type }}
  ports:
    - port: {{ .Values.service.backendPort }}
      targetPort: 5000
      protocol: TCP
      {{- if eq .Values.service.type "NodePort" }}
      nodePort: {{ .Values.service.backendNodePort }}
      {{- end }}
  selector:
    app: {{ .Release.Name }}-backend
What this does:
- Creates a network service for our backend API
- Explicitly sets
nodePort: 32001(from our values.yaml) - This fixed port makes it easier for our frontend to consistently locate the backend
- Routes API requests to our backend pods
🚀 Deploying the Application with Helm
Now that we’ve prepared our Helm chart, let’s deploy our two-tier application to Kubernetes!
📋 Prerequisites
Before deploying, ensure you have:
- A running Kubernetes cluster (we’re using Kind)
- Helm installed on your machine
- kubectl configured to connect to your cluster
- Node(s) labeled for database and backend:
kubectl label nodes <node-name> role=backend-db-node
🔍 Review Values Before Deployment
First, let’s check our values.yaml to ensure settings are correct:
cat values.yaml
Key settings to verify:
- Image repositories and tags
- Backend URL in frontend configuration
- Correct PostgreSQL credentials
⚡ First-Time Installation
When deploying for the first time, use this command:
# Create namespace if it doesn't exist
kubectl create namespace flask-app

# Install the Helm chart
helm install demo-app ./ -n flask-app
helm install: Tells Helm we want to install a new chartdemo-app: The name we’re giving to our release./: Specifies the path to our Helm chart – in this case, the current directory where our chart files (including values.yaml, Chart.yaml, and the templates folder) are located-nflask-app: Deploys the application to the “flask-app” namespace
You should see output confirming the installation:

📊 Checking Deployment Status
To check the status of your Helm deployment:
helm status demo-app -n flask-app
This shows useful information including:
- Deployment timestamp
- Current status
- Revision number
- Usage notes

⏳ Watching Resources Being Created
Watch as Kubernetes creates all the resources:
kubectl get po -n flask-app
You should see output similar to:

🔍 Verifying Database Initialization Job Completion
After deploying our application, it’s important to confirm that the database initialization job completed successfully. Since our job is configured to be automatically deleted after completion (hook-delete-policy: hook-succeeded), you won’t see the job pod in the regular pod listing.
Checking for Job Completion
When you check your pods, you’ll only see the main application components:
Using Events to Verify Job Execution
The best way to confirm the job ran successfully is by checking the Kubernetes events:
kubectl get events -n flask-app | grep db-init
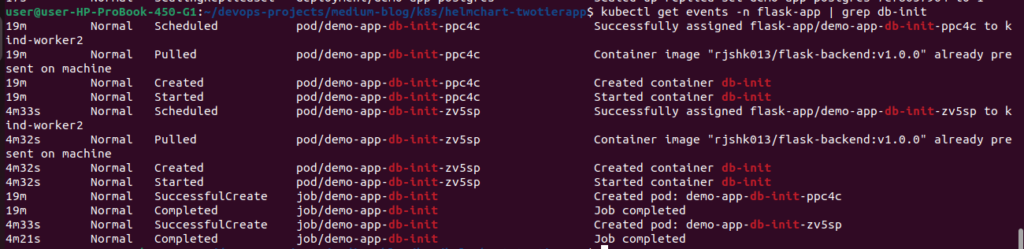
The key event to look for is Normal Completed job/demo-app-db-init Job completed, which confirms that the job ran successfully.
⚙️ Validating ConfigMap
Let’s check our frontend configuration:
kubectl get cm -n flask-app
kubectl get cm demo-app-frontend-config -n flask-app -o yaml
You should see the backend URL correctly set:

🌐 Examining Services
Next, check how our services are exposed:
kubectl get svc -n flask-app

Note the important details:
- Frontend is exposed on port 32656 (your port may differ if auto-assigned)
- Backend API is exposed on port 32001 (fixed in our values.yaml)
- Database is only accessible within the cluster (ClusterIP)
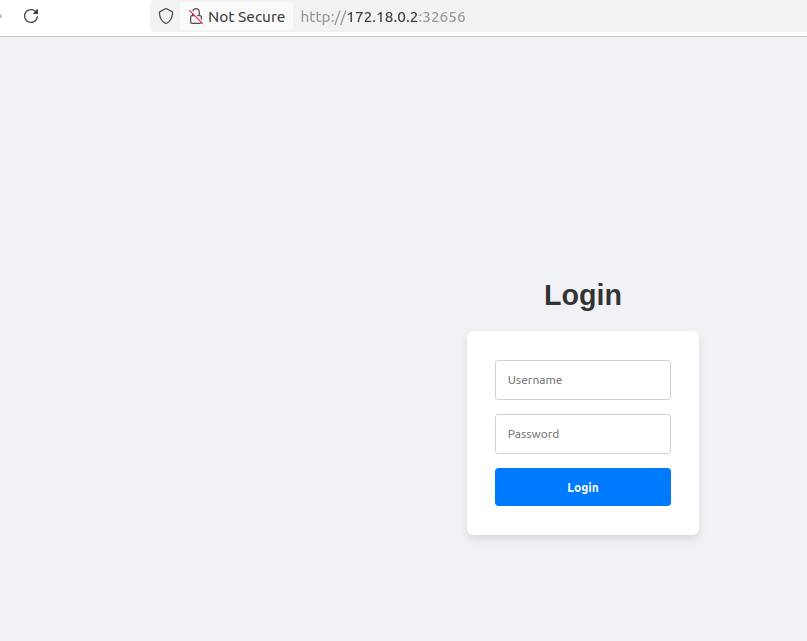
🖥️ Accessing the Frontend
Open your web browser and navigate to:
http://172.18.0.2:32656/
(Replace the IP with your node IP and the port with your frontend NodePort if different)
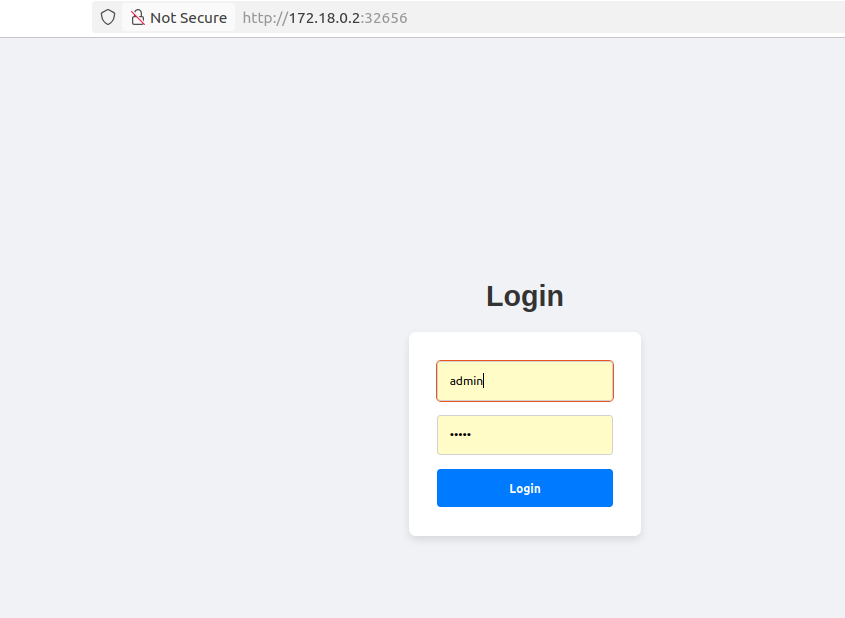
You should see the login page of our application!
🔄 Full Application Test
Login with default credentials:
- Username: admin
- Password: admin
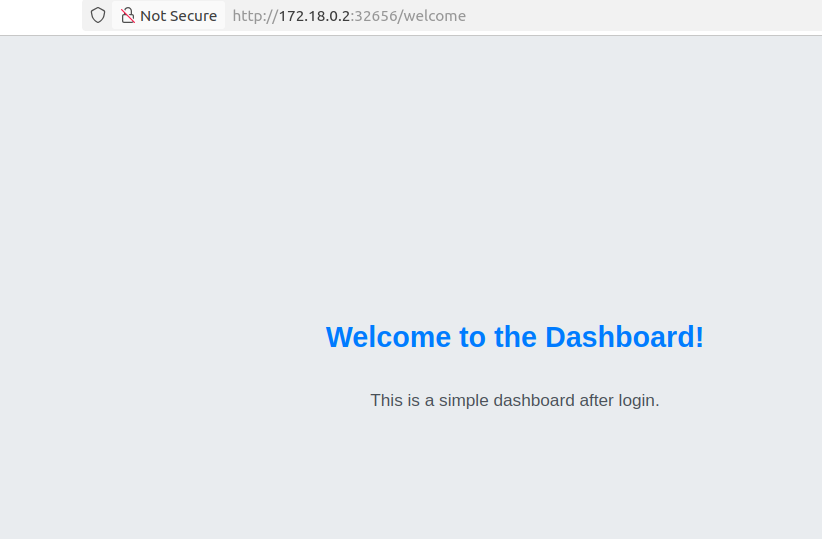
After successful login, you will be directed to the welcome dashboard page.That means our app working as expected.
🔍 Inspecting Frontend-Backend Communication
Want to see your app components talking to each other? Here’s how:
Watch the Magic Happen
Open Your Secret Weapon: Launch your browser’s Developer Tools
- In Chrome/Edge: Press
F12orCtrl+Shift+I - In Firefox: Press
F12or right-click → “Inspect Element” - In Safari: Enable Developer menu first, then
Option+Command+I
🔬 Examine the Traffic:
- Click the Network tab – your window into the application’s communication
- Perform a login action or refresh the page
- Watch requests appear in real-time! 🪄
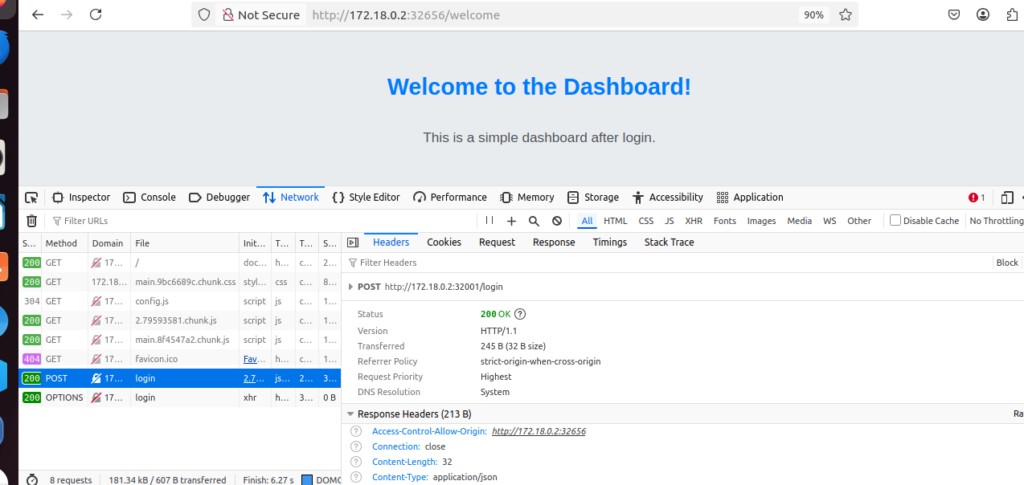
🎯 Find the Backend Calls:
- Look for requests going to your backend URL:
http://172.18.0.2:32001/loginor similar endpoints- These are your frontend reaching out to the Flask API!
✅ Confirm Success:
- Green status codes (
200 OK) indicate successful communication - Expand a request to see the full data exchange between frontend and backend
- This confirms your Kubernetes services are correctly routing traffic!
🛠️ Troubleshooting Common Issues
Even with careful deployment, you might encounter a few common issues. Here’s how to diagnose and fix them:
1. Verifying Frontend-Backend Connectivity
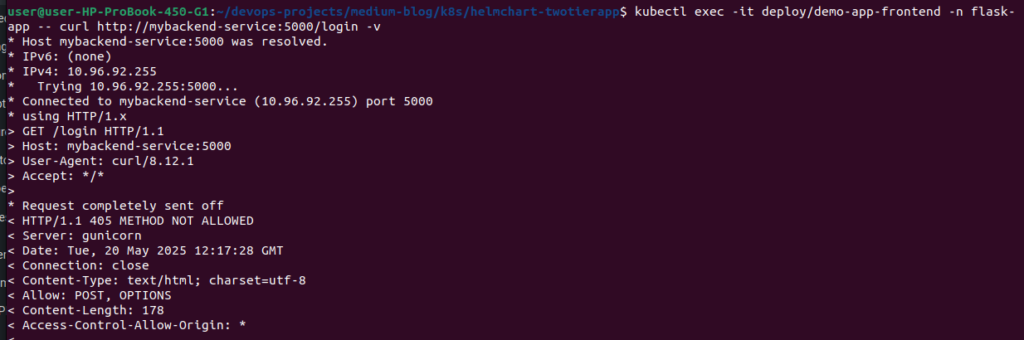
If your application isn’t working, first check if the frontend can reach the backend:
kubectl exec -it deploy/demo-app-frontend -n flask-app -- curl http://mybackend-service:5000/login -v
🧩 URL Components
http://– The protocol- We’re using standard HTTP to communicate between services
- In production, you might use HTTPS instead
mybackend-service– The Kubernetes service name- This comes from our service.yaml file:
metadata:
  name: mybackend-service
- Kubernetes creates internal DNS entries for all services
- Pods can access services by name within the same namespace
:5000 – The port number
- This comes from our service.yaml file:
ports:
  - port: {{ .Values.service.backendPort }}
- In our values.yaml file, we defined
backendPort: 5000 - This matches the port our Flask application listens on
/login – The API endpoint
- This is a specific route in our Flask backend
- Handles user authentication requests
- Expects a POST request with username and password
-v – Not part of the URL; this is a curl flag
- Makes curl output more verbose
- Shows request/response headers for debugging
🔄 How This Works
When a pod makes a request to http://mybackend-service:5000:
- Kubernetes DNS resolves
mybackend-serviceto the service’s cluster IP - The service routes traffic to one of the backend pods
- The request reaches the Flask application running on port 5000
- Flask processes the request based on the endpoint path (/login)
⚠️ Troubleshooting DNS Resolution
If DNS resolution isn’t working correctly:
- Check CoreDNS service and pods – DNS resolution in Kubernetes depends on CoreDNS:
# Check CoreDNS service
kubectl get svc -n kube-system kube-dns

# Check CoreDNS pods
kubectl get pods -n kube-system -l k8s-app=kube-dns

# Check CoreDNS logs
kubectl logs -n kube-system -l k8s-app=kube-dns
- Look for errors in CoreDNS logs that might indicate configuration issues or pod communication problems
- Ensure CoreDNS has adequate resources and is running properly
2. Verifying Database Initialization
If you can’t log in, check if the admin user was properly created in the database:
Login to postgresql pod & check admin user created
kubectl exec -it demo-app-postgres-7cf8657964-zf7vt -n flask-app sh

Inside the PostgreSQL console:
# psql -U postgres
postgres=# \c
-- List all tables
postgres=# \dt
-- Check user table (quotes needed as "user" is a reserved keyword)
postgres=# SELECT * FROM "user";

What to look for:
- If tables don’t exist: Database initialization job didn’t complete
- If “user” table exists but admin user missing: Insert command failed
- If password doesn’t work: Check hash format in database
🎉 Conclusion: Your Kubernetes Journey Has Just Begun!
Congratulations! You’ve successfully deployed a complete two-tier application on Kubernetes using Helm. Through this journey, you’ve:
- 🔧 Created flexible deployment templates with Helm
- 🔌 Connected React frontend and Flask backend components
- 🗃️ Set up PostgreSQL with secure credentials
- 🚀 Automated database initialization
- 🔄 Built a system that’s easy to update and maintain
This foundation gives you a powerful starting point for building and deploying your own modern, containerized applications.
By learning how to manage configuration, handle secrets, automate initialization, and verify your deployment, you’ve gained essential skills that apply to any Kubernetes project.
🚀 What’s Next?
Your application is running, but there’s always room to grow! Here are exciting ways to take your deployment to the next level:
⚙️ Integrate with CI/CD
- Connect your project to Jenkins, GitLab CI, or GitHub Actions
- Automatically test, build, and deploy whenever you push code
- Implement automated testing for both frontend and backend
📈 Add Scaling & High Availability
- Configure Horizontal Pod Autoscaling to handle traffic spikes
- Implement multi-replica deployments for redundancy
- Set up database replication for data safety
- Add health checks and readiness probes for resilience
🔒 Enhance Security
- Implement HTTPS with cert-manager
- Add network policies to restrict pod-to-pod communication
- Apply Pod Security Standards
- Set up proper RBAC for service accounts
📊 Add Monitoring & Observability
- Install Prometheus for metrics collection
- Deploy Grafana for beautiful dashboards
- Implement structured logging with tools like Loki
- Set up alerts for potential issues


One thought on “How to Deploy React app with flask on k8s using helm-part 1”