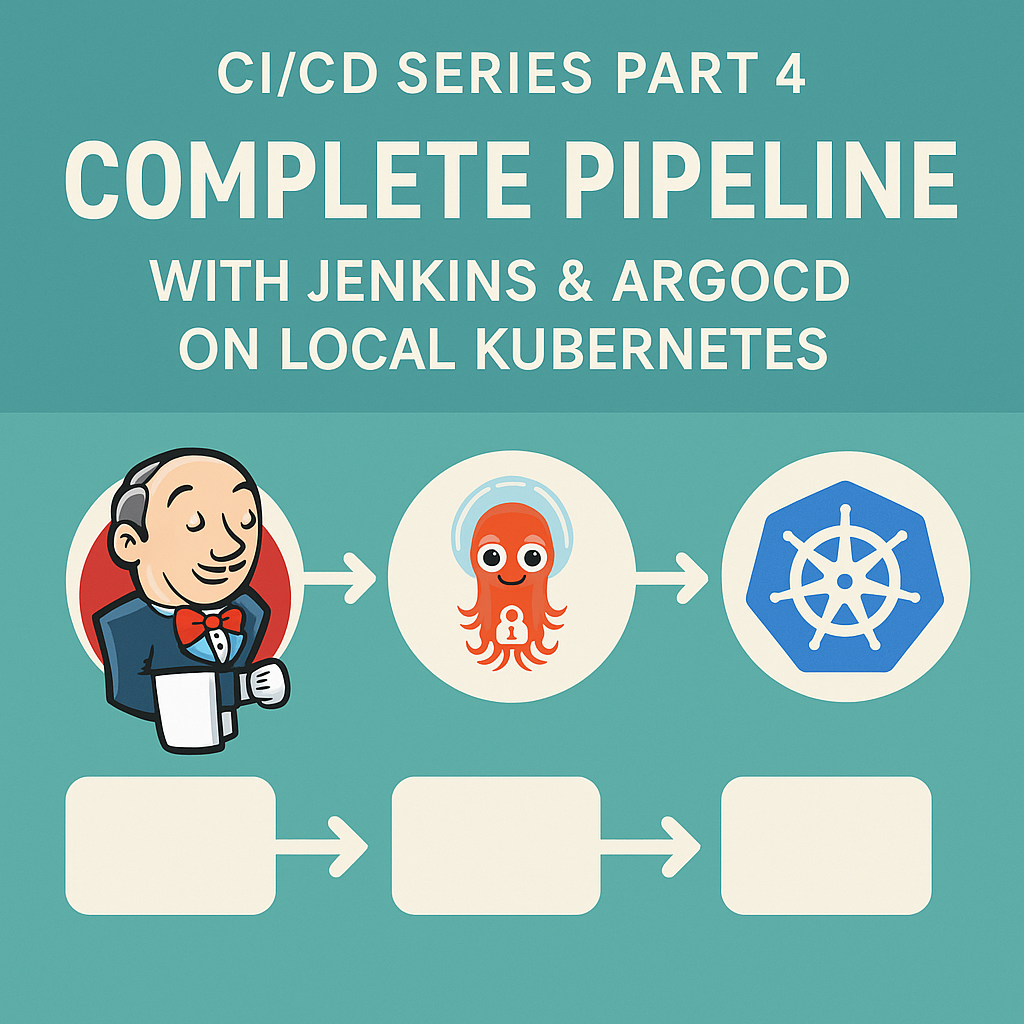
CI/CD Series Part 4: Complete Pipeline with Jenkins & ArgoCD on Local Kubernetes 🚀
🎯 Building the Complete CI/CD Workflow
In the previous parts of this series, we’ve set up the individual components of a modern CI/CD pipeline. Now it’s time to connect everything together and create a seamless workflow that automates the entire journey from code commit to application deployment.
What We’ll Accomplish
This tutorial focuses on integration and automation. You’ll learn how to:
- Connect Jenkins and ArgoCD for seamless CI/CD workflows
- Implement GitOps practices with automated deployments
- Create production-ready pipelines that handle real applications
- Set up monitoring and troubleshooting for reliable operations
- Apply enterprise-grade practices in your local environment
Prerequisites from Previous Parts
This tutorial builds on the foundation from earlier parts
To learn jenkins deployment using argocd check below link:
https://cldop.com/deploying-jenkins-on-local-kubernetes-cluster-with-helm-chart-and-argocd-part-1/
To learn flask react app deployment using helm check below link:
https://cldop.com/how-to-deploy-flask-react-postgresql-via-helm/
If you haven’t completed these setups, please follow the linked guides first. Each component is essential for the complete workflow we’ll build today.
What Makes This Integration Valuable
Real-world applicability: The patterns you’ll implement mirror what’s used in production environments at scale. The only difference is that everything runs locally, giving you complete control and zero cloud costs.
Hands-on learning: Every step includes verification commands and troubleshooting guidance. You’ll understand not just what to do, but why each piece matters and how to fix issues when they arise.
Career relevance: GitOps and automated CI/CD pipelines are core skills for modern DevOps roles. This practical experience directly translates to professional environments.
Ready to see how all the pieces fit together? Let’s build a complete pipeline that showcases the power of modern DevOps practices! 🚀
What You’ll Build Today
By the end of this tutorial, you’ll have a production-grade CI/CD pipeline running entirely on your local machine:
✅ Jenkins master and agents running as Kubernetes pods
✅ ArgoCD for GitOps-based deployments
✅ Complete automation from code push to production deployment
✅ Zero cloud costs – everything runs locally
✅ Real-world skills transferable to enterprise environments
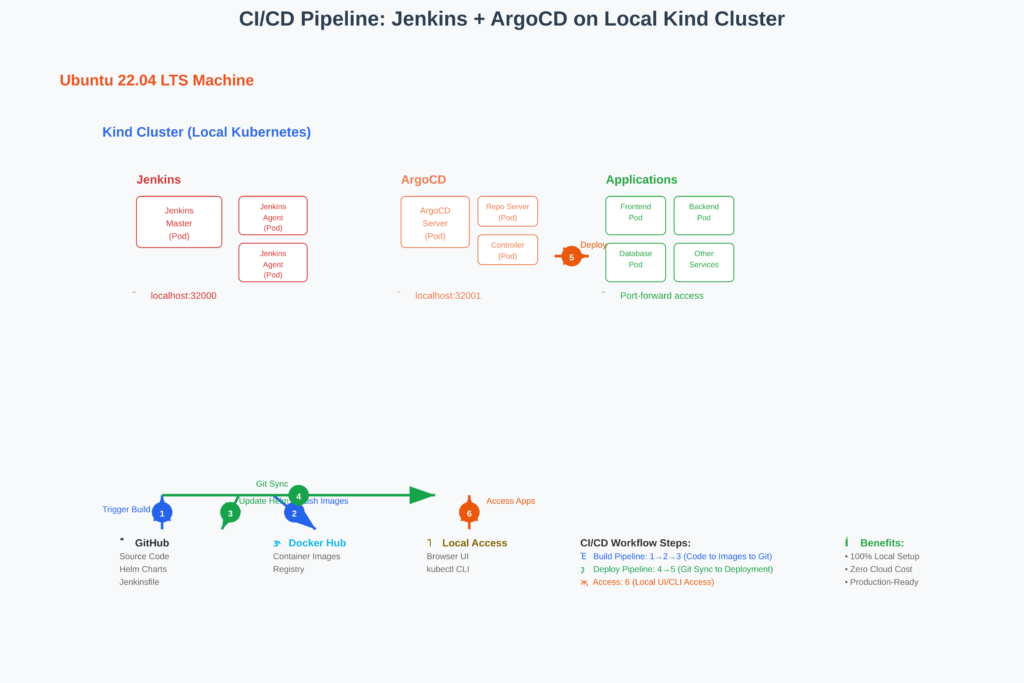
🏗️ Architecture Overview
Your final setup will look like this:
Prerequisites & Environment Setup
What You Need
- Ubuntu 22.04 LTS (or similar Linux distribution)
- 16GB RAM recommended (8GB minimum)
- 20GB free disk space
- Docker, kubectl, helm, and kind installed
Quick Environment Check
Run these commands to verify your setup:
# Verify installations
docker --version          # Should return Docker version
kubectl version --client  # Should return kubectl version
helm version              # Should return Helm version
kind --version            # Should return Kind version
Step 1: Initial Setup – Jenkins & ArgoCD Deployment
📖 Follow our detailed setup guide: https://cldop.com/deploying-jenkins-on-local-kubernetes-cluster-with-helm-chart-and-argocd-part-1/
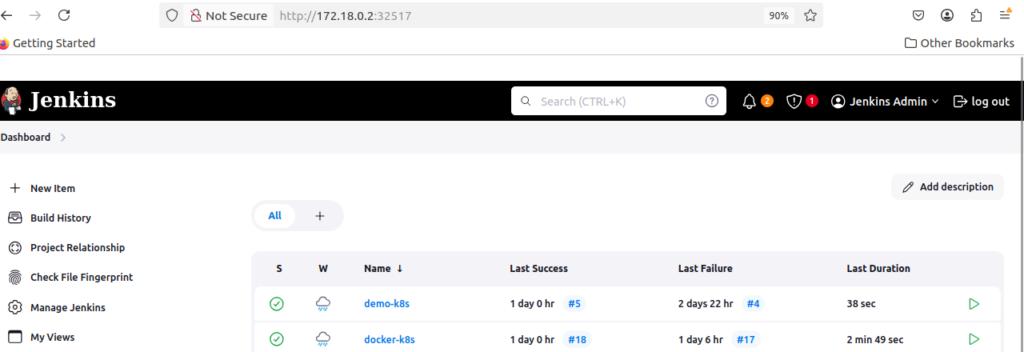
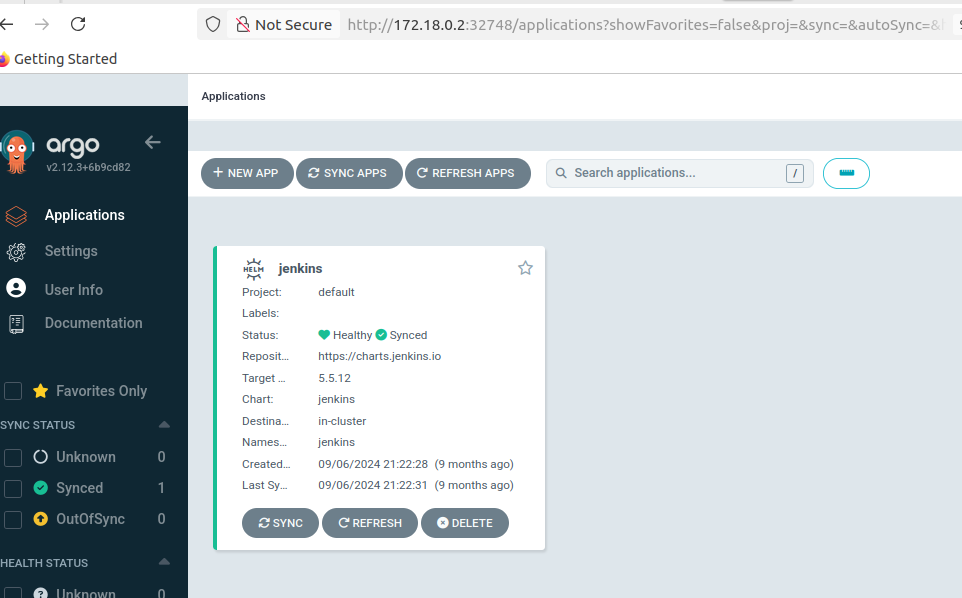
Check both jenkins & argocd are up & running
After following the setup guide, verify both services:
kubectl get svc -n jenkins
kubectl get svc -n argocd
Check via browser
jenkins
Step 3: Prepare Your Sample Application
3.1 Clone the Sample Repository
git clone https://github.com/your-username/medium-blog-cicd.git
cd medium-blog-cicd
3.2 Examine the Dockerfiles
Backend Dockerfile (k8s/flask-backend/Dockerfile):
# Step 1: Use a Python base image
FROM python:3.9-slim

# Step 2: Set up the working directory
WORKDIR /app

# Step 3: Install dependencies
COPY requirements.txt requirements.txt
RUN pip install --no-cache-dir -r requirements.txt

# Step 4: Copy the application code
COPY . .

# Step 5: Expose the Flask port (5000)
EXPOSE 5000

# Step 6: Run the Flask application using Gunicorn for production
#CMD ["gunicorn", "-b", "0.0.0.0:5000", "app:app"]
CMD ["gunicorn", "--log-level=debug", "--access-logfile", "-", "--error-logfile", "-", "-b", "0.0.0.0:5000", "app:app"]
Frontend Dockerfile (k8s/reactjs-frontend/Dockerfile):
# Step 1: Build the React app
FROM node:16-alpine as build
WORKDIR /app

COPY package.json ./
RUN npm install
COPY . .
RUN npm run build

# Step 2: Serve the React app with NGINX
FROM nginx:alpine
COPY --from=build /app/build /usr/share/nginx/html

# Copy the env.template.js to the NGINX folder
COPY ./public/env.template.js /usr/share/nginx/html/env.template.js

# Add entrypoint script to dynamically substitute the environment variable
COPY ./entrypoint.sh /entrypoint.sh
RUN chmod +x /entrypoint.sh

EXPOSE 80

# Use the entrypoint script to substitute variables before starting NGINX
CMD ["/entrypoint.sh"]
Step 4: Configure Jenkins Pipeline Integration
Docker Hub Token:
- Go to Manage Jenkins → Manage Credentials
- Click Global → Add Credentials
- Choose Secret text
- ID:
docker-hub-token - Secret: Your Docker Hub access token
GitHub Token:
- Add Credentials → Secret text
- ID:
github-token - Secret: Your GitHub personal access token
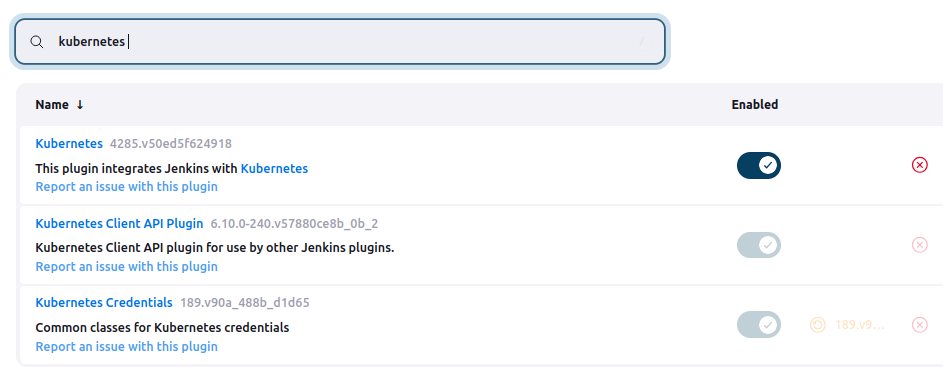
4.2 Install Required Jenkins Plugins
Navigate to Manage Jenkins → Manage Plugins → Available and install:
- ✅ Kubernetes Plugin
2.Stage View Plugin-It is very helpful to view each stages of build
Note: Git Plugin and Pipeline Plugin should already be available in your Jenkins installation.
4.3 Configure Kubernetes Plugin
Manage Jenkins → Configure System → Cloud → Add a new cloud → Kubernetes
Configure with these exact settings:
Basic Configuration:
Name: kubernetes
Kubernetes URL: https://kubernetes.default
Kubernetes Namespace: jenkins
Important Settings:
- ✅ Use Jenkins Proxy: Leave unchecked
- ✅ Kubernetes server certificate key: Leave empty
- ✅ Disable https certificate check: Leave unchecked
- ✅ Credentials: Select “- none -“
- ✅ Agent Docker Registry: Leave empty
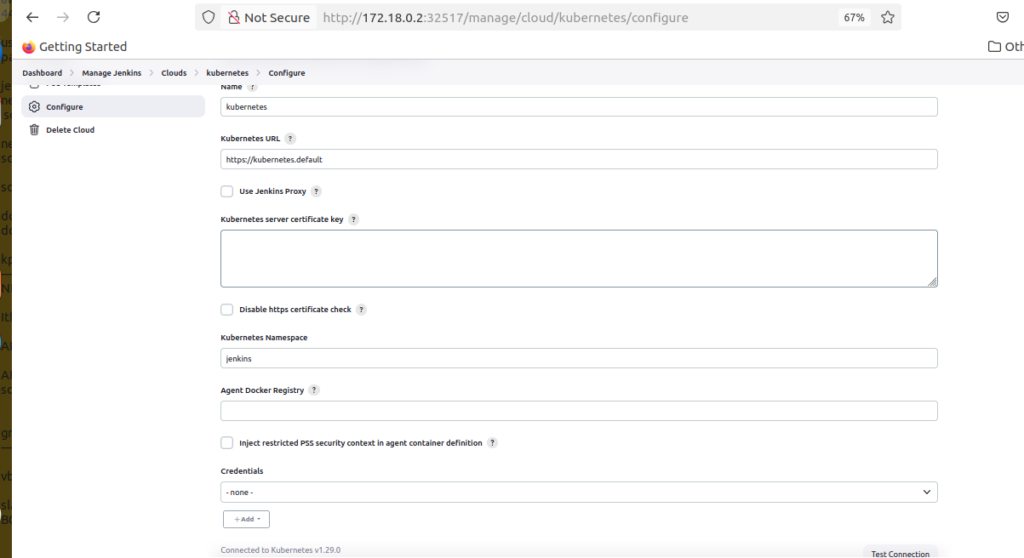
Why these settings work:
https://kubernetes.default: Standard in-cluster service discovery URL- No credentials needed: Jenkins automatically uses the service account token
- jenkins namespace: Matches where Jenkins is deployed
Verification: Click Test Connection – you should see: “Connected to Kubernetes v1.x.x” ✅
4.4 Test Jenkins Agent Connectivity
Create a test pipeline:
pipeline {
    agent {
        kubernetes {
            yaml """
                apiVersion: v1
                kind: Pod
                spec:
                  containers:
                  - name: test
                    image: alpine:latest
                    command: ['sleep', '300']
                """
        }
    }
    stages {
        stage('Test') {
            steps {
                container('test') {
                    sh 'echo "✅ Kubernetes agent working!"'
                    sh 'hostname && date'
                }
            }
        }
    }
}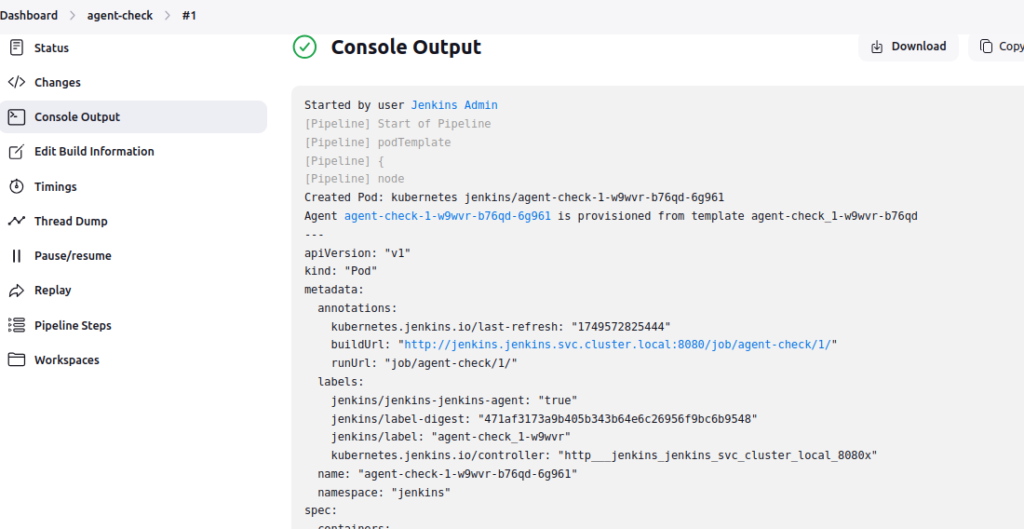
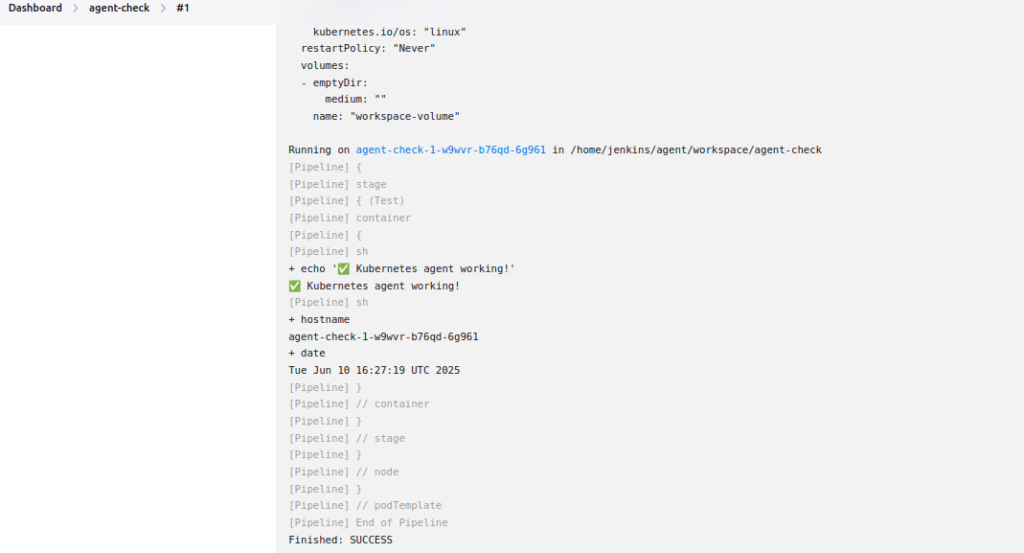
Test pipeline should execute successfully on a Kubernetes agent.
5.3 Understanding the Jenkinsfile Structure
🔍 How This Pipeline Works:
Pipeline Architecture Breakdown:
🏗️ Agent Configuration (Inline Pod Template):
agent {
    kubernetes {
        label 'kubernetes-agent'
        yaml """[Pod specification]"""
    }
}- Dynamic pod creation: Jenkins creates a fresh Kubernetes pod for each build
- Multi-container setup: Three containers work together (JNLP, Docker, kubectl)
- Ephemeral agents: Pod is deleted after build completion
- Resource isolation: Each build gets clean, dedicated resources
⚙️ Environment Variables Section:
environment {
IMAGE_TAG = "${BUILD_NUMBER}"
BACKEND_IMAGE = "tecnotes/medium-blog-backend"
// …
}- Centralized configuration: All build parameters in one place
- Dynamic values: BUILD_NUMBER creates unique tags (1, 2, 3…)
- Consistency: Same values used across all pipeline stages
- Maintainability: Change image names in one location
🔄 Pipeline Stages Flow:
1.📥 Preparation Stage:
- Checks out source code from Git
- Sets up workspace and validates environment
- Runs on default JNLP container
2.🏗️ Build Images Stage (Parallel):
- Frontend build:
container('docker')– Builds React application - Backend build:
container('docker')– Builds Node.js/Python API - Parallel execution: Both images build simultaneously for speed
3.📤 Push to Registry Stage:
container('docker')– Uses Docker container for registry operations- Docker Hub authentication: Secure credential handling
- Multi-tag push: Both
${BUILD_NUMBER}andlatesttags - Security cleanup: Automatic logout after push
4.📝 GitOps Update Stage:
- Default container – Uses default JNLP container for Git operations
- Flexible Helm values update: Uses
sed -i "s|tag: .*|tag: ${IMAGE_TAG}|g"to replace any existing tag value - Smart Git workflow: Only commits if changes are detected with detailed commit messages including build metadata
- Secure Git operations: Uses GitHub token authentication and proper remote URL handling
- ArgoCD auto-sync: Repository changes trigger automatic deployment (configured in ArgoCD, not Jenkins)
5.4 Why Inline Pod Templates Over Jenkins UI Configuration?
🤔 The Traditional vs Modern Approach:
📋 Jenkins UI Pod Templates (Old Way):
Jenkins UI → Manage Jenkins → Configure System → Kubernetes Cloud → Pod Templates
Problems with UI Configuration:
- ❌ Not version controlled: Changes happen outside Git
- ❌ Configuration drift: Production vs development differences
- ❌ Shared state: One template affects all projects using it
- ❌ No code review: Infrastructure changes bypass review process
- ❌ Admin dependency: Requires Jenkins admin access to modify
- ❌ Hard to debug: Template definition not visible in build logs
🚀 Inline Pod Templates (Modern GitOps Way):
agent {
    kubernetes {
        yaml """
        apiVersion: v1
        kind: Pod
        spec: [...]
        """
    }
}
Why This Approach is Superior:
🔐 Security & Governance Benefits:
- ✅ Version controlled: Pod definition lives with your code
- ✅ Code review process: All infrastructure changes reviewed like code
- ✅ Audit trail: Every change tracked in Git with author and reason
- ✅ Least privilege: Each pipeline gets exactly what it needs
- ✅ No configuration drift: What’s in Git is what runs
🚀 Ready to Test? Let’s Run Our First Build!
Now that you understand how the Jenkinsfile works and why we chose inline pod templates, it’s time to put it into action. In the next section, we’ll trigger our first Jenkins build to:
✅ Create the fresh Docker images from your source code
✅ Update the GitOps repository with proper image tags
✅ Verify everything works before setting up ArgoCD
This first build is crucial because it transforms your values.yaml from having tag: latest (which doesn’t exist yet) to tag: 1 (which we’re about to create).
🎯 What to expect in the next steps:
- Trigger first build → Jenkins creates images and updates Git
- Verify the changes → Check Docker Hub and Git repository
- Set up ArgoCD application → Connect to our updated GitOps repo
- Test automation → Trigger second build and watch auto-sync
Let’s start by running our pipeline for the first time!
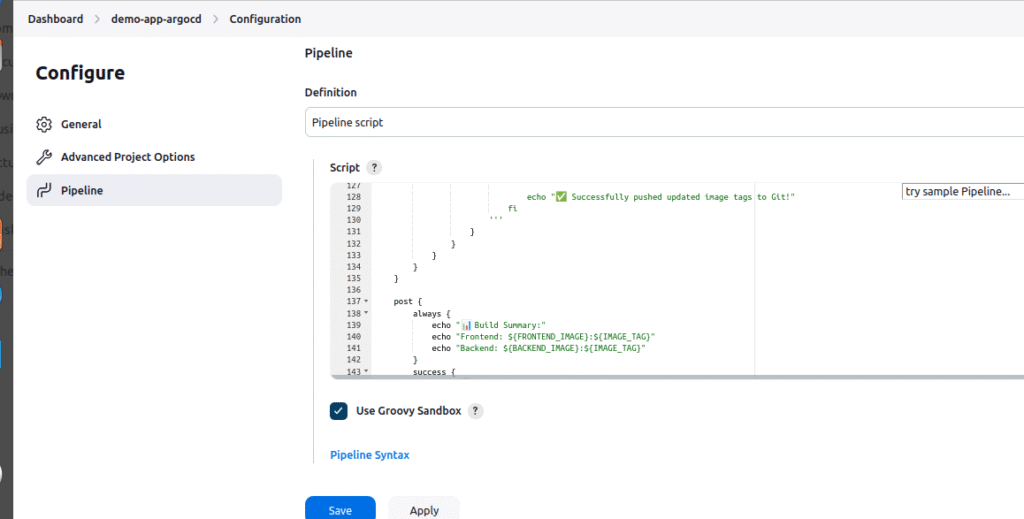
Step 5: Create Your Production Pipeline
5.1 Complete Jenkinsfile
Create this Jenkinsfile in your repository root:
pipeline {
agent {
kubernetes {
yaml """
apiVersion: v1
kind: Pod
spec:
containers:
- name: docker
image: docker:dind
securityContext:
privileged: true
env:
- name: DOCKER_TLS_CERTDIR
value: ""
- name: jnlp
image: jenkins/inbound-agent:latest
"""
}
}
environment {
IMAGE_TAG = "${BUILD_NUMBER}"
BACKEND_IMAGE = "tecnotes/flask-app-backend"
FRONTEND_IMAGE = "tecnotes/flask-app-frontend"
DOCKER_HUB_USERNAME = "tecnotes"
HELM_CHART_PATH = "k8s/helmchart-twotierapp"
NAMESPACE = "flask-app"
RELEASE_NAME = "demo-app"
}
stages {
stage('SCM Checkout') {
steps {
git branch: 'main', url: 'https://github.com/rjshk013/medium-blog.git'
}
}
stage('Docker Build') {
parallel {
stage('Build Backend') {
steps {
container('docker') {
sh '''
dockerd-entrypoint.sh &
sleep 15
cd k8s/flask-backend
docker build -t ${BACKEND_IMAGE}:${IMAGE_TAG} .
docker tag ${BACKEND_IMAGE}:${IMAGE_TAG} ${BACKEND_IMAGE}:latest
echo "✅ Backend image built: ${BACKEND_IMAGE}:${IMAGE_TAG}"
'''
}
}
}
stage('Build Frontend') {
steps {
container('docker') {
sh '''
dockerd-entrypoint.sh &
sleep 15
cd k8s/reactjs-frontend
docker build -t ${FRONTEND_IMAGE}:${IMAGE_TAG} .
docker tag ${FRONTEND_IMAGE}:${IMAGE_TAG} ${FRONTEND_IMAGE}:latest
echo "✅ Frontend image built: ${FRONTEND_IMAGE}:${IMAGE_TAG}"
'''
}
}
}
}
}
stage('Push to Registry') {
steps {
container('docker') {
withCredentials([string(credentialsId: 'docker-hub-token', variable: 'DOCKER_TOKEN')]) {
sh '''
dockerd-entrypoint.sh &
sleep 15
echo "${DOCKER_TOKEN}" | docker login -u ${DOCKER_HUB_USERNAME} --password-stdin
echo "📤 Pushing images..."
docker push ${BACKEND_IMAGE}:${IMAGE_TAG} || echo "⚠️ Push failed - will use local images"
docker push ${FRONTEND_IMAGE}:${IMAGE_TAG} || echo "⚠️ Push failed - will use local images"
docker logout
'''
}
}
}
}
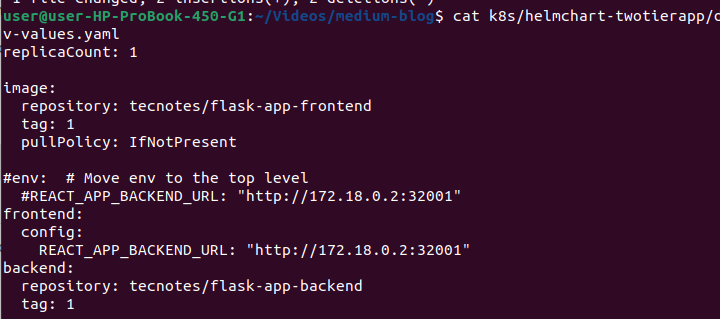
stage('Update Helm Values & Push to Git') {
steps {
withCredentials([string(credentialsId: 'github-token', variable: 'GITHUB_TOKEN')]) {
dir("${HELM_CHART_PATH}") {
sh '''
echo "📝 Updating dev-values.yaml..."
# Update image tags
sed -i "s|tag: .*|tag: ${IMAGE_TAG}|g" dev-values.yaml
echo "✅ Updated dev-values.yaml with tag: ${IMAGE_TAG}"
git config user.name "Jenkins CI"
git config user.email "jenkins@company.com"
echo "➕ Adding changes..."
git add dev-values.yaml
if git diff --staged --quiet; then
echo "ℹ️ No changes to commit"
else
echo "💾 Committing changes..."
git commit -m "🚀 Update image tags to ${IMAGE_TAG} [Build #${BUILD_NUMBER}]
- Frontend: ${FRONTEND_IMAGE}:${IMAGE_TAG}
- Backend: ${BACKEND_IMAGE}:${IMAGE_TAG}
- Updated by: Jenkins CI Pipeline"
git remote set-url origin "https://${GITHUB_TOKEN}@github.com/rjshk013/medium-blog.git"
echo "📤 Pushing to GitHub..."
git push origin main
echo "✅ Successfully pushed updated image tags to Git!"
fi
'''
}
}
}
}
}
post {
always {
echo "📊 Build Summary:"
echo "Frontend: ${FRONTEND_IMAGE}:${IMAGE_TAG}"
echo "Backend: ${BACKEND_IMAGE}:${IMAGE_TAG}"
}
success {
echo "🎉 Pipeline completed successfully!"
echo "✅ Images built and pushed"
echo "✅ Helm values updated in Git"
echo "✅ ArgoCD will auto-sync the deployment"
}
failure {
echo "❌ Pipeline failed - check logs above"
}
}
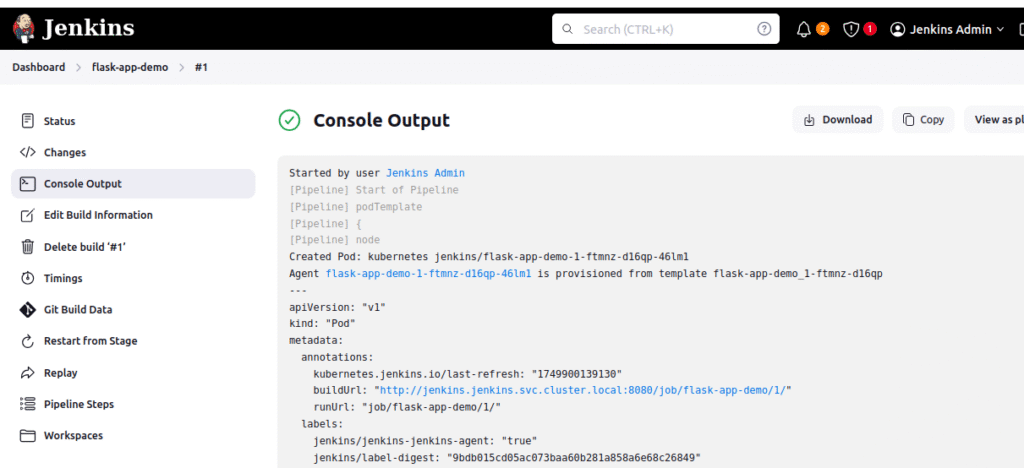
}Create Job for this build
1.New Item → Pipeline → Name: demo-app-argocd
2. Pipeline Definition: Pipeline script
3. Script: Paste your complete pipeline code in the text area
4.Save
5.Build Now
Step 6: Configure ArgoCD Application Integration
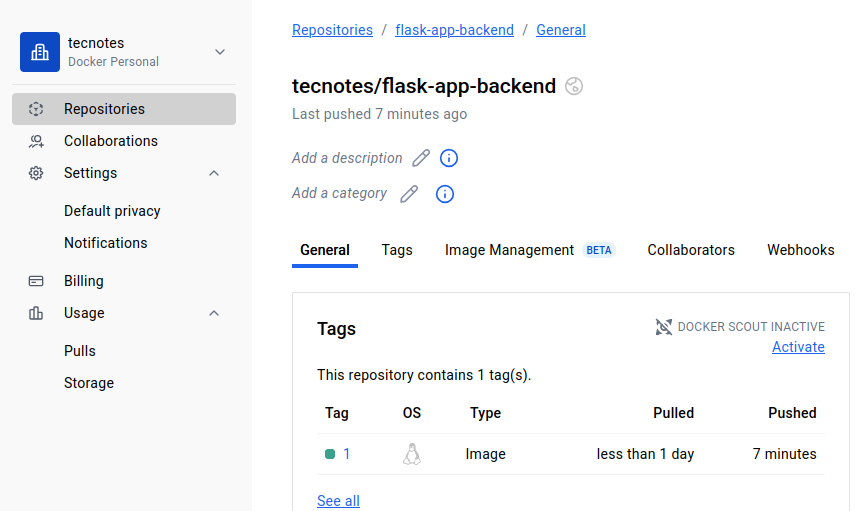
🔗 Perfect! Your First Build Should Be Complete
Before proceeding, let’s make sure your first Jenkins build was successful. You should have seen:
- ✅ Jenkins pipeline completed without errors
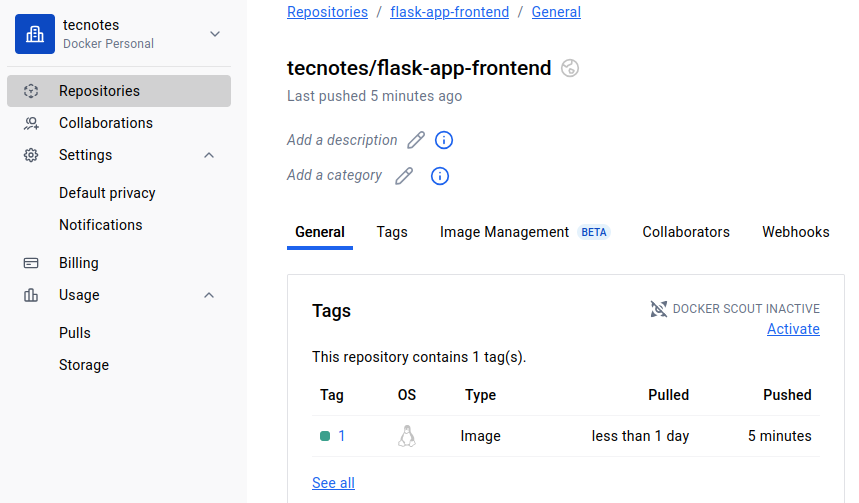
- ✅ Docker images pushed to your Docker Hub registry
- ✅ Git repository updated with new
values.yamlcontainingtag: 1
🎯 Why This Verification Matters: If your values.yaml still shows tag: latest, ArgoCD will fail to deploy because those images don’t exist yet. This verification ensures we’re ready for the next step.
✅ Ready for ArgoCD Integration!
Now that we have:
- ✅ Working Jenkins pipeline that builds and pushes images
- ✅ Updated GitOps repository with proper image tags
- ✅ Verified images available in Docker registry
We can confidently set up ArgoCD to automatically deploy our application. ArgoCD will read our updated values.yaml and deploy the images that Jenkins just created.
6.1 ArgoCD UI Access
Login to argocd UI using username & password.Please check my previous blog to know more https://cldop.com/how-to-deploy-jenkins-with-helm-and-agrocd-on-k8s/
6.2 Create Application via ArgoCD UI
🤔 Why ArgoCD UI Over CLI/YAML?
UI Advantages for Learning & Operations:
- ✅ Visual feedback: See real-time sync status, health indicators
- ✅ Intuitive navigation: Point-and-click vs memorizing commands
- ✅ Rich context: Resource relationships, dependency visualization
- ✅ Built-in troubleshooting: One-click access to logs, events, terminals
- ✅ Team collaboration: Non-DevOps team members can understand status
- ✅ Onboarding friendly: Minimal learning curve for new team members
Step-by-step UI Configuration:
- Access ArgoCD UI at http://172.18.0.2:32748/ (replace with your node ip & Node Port)
- Click “+ NEW APP” button (top left)
- Fill in the GENERAL section:
Application Name: demo-app
Project Name: default
Configure SYNC POLICY section:
Automatic (selected)
✅ PRUNE RESOURCES (checked)
✅ SELF HEAL (checked)
✅ PRUNE LAST (checked)
Your configuration should look exactly like this:

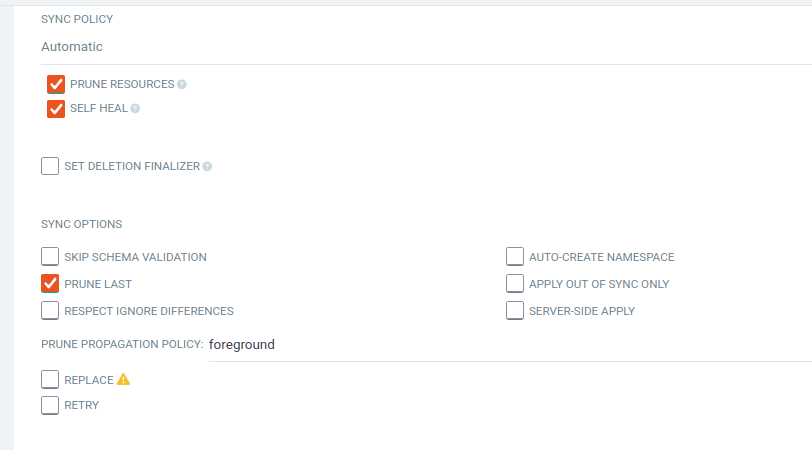
Why Configure Auto-Sync from the Start?
- PRUNE RESOURCES: Automatically removes Kubernetes resources that are no longer defined in Git
- SELF HEAL: Automatically corrects any manual changes made to deployed resources
- Immediate Automation: No need to manually sync after each Jenkins build
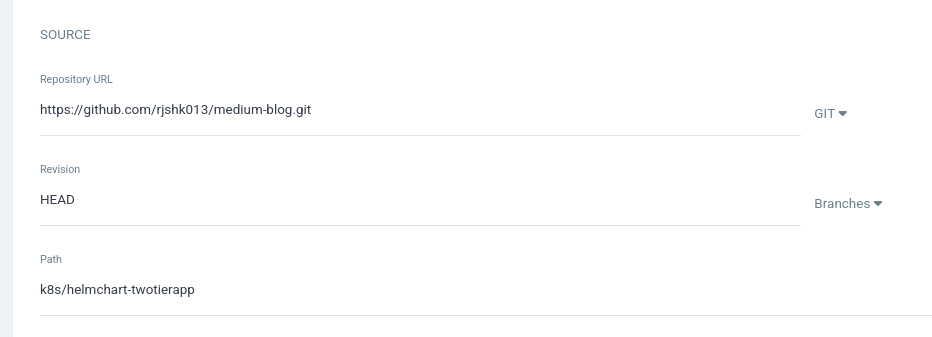
4.Fill in the SOURCE section:
Repository URL: https://github.com/rjshk013/medium-blog.git
Revision: HEAD
Path: k8s/helmchart-twotierapp
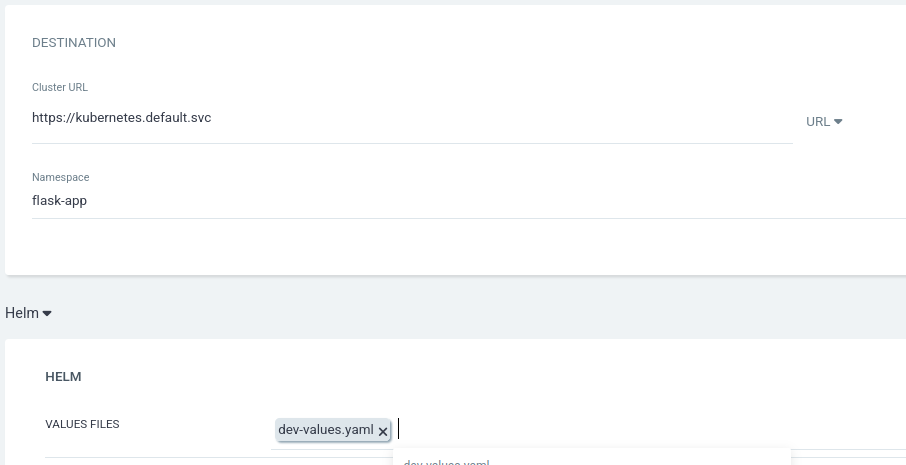
Fill in the DESTINATION section:
Cluster URL: https://kubernetes.default.svc
Namespace: flask-app
Fill in the HELM section:
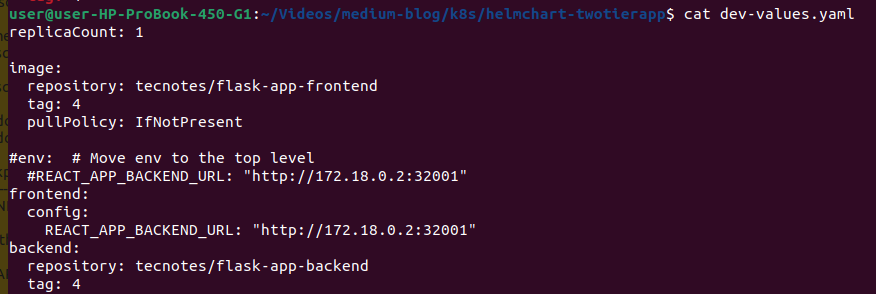
Values Files: dev-values.yaml
Note: For this tutorial i am using this values.yaml.You can use original values yaml form the repo as it is
Click CREATE at the top
You’ll see the application status change through these phases:
- OutOfSync → Syncing → Healthy & Synced
6.4 Monitor Automatic Deployment
Watch the automatic deployment process:
# Watch pods being created automatically
kubectl get pods -n flask-app -w

# Check services created automatically
kubectl get svc -n flask-app

# Check all resources created automatically
kubectl get all -n flask-app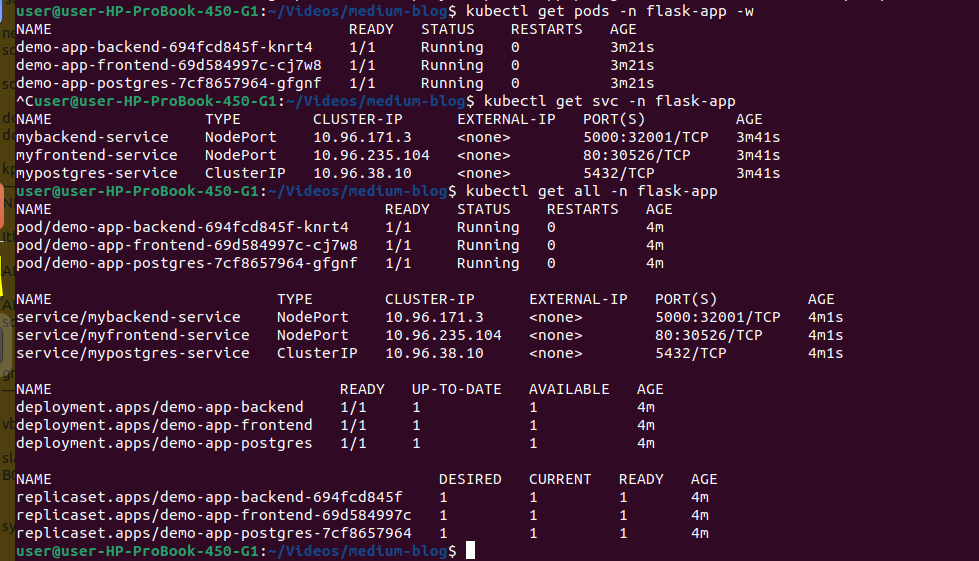
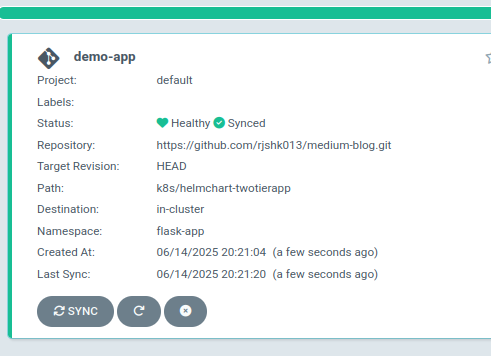
6.5 Verify Automatic Deployment Success
Once the automatic sync completes, verify:
- ArgoCD Status: Application shows “Healthy” and “Synced”
- Kubernetes Resources: All pods, services, and deployments are running
6.6 Test Application Access
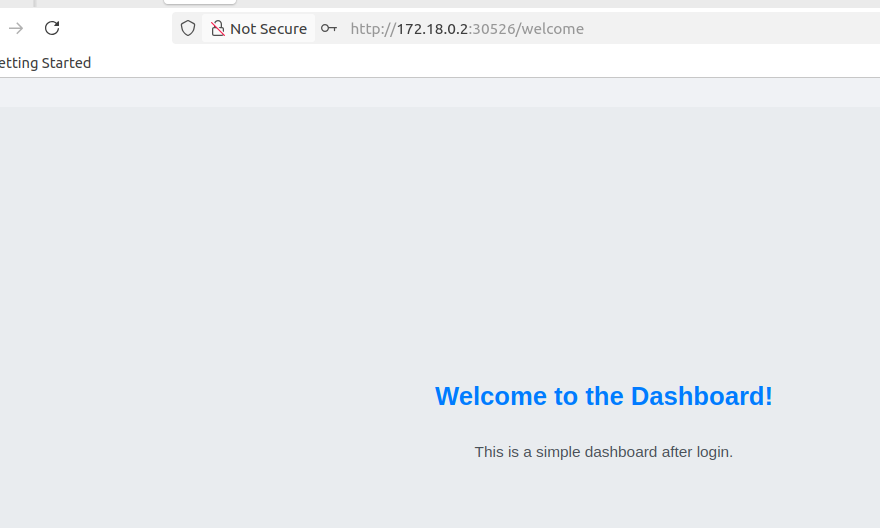
After the automatic deployment completes, test the application:
After the automatic deployment completes, let’s access the application using the NodePort services.
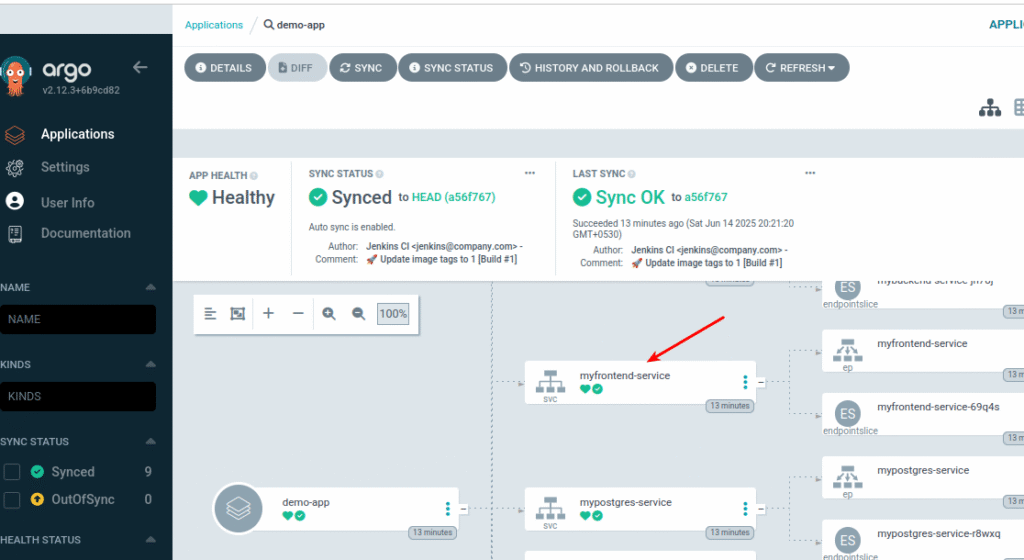
Method 1: Get NodePort from ArgoCD UI
In your ArgoCD application view, you can see the services deployed:
myfrontend-servicemypostgres-service- Backend service (check your service name)
Steps to find NodePort in ArgoCD UI:
- Click on your application (
demo-app) in ArgoCD dashboard - Look for services in the resource tree (right side panel)
- Click on any service (e.g.,
myfrontend-service) - Check the service details for the NodePort number

Method 2: Get NodePort using kubectl
# Check all services and their NodePorts
kubectl get svc -n flask-app

# Get specific service details
kubectl get svc -n flask-app -o wide
Since you’re using a kind cluster, you need to determine the correct node IP to access your NodePort services.
To find the node ip run below command:
kubectl get nodes -o wide
Which Node IP to Use?
For kind clusters, you can use any of the node IP
Access using Node IP + NodePort:
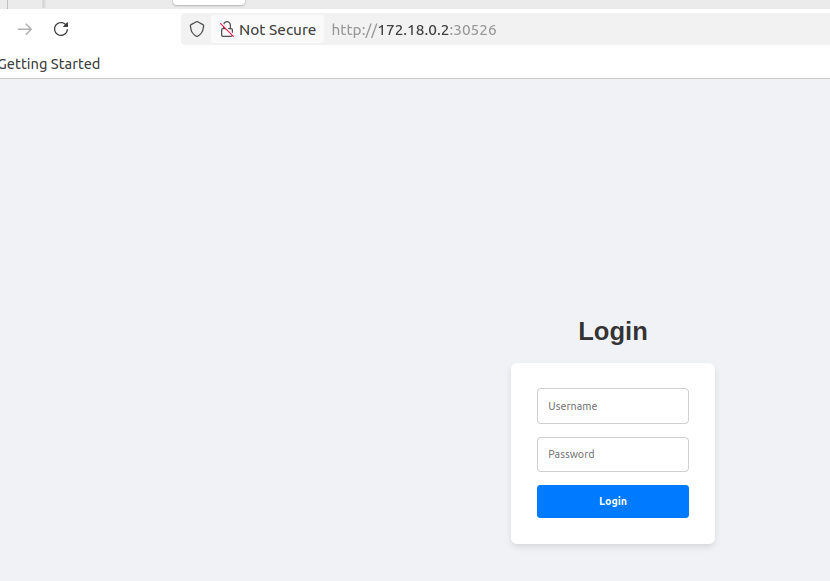
- Frontend:
http://172.18.0.2:30526 - Backend API:
http://172.18.0.2:32001
Step 7: Test Complete CI/CD Automation (Second Build)
7.1 Understanding the Current State
At this point, you have:
- ✅ Jenkins pipeline that builds images with tag “1” and updates Git
- ✅ ArgoCD application with automatic sync enabled from creation
- ✅ Running application deployed automatically by ArgoCD (version 1)
Now let’s test the complete automation by triggering a second Jenkins build that will:
- Build new images with tag “2”
- Update Git repository with new tags
- Trigger automatic ArgoCD sync and deployment
7.2 Trigger Second Jenkins Build
Now let’s test the complete automation pipeline. When we trigger a second build:
- Jenkins will build new images with tag “2”
- Jenkins will update the Git repository with
tag: 2 - ArgoCD will automatically detect the Git change
- ArgoCD will sync and deploy the new version
Go to Jenkins and trigger Build #2:
- Navigate to your
demo-app-argocdpipeline - Click Build Now
7.3 Monitor Second Build Progress
Note: The tag number will match your successful Jenkins build number. If Build #2 failed due to rate limits and Build #3 succeeded, your images will be tagged with “3”.
Watch the Jenkins pipeline stages:
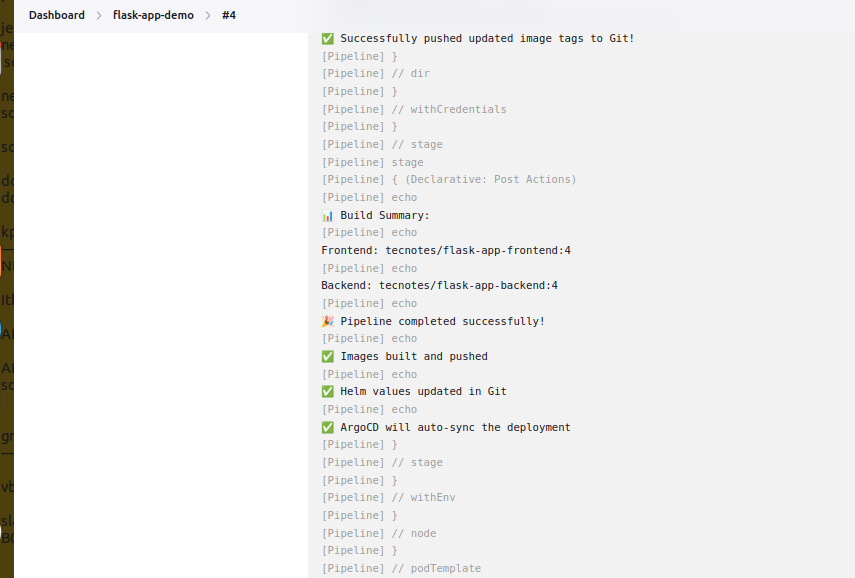
Once your build succeeds (whether it’s Build #2, #3, or #4), watch the Jenkins pipeline stages:
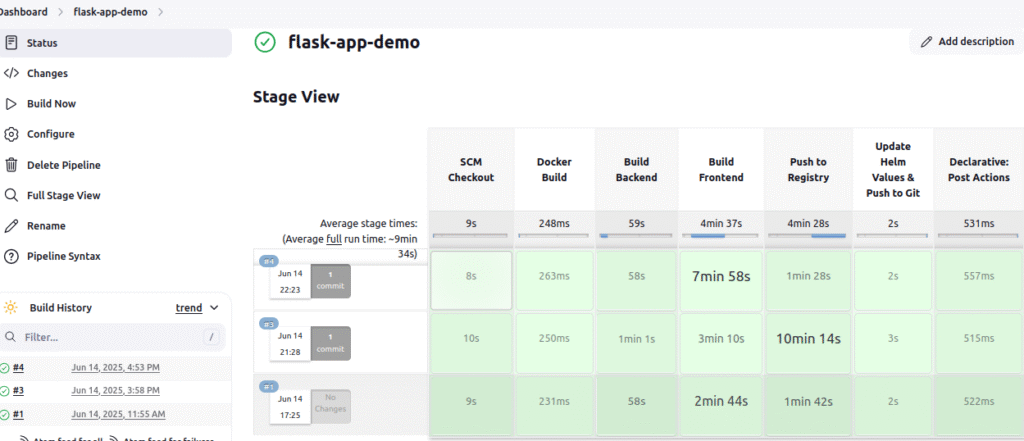
Key stages to monitor:
- ✅ SCM Checkout
- ✅ Docker Build (Frontend & Backend parallel)
- ✅ Push to Registry
- ✅ Update Helm Values & Push to Git
Build should complete with:
🎉 Pipeline completed successfully!
✅ Images built and pushed
✅ Helm values updated in Git
✅ ArgoCD will auto-sync the deployment
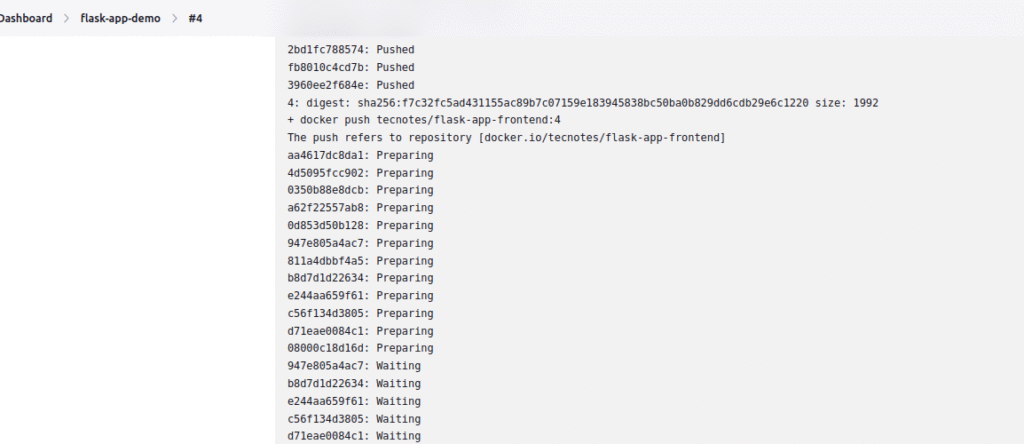
⚠️ IMPORTANT: Docker Hub Rate Limiting Issues
🚨 Expected Build Failures Due to Docker Hub Constraints
Common Scenario: Your Jenkins pipeline may fail during the “Push to Registry” stage due to Docker Hub rate limiting policies.
Typical Error Messages:
❌ “net/http: TLS handshake timeout”
❌ “Head ‘https://registry-1.docker.io/v2/…’ TLS handshake timeout”
❌ “Error response from daemon: pull rate limit exceeded”
❌ “toomanyrequests: You have reached your pull rate limit”
🔄 Build Number Progression Pattern
What Actually Happens:
- Build #1: ✅ Initial deployment (usually succeeds)
- Build #2: ❌ May fail during Docker push (rate limit hit)
- Build #3: ❌ May still fail (rate limits persist)
- Build #4: ✅ Usually succeeds (rate limit window resets)
🎯 Why This Happens & What to Do
Root Cause:
- Docker Hub limits: 100 pulls/6hrs (anonymous) or 200 pulls/6hrs (authenticated)
- TLS handshake timeouts are Docker Hub’s rate limiting mechanism
- Multiple Jenkins builds in succession trigger these limits
Immediate Solution:
- ⏰ Wait 3-5 minutes between build attempts
- 🔄 Simply click “Build Now” again in Jenkins
- 👀 Monitor “Push to Registry” stage specifically
- ✅ Build #3 or #4 will typically succeed
Final Result:
- Your application will deploy with tag matching the successful build number
- If Build #4 succeeds: images tagged as
tecnotes/flask-app-backend:4 - ArgoCD will auto-deploy with
tag: "4"in dev-values.yaml
7.4 Verify Git Repository Update
Check that your dev-values.yaml was updated with the new build number:
git pull
cd k8s/helmchart-twotierapp/
# Verify the tag was updated (build number will match your successful build)<br>cat dev-values.yaml | grep tag: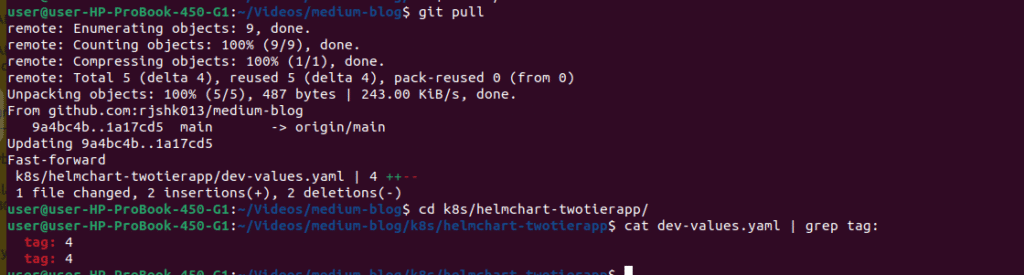
7.5 Watch ArgoCD Auto-Sync in Action
Switch back to ArgoCD UI and watch the magic happen:
- Auto-Detection: ArgoCD detects Git repository change (usually within 3 minutes)
- Auto-Sync Trigger: Application status changes to “Syncing”
- Deployment: New pods are created with image tag “4”
- Health Check: ArgoCD verifies new deployment is healthy
Verify Image Tags Updated:
# Confirm new image tags are deployed
kubectl describe pods -n flask-app | grep Image:
Expected output should show images with tag “4”:

Test the Updated Application (Version 4):
The NodePort services remain the same, so you can access the updated application immediately using the same methods:
# Check that NodePorts haven't changed
kubectl get svc -n flask-app

# Verify node IPs are still the same
kubectl get nodes -o wide
Access the updated application using Node IP + NodePort:
- Frontend:
http://172.18.0.2:30526 (replace with your worker node IP) - Backend API:
http://172.18.0.2:30001 (replace with your worker node IP)
🎯 What Just Happened:
- ✅ Jenkins built and pushed version 2 images
- ✅ Git repository updated with
tag: 2 - ✅ ArgoCD auto-detected the change and deployed seamlessly
- ✅ Zero downtime thanks to PRUNE LAST configuration
- ✅ Same NodePort URLs now serve the updated application version
Conclusion
Congratulations! 🎉 You’ve successfully built a production-grade CI/CD pipeline that automates the complete journey from code to deployment.
🚀 What You’ve Accomplished
- ✅ Jenkins CI/CD: Automated build and deployment pipeline
- ✅ GitOps with ArgoCD: True GitOps with auto-sync and zero-downtime updates
- ✅ Kubernetes Deployment: Container orchestration with persistent NodePort access
- ✅ Real-World Resilience: Handled Docker Hub rate limits (Build #4 success!)
- ✅ Enterprise Patterns: PRUNE LAST, self-healing, and automated rollbacks