Deploy React + Flask App on K8s Using Helm – Series 2
Welcome to Series 2 of our Kubernetes Helm deployment guide. In Series 1, we deployed a full-stack React + Flask app on a local Kind cluster using Docker Hub and Kubernetes Secrets.
In this enhanced edition, we’re keeping the same application and infrastructure but making three powerful upgrades:
- ✨ Amazon ECR – Replace Docker Hub with a private AWS container registry for secure image storage.
- ⚡ GitHub Actions CI – Automate image build and push with a powerful, cloud-native CI pipeline.
- 🚀 ArgoCD CD – Achieve continuous deployment with GitOps magic for real-time sync to Kubernetes.
✨ Additional Enhancements
- Separation of Repositories – Application code and Helm charts are now in two separate repositories:
- App Repository → Contains React + Flask code and Dockerfiles.
- Helm Chart Repository → Contains Kubernetes manifests and deployment configuration.
- Private Repos under an Organization – Both repos are now private and housed under an organization to replicate a production-grade workflow, enabling:
- Centralized access control and security.
- Independent versioning of code and deployments.
- Seamless GitOps integration with ArgoCD watching the chart repo only.
Let’s get started!
🔄 What Remains the Same
- Kind-based local Kubernetes cluster on Ubuntu 20.04
- React frontend + Flask backend + PostgreSQL DB
- Helm-based deployment
- NodePort services to access apps
🧱 Infrastructure Summary
🧱 Original Infrastructure (Series 1)
- Local Kubernetes cluster set up using Kind (Kubernetes in Docker) on Ubuntu 20.04
- Helm charts were used to deploy a two-tier application comprising:
- Flask backend container
- ReactJS frontend container
- PostgreSQL database (running inside the cluster)
- All managed through templated deployments, services, and secrets via Helm
- Services were exposed as NodePorts, allowing access via the local Kind cluster nodes
- Kubernetes Secrets were used to store database credentials (username, password, DB name), base64-encoded within the Helm chart
Added Steps in This Series
We’re not just upgrading the tools — we’re elevating the entire workflow to a production-grade standard. Here’s what’s new:
1️⃣ Switch to Amazon ECR
- 🛠 Migrate Images – Move container images from Docker Hub to Amazon ECR (private registry).
- 🔐 Secure Auth – Configure ECR authentication for both local builds and GitHub Actions workflows.
- ⚙️ Helm Integration – Update Helm values to pull images securely from ECR.
2️⃣ Integrate GitHub Actions for CI
- 🤖 Automated Builds – Trigger Docker image builds on every push or pull request.
- 🏷 Dynamic Tagging – Version images using commit hashes or release tags.
- 🔑 OIDC Authentication – Push images to ECR without storing AWS keys (no hardcoded secrets!).
3️⃣ Implement ArgoCD for Continuous Deployment (GitOps)
- 👀 Repo Watcher – Configure ArgoCD to monitor your Helm chart repo for updates.
- 🚀 Auto Sync – Automatically deploy updates to the Kubernetes cluster in real time.
- 🔄 Safe Rollbacks – Enable rollback strategies for failed deployments.
4️⃣ Refine Helm Charts for Cloud Readiness
- 🛠 Update References – Point image paths and secret references to ECR.
- 🌎 Environment Overrides – Add dev/prod overrides for flexible deployments.
- ✅ Production Features – Include readiness probes, autoscaling hints, and health checks for robust deployments.
Prerequisites
Before starting this guide, ensure you have the following setup:
- Local Kubernetes Cluster (Kind) – Running on Ubuntu 22.04 (or later).
- AWS CLI Installed & Configured – With IAM user permissions for ECR
- kubectl & Helm – Installed and configured to communicate with your local Kind cluster.
- Docker – For building container images locally before pushing to ECR.
- ArgoCD Installed – Already deployed in your cluster (refer to my earlier blog if not:
How to Deploy Jenkins with Helm & ArgoCD on K8s ). - GitHub Repository – Application code stored in GitHub for CI with GitHub Actions.
- Basic Knowledge of Helm & GitOps – Familiarity with Helm values and ArgoCD sync workflow will help.
Step: Prepare Repositories for Production Setup
In this part of the series, we’re shifting from public repositories (used in Series 1) to a production-grade setup with private repositories under an organization. This ensures better access control, security, and proper separation of code and infrastructure.
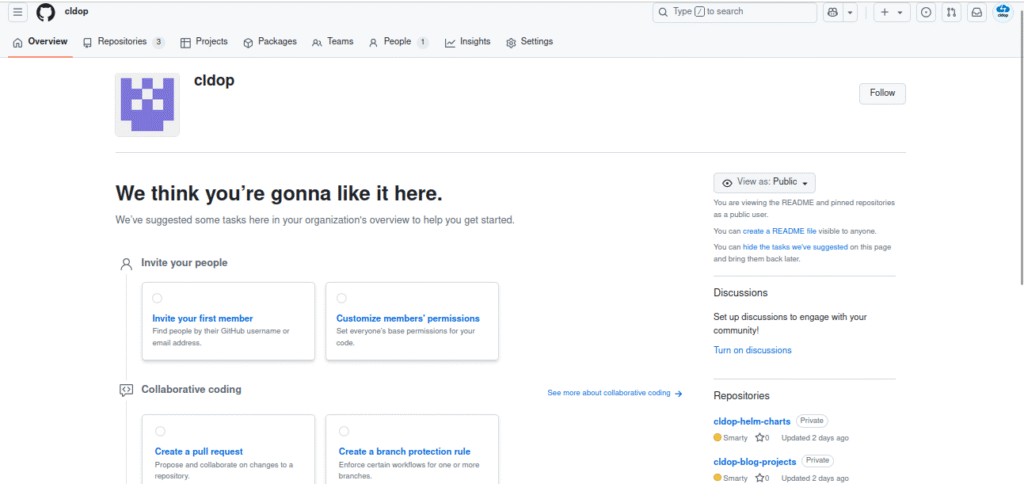
1. Create a GitHub Organization
- Go to GitHub Organizations and click New organization.
- Choose a plan (Free is fine for this setup).
- Name your organization (e.g.,
cldopor your team name).
2. Create Two Private Repositories
Inside the new organization, create two private repos:
devops-projects– This will contain your application code (React + Flask).helm-charts– This will store your Helm chart deployments for Kubernetes.
3. Import Existing Code
- If you followed Series 1, your application code already exists in a public repo.
- Use GitHub’s Import Repository feature to copy that code into your new
devops-projectsprivate repo:- Navigate to New Repository → Import a repository.
- Paste the URL of the public repo from Series 1 and import it.
4. Adjust Helm Chart Repo
- The application code remains unchanged.
- The Helm chart repo will have minor changes (e.g., image repository paths pointing to Amazon ECR instead of Docker Hub, and updated
aws-values.yaml). - We’ll explain these changes in the Helm chart section of this blog.
Step: Generate Personal Access Token for Helm Charts Repo Access
When GitHub Actions needs to update the Helm Charts repository (to push new image tags), it must authenticate securely. For this, we use a Personal Access Token (PAT).
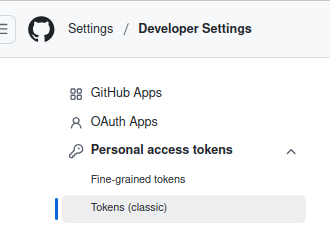
1. Go to GitHub Developer Settings
- Navigate to GitHub → Settings → Developer settings → Personal access tokens → Tokens (classic).
- Click Generate new token → Classic.
2. Configure Token Details
- Name:
Helm Charts Access Token - Expiration: Choose 90 days or custom (rotate regularly for security).
- Select scopes:
repo→ Full control of private repositories (needed to push updates).- (Optional)
workflow→ If you plan to trigger workflows in the helm-charts repo from Actions.
3. Generate and Copy the Token
- Click Generate token.
- Copy the token immediately (you won’t see it again).
AWS Setup for ECR & OIDC
1.AWS CLI Installed & Configured
Ensure that the AWS CLI is installed and configured with an IAM user that has permissions to work with Amazon ECR.
2.Attach IAM policy to the IAM user
Attach the below ecr permission policy to IAM user .In my case policy name is Githubaction_ecr_policy
{
    "Version": "2012-10-17",
    "Statement": [
        {
            "Effect": "Allow",
            "Action": [
                "ecr:GetAuthorizationToken"
            ],
            "Resource": "*"
        },
        {
            "Effect": "Allow",
            "Action": [
                "ecr:BatchCheckLayerAvailability",
                "ecr:GetDownloadUrlForLayer",
                "ecr:BatchGetImage",
                "ecr:InitiateLayerUpload",
                "ecr:UploadLayerPart",
                "ecr:CompleteLayerUpload",
                "ecr:PutImage",
                "ecr:DescribeRepositories",
                "ecr:ListImages",
                "ecr:DescribeImages"
            ],
            "Resource": [
                "arn:aws:ecr:*:<accountid>:repository/*"
            ]
        }
    ]
}3.Amazon ECR Repository
Create private ECR repository for your frontend and backend images.
How to Configure GitHub Actions OIDC with AWS
OpenID Connect (OIDC) unlocks a secure, secret‑less way for your GitHub Actions to access AWS resources. 🚀
Instead of storing long‑lived AWS keys in GitHub secrets, your workflow can request a short‑lived OIDC token from GitHub, exchange it with AWS IAM, and assume a temporary role — all on‑demand and fully automated.
No more manual key rotation, no risk of leaked credentials — just ephemeral, secure access every time your pipeline runs. 🔐
Step 1: Create the OIDC Identity Provider in AWS IAM for GitHub
In this setup, GitHub is the OpenID Provider. So we need to setup the provider details on AWS.
Navigate to AWS IAM → Identity Providers.
Add a new provider:
- Provider type: OpenID Connect
- Provider URL:
https://token.actions.githubusercontent.com - Audience:
sts.amazonaws.com
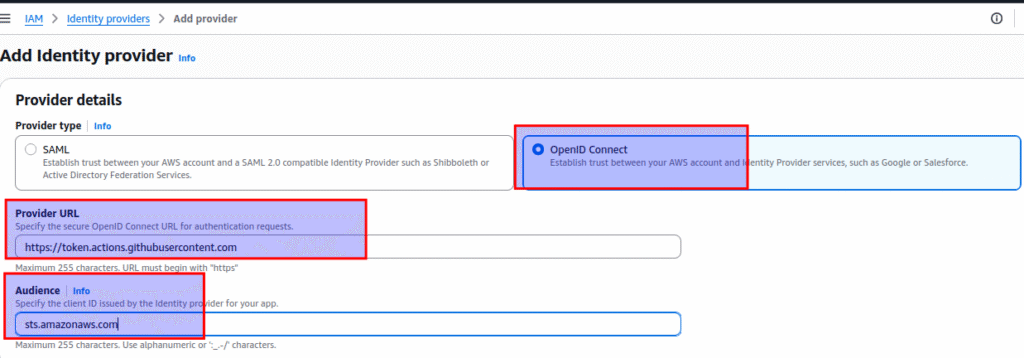
This step tells AWS to trust tokens issued by GitHub Actions. Basically we are establishing a trust relationship between Github and AWS
Step 2: Create WebIdentity IAM Role with Trust Policy
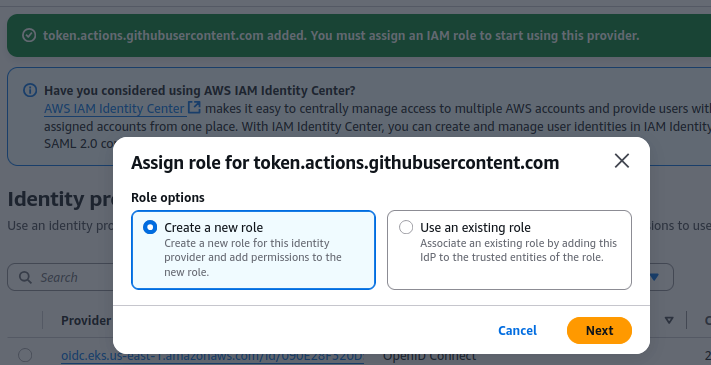
f you click the created Identity provider, you will get an option to Assign role as shown below.
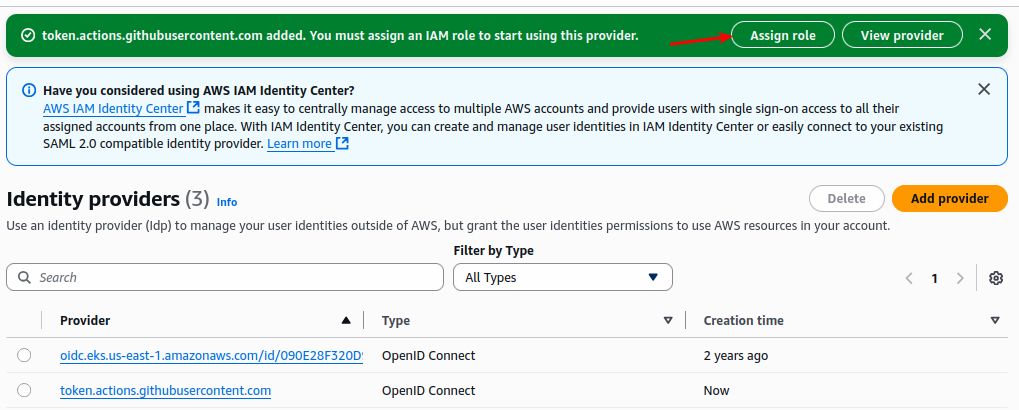
Click Assign role and select the create a new role option.
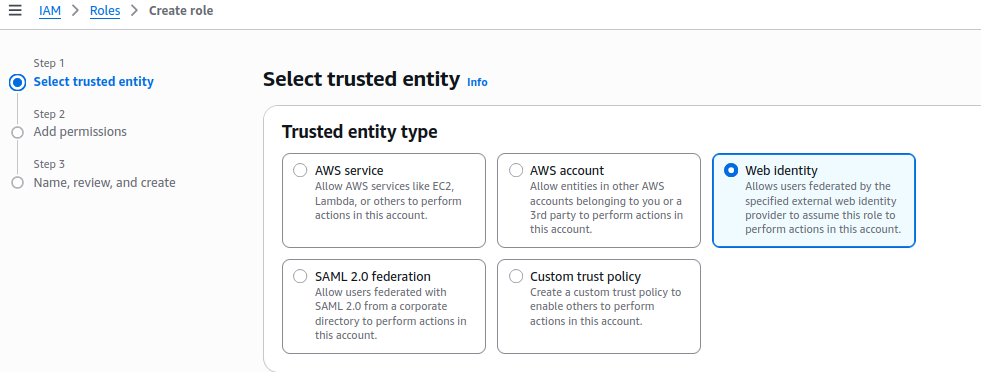
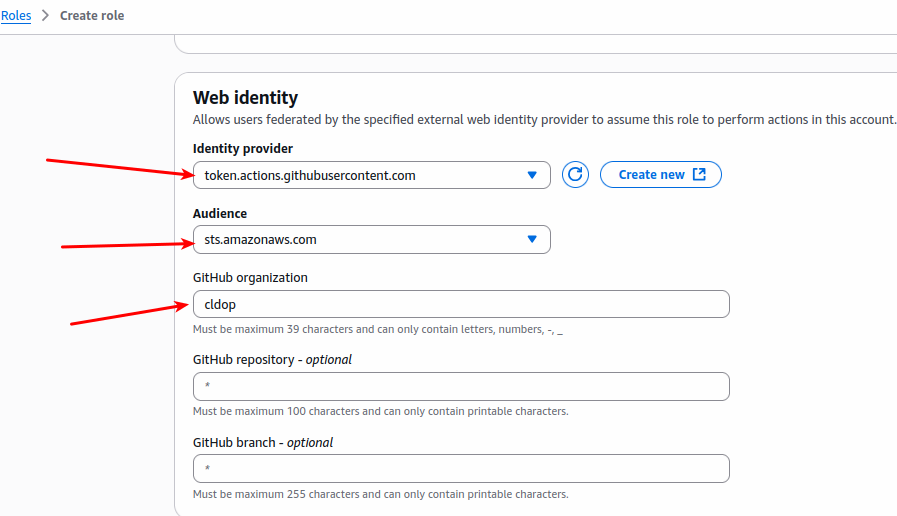
Next, select the trusted entity type “Web Identity” to log in to AWS with OIDC.
A web identity in AWS IAM allows an external service or user to authenticate with AWS using an OIDC token instead of traditional access keys.
Now, enter the web identity information. Under Github Organization, enter your Github organization ID.
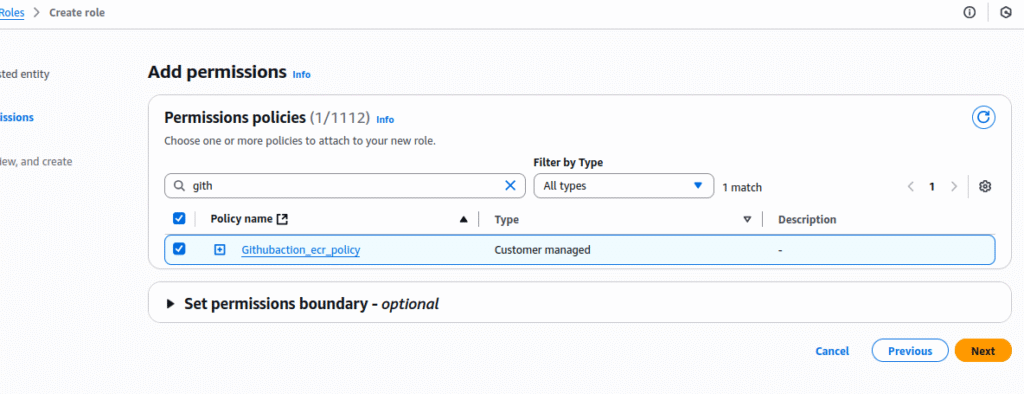
Next, add IAM permissions.Here we already created the Iam policy with the required ecr permission with the name Githubaction_ecr_policy
In the next page, enter the role name (eg, github-actions-aws-role), review the details and click create role.
This IAM Role is what your GitHub Actions workflow will assume, specifying exactly what actions it can perform within your AWS accountStep 4: Add the Official GitHub Thumbprint (Important!)
When you create an OIDC identity provider in AWS IAM for GitHub Actions, AWS needs a CA thumbprint to verify the TLS certificate for GitHub’s OIDC endpoint:
https://token.actions.githubusercontent.com
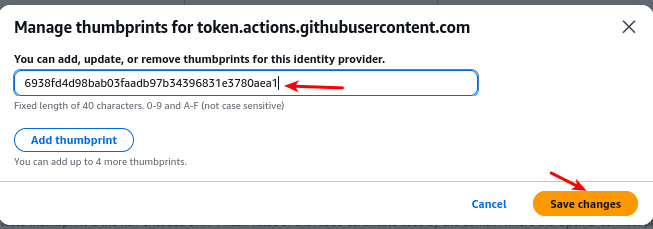
Official Thumbprint
The official thumbprint (recommended by GitHub) is:
6938fd4d98bab03faadb97b34396831e3780aea1
Why Replace the Auto-Generated Thumbprint?
To avoid trust issues later, always replace it with the official GitHub thumbprint.
AWS may auto-generate a thumbprint when you add the provider.
Sometimes this auto-generated value can be temporary or incorrect.
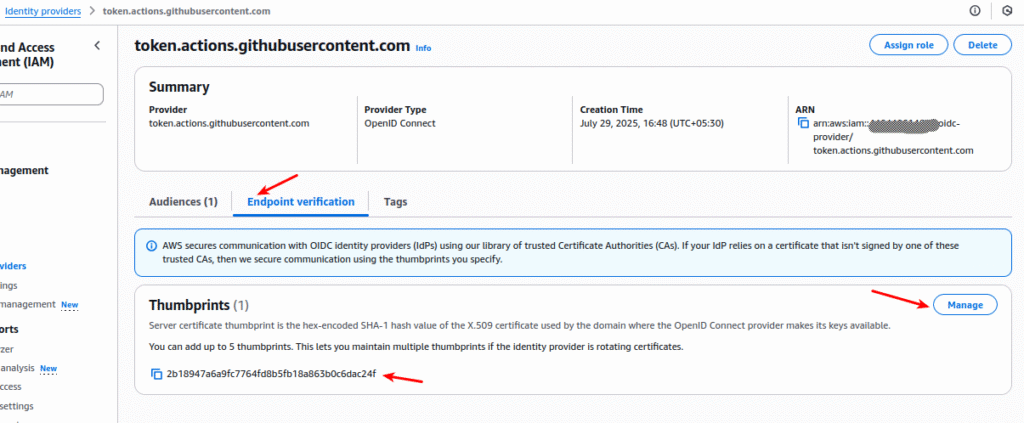
How to Replace It (Easy Steps)
- Go to IAM → Identity Providers and open your GitHub OIDC provider.
- Scroll down to Endpoint verification — you’ll see an auto-generated thumbprint.
- Click Manage → Edit Thumbprints.
- Delete the existing value and paste the official thumbprint:
Configure Kind cluster to access aws ECR repo
🛠️ Step 1: Create Kubernetes Docker Registry Pull Secret for ECR
To allow Kubernetes to pull images from your private ECR repositories, create a pull secret using the following steps:
# First, get an auth token from ECR
aws ecr get-login-password --region <region> | \
  docker login --username AWS \
  --password-stdin <account_id>.dkr.ecr.<region>.amazonaws.com

# Now create the Kubernetes secret
kubectl create secret docker-registry ecr-secret \
  --docker-server=<account_id>.dkr.ecr.<region>.amazonaws.com \
  --docker-username=AWS \
  --docker-password=$(aws ecr get-login-password --region <region>) \
  --docker-email=your-email@example.com \
  -n flask-app
✅ Now any pod in the flask-app namespace will automatically use the ECR pull secret when pulling images.
What all changes need to be done helm chart files ?
1.create new values yaml like aws-values.yaml with below contents
replicaCount: 1

imagePullSecrets:
  - name: ecr-secret # this is the created k8s secrets for ecr access
image:
  repository: <accountid>.dkr.ecr.us-east-1.amazonaws.com/react-frontend # replace with your account id & region
  tag: "1"
  pullPolicy: IfNotPresent

frontend:
  config:
    REACT_APP_BACKEND_URL: "http://172.18.0.2:32001" #replace with your node ip & port
backend:
  repository: <accountid>.dkr.ecr.us-east-1.amazonaws.com/flask-backend
  tag: "1"
  pullPolicy: IfNotPresent
imagePullSecrets
imagePullSecrets:
  - name: ecr-secret
Specifies the Kubernetes secret used to authenticate with a private container registry (Amazon ECR in this case).
The ecr-secret must contain ECR login credentials generated via aws ecr get-login-password.We done this in Configure Kind cluster to access aws ECR repo step
image (Frontend) & frontend
image:
  repository: <accountid>.dkr.ecr.us-east-1.amazonaws.com/react-frontend
  tag: "1"
  pullPolicy: IfNotPresent
repository: Points to your ECR image path for the React frontend. Replace <accountid> with your AWS account ID.make sure the ecr repo name is correct
tag: Defines which image version to deploy (1 = first build).
pullPolicy: IfNotPresent: Pulls the image only if not already present on the node, saving bandwidth.
2.update the Deployment template with imagePullSecrets value reference
deployment.yaml:
imagePullSecrets Reference
  template:
    metadata:
      labels:
        app: {{ .Release.Name }}-frontend
    spec:
      imagePullSecrets:
        {{- range .Values.imagePullSecrets }}
        - name: {{ .name }}
        {{- end }}
      containers:
        - name: myfrontend-app
image: "{{ .Values.image.repository }}:{{ .Values.image.tag }}"- Pulls secret name dynamically from
values.yaml. - Ensures both frontend and backend deployments use the same ECR credentials.
  template:
    metadata:
      labels:
        app: {{ .Release.Name }}-backend
    spec:
      nodeSelector:
        role: backend-db-node
      imagePullSecrets:
        {{- range .Values.imagePullSecrets }}
        - name: {{ .name }}
        {{- end }}
      containers:
        - name: mybackend-app
          image: "{{ .Values.backend.repository }}:{{ .Values.backend.tag }}"
complete deployment.yaml
apiVersion: apps/v1
kind: Deployment
metadata:
  name: {{ .Release.Name }}-frontend
  labels:
    app: {{ .Release.Name }}-frontend
spec:
  replicas: {{ .Values.replicaCount }}
  selector:
    matchLabels:
      app: {{ .Release.Name }}-frontend
  template:
    metadata:
      labels:
        app: {{ .Release.Name }}-frontend
    spec:
      imagePullSecrets:
        {{- range .Values.imagePullSecrets }}
        - name: {{ .name }}
        {{- end }}
      containers:
        - name: myfrontend-app
          image: "{{ .Values.image.repository }}:{{ .Values.image.tag }}"
          ports:
            - containerPort: {{ .Values.service.frontendPort }}
          volumeMounts:
            - name: config-volume
              mountPath: /usr/share/nginx/html/config.js
              subPath: config.js
      volumes:
        - name: config-volume
          configMap:
            name: {{ .Release.Name }}-frontend-config
---
apiVersion: apps/v1
kind: Deployment
metadata:
  name: {{ .Release.Name }}-backend
  labels:
    app: {{ .Release.Name }}-backend
spec:
  replicas: {{ .Values.replicaCount }}
  selector:
    matchLabels:
      app: {{ .Release.Name }}-backend
  template:
    metadata:
      labels:
        app: {{ .Release.Name }}-backend
    spec:
      nodeSelector:
        role: backend-db-node
      imagePullSecrets:
        {{- range .Values.imagePullSecrets }}
        - name: {{ .name }}
        {{- end }}
      containers:
        - name: mybackend-app
          image: "{{ .Values.backend.repository }}:{{ .Values.backend.tag }}"
          ports:
            - containerPort: {{ .Values.service.backendPort }}
          env:
            - name: POSTGRES_USER
              valueFrom:
                secretKeyRef:
                  name: postgres-secrets
                  key: POSTGRES_USER
            - name: POSTGRES_PASSWORD
              valueFrom:
                secretKeyRef:
                  name: postgres-secrets
                  key: POSTGRES_PASSWORD
            - name: POSTGRES_HOST
              value: "{{ .Values.backend.env.POSTGRES_HOST }}"
            - name: POSTGRES_PORT
              value: "{{ .Values.backend.env.POSTGRES_PORT }}"
            - name: POSTGRES_DB
              valueFrom:
                secretKeyRef:
                  name: postgres-secrets
                  key: POSTGRES_DB
Now your helm chart repo is ready for the deployment.
Configure github actions for cicd
Step 1: Open GitHub Actions in Your Repository
- Go to your application repository on GitHub.
- Navigate to Actions tab → Click New workflow (or “set up a workflow yourself”).
- This will open an editor where you can create
.github/workflows/deploy.yml
Step 2: Create the Workflow YAML File
.github/workflows/deploy.ymlname: Build, Push to ECR & Update Helm Charts
on:
  push:
    branches: [ main ]
  workflow_dispatch:
env:
  AWS_REGION: ${{ secrets.AWS_REGION }}
  AWS_ACCOUNT_ID: ${{ secrets.AWS_ACCOUNT_ID }}
permissions:
  id-token: write
  contents: read
jobs:
build-push-update:
runs-on: ubuntu-latest
steps:
# Step 1: Checkout application repository
- name: Checkout App Repository
uses: actions/checkout@v4
# Step 2: Configure AWS credentials via OIDC
- name: Configure AWS Credentials
uses: aws-actions/configure-aws-credentials@v4
with:
role-to-assume: ${{ secrets.AWS_OIDC_ROLE }}
aws-region: ${{ secrets.AWS_REGION }}
# Step 3: Login to Amazon ECR
- name: Login to Amazon ECR
id: login-ecr
uses: aws-actions/amazon-ecr-login@v2
# Step 4: Build & Push Backend + Frontend Images
- name: Build and Push Docker Images
env:
ECR_REGISTRY: ${{ steps.login-ecr.outputs.registry }}
IMAGE_TAG: build-${{ github.run_number }}
run: |
# Build Backend
cd k8s/flask-backend
docker build -t $ECR_REGISTRY/flask-backend:$IMAGE_TAG .
docker push $ECR_REGISTRY/flask-backend:$IMAGE_TAG
# Build Frontend
cd ../reactjs-frontend
docker build -t $ECR_REGISTRY/react-frontend:$IMAGE_TAG .
docker push $ECR_REGISTRY/react-frontend:$IMAGE_TAG
# Step 5: Checkout Helm Charts Repository
- name: Checkout Helm Charts Repository
uses: actions/checkout@v4
with:
  repository: cldop/cldop-helm-charts
  token: ${{ secrets.HELM_CHARTS_PAT }}
path: helmcharts
# Step 6: Update Helm Chart Image Tags
- name: Update Helm Charts
env:
IMAGE_TAG: build-${{ github.run_number }}
run: |
cd helmcharts/helmchart-twotierapp
# Configure git
git config user.name "GitHub Actions"
git config user.email "actions@github.com"
# Update frontend image tag
sed -i '/image:/,/frontend:/ s|tag: ".*"|tag: "'$IMAGE_TAG'"|' aws-values.yaml
# Update backend image tag
sed -i '/backend:/,$ s|tag: ".*"|tag: "'$IMAGE_TAG'"|' aws-values.yaml
# Show changes
echo "Updated aws-values.yaml:"
grep 'tag:' aws-values.yaml
# Commit and push changes
git add aws-values.yaml
git commit -m "🚀 Update images to $IMAGE_TAG" -m "Frontend: react-frontend:$IMAGE_TAG" -m "Backend: flask-backend:$IMAGE_TAG" -m "Source: ${{ github.repository }}@${{ github.sha }}"
git push
Workflow Overview
This workflow automates three key tasks:
- Build Docker images for the frontend and backend.
- Push images to Amazon ECR (private container registry).
- Update the Helm chart repository with the new image tags (triggers ArgoCD to deploy automatically).
Step-by-Step Breakdown
1. Workflow Triggers
on:
push:
branches: [ main ]
workflow_dispatch:
Runs automatically on every push to the main branch.
Can also be triggered manually using workflow_dispatch from GitHub Actions tab.
Environment Variables:
env:
AWS_REGION: ${{ secrets.AWS_REGION }}
AWS_ACCOUNT_ID: ${{ secrets.AWS_ACCOUNT_ID }}
Pulls AWS region and account ID from GitHub Secrets.
Used throughout the workflow for ECR login and image paths.
Permissions:
permissions:
id-token: write
contents: read
Grants permission to request OIDC tokens (for AWS login without storing keys).
Allows the workflow to read repository contents
Checkout Application Code:
uses: actions/checkout@v4
Clones the application repository (React + Flask code) into the runner.
Required before building Docker images.
Configure AWS Credentials :
uses: aws-actions/configure-aws-credentials@v4
Uses OIDC role (AWS_OIDC_ROLE) to authenticate with AWS.
No AWS keys are stored in GitHub Secrets — short-lived tokens are generated at runtime.
Login to Amazon ECR:
uses: aws-actions/amazon-ecr-login@v2
Authenticates Docker CLI to push images to Amazon ECR.
The registry URL (e.g., 1234567890.dkr.ecr.us-east-1.amazonaws.com) is saved for later steps.
Build and Push Docker Images:
docker build -t $ECR_REGISTRY/flask-backend:$IMAGE_TAG .
docker push $ECR_REGISTRY/flask-backend:$IMAGE_TAG
Builds the backend and frontend Docker images.
Tags images dynamically with build-<run_number> (e.g., build-15).
Pushes images to ECR for later use by Kubernetes.
Checkout Helm Charts Repository:
with:
repository: cldop/cldop-helm-charts
token: ${{ secrets.HELM_CHARTS_PAT }}
Checks out the separate Helm chart repository where Kubernetes deployment configs are stored.
Uses a Personal Access Token (PAT) to access private repos.
Update Helm Chart Image Tags:
sed -i '/image:/,/frontend:/ s|tag: ".*"|tag: "'$IMAGE_TAG'"|' aws-values.yaml
Updates the aws-values.yaml file with the new image tags for frontend and backend.
Commits and pushes these changes to the Helm repo.
ArgoCD detects the update and automatically redeploys to the Kubernetes cluster.
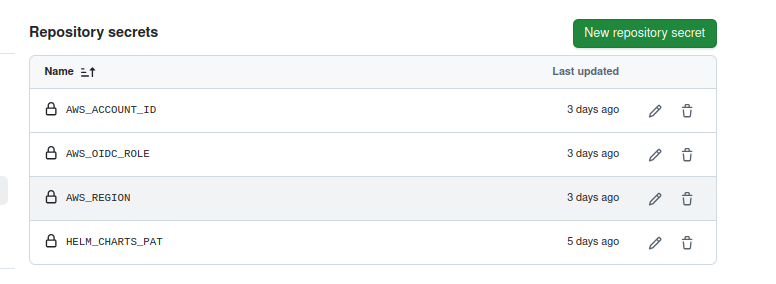
Key Secrets Required
- AWS_REGION – Your AWS region (e.g.,
us-east-1). - AWS_ACCOUNT_ID – Your AWS account ID (e.g.,
123456789012). - AWS_OIDC_ROLE – IAM role ARN configured for GitHub OIDC.
- HELM_CHARTS_PAT – GitHub Personal Access Token to update the Helm charts repo.
Step: Create GitHub Actions Secrets
Secrets in GitHub Actions store sensitive information (like AWS credentials, PATs, tokens) securely. They are encrypted and available only to workflows in your repository.
1. Go to Your Repository Settings
- Open your GitHub repository (e.g.,
devops-projects). - Click on Settings (top menu).
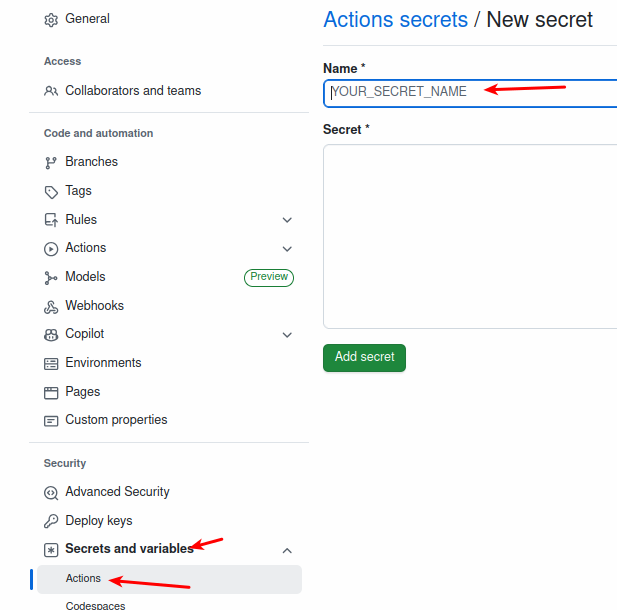
2. Access Actions Secrets
- In the left sidebar, click Secrets and variables → Actions.
- Click New repository secret.
3. Add a New Secret
- Name: Provide a clear name (e.g.,
AWS_REGION,AWS_ACCOUNT_ID,AWS_OIDC_ROLE,HELM_CHARTS_PAT). - Value: Paste the secret value (e.g., token, AWS account ID).
- Click Add secret to save it.
After creation it will look like :
Step: Trigger GitHub Actions & Verify the Pipeline
After configuring the workflow, secrets, and repository setup, let’s trigger the pipeline and test the end-to-end flow.
1. Trigger the GitHub Actions Workflow
- Automatic Trigger: Push a code change (e.g., modify
README.mdor update application code) to themainbranch. - Manual Trigger:
- Go to your repository → Actions tab.
- Select the workflow “Build, Push to ECR & Update Helm Charts”.
- Click Run workflow → main branch → Run workflow.
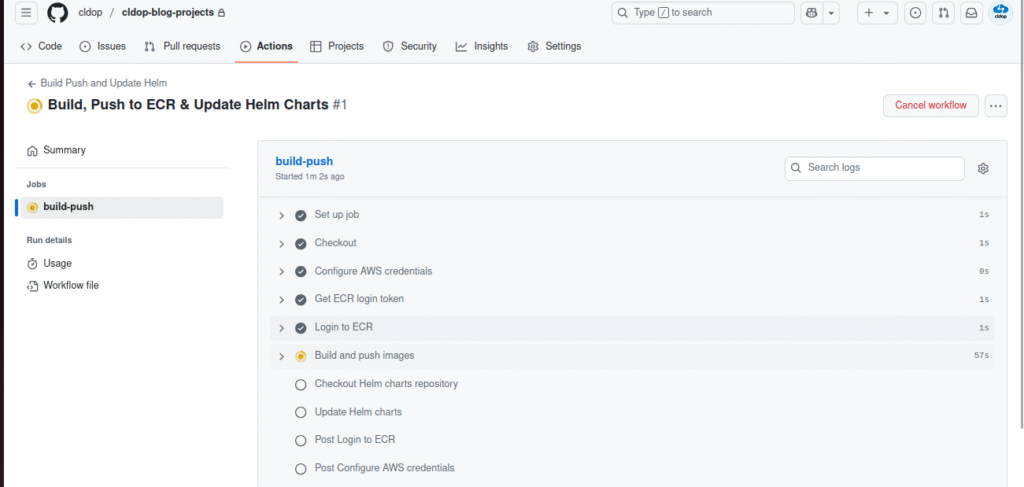
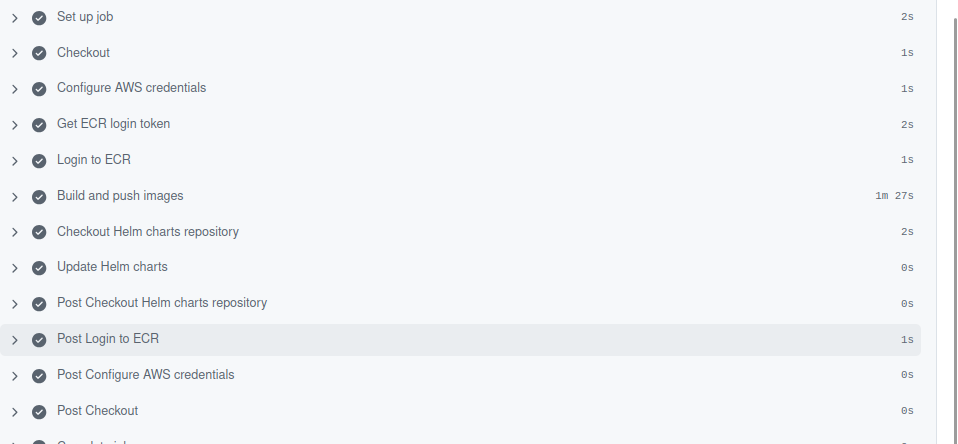
2. Monitor Workflow Execution
- Click on the running workflow to view logs.
- Ensure each step completes successfully:
- Build & push images to ECR
- Checkout Helm charts repo
- Update
aws-values.yamlwith new tags - Commit & push changes
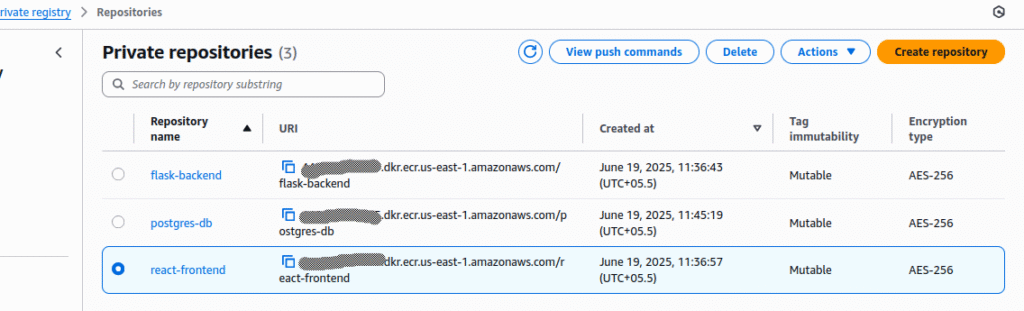
3. Verify Images in Amazon ECR
- Open AWS Console → ECR → Repositories.
- Check both:
react-frontendrepositoryflask-backendrepository
- Confirm new images with tags like
build-<run_number>(e.g.,build-12) are present.


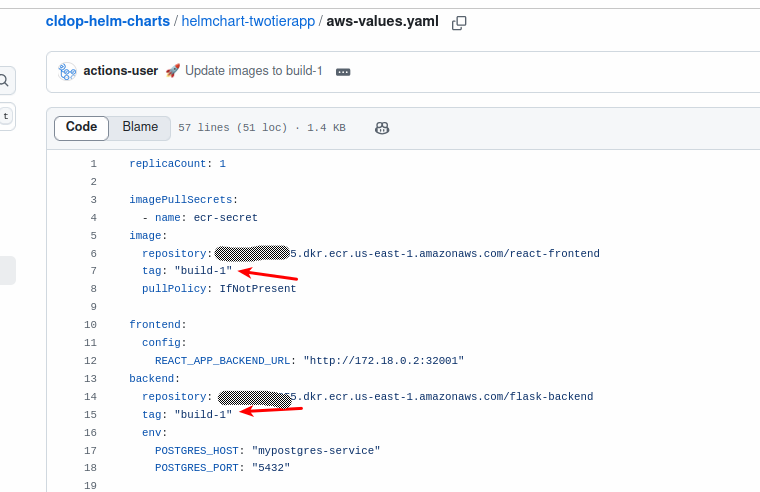
4. Verify Helm Charts Repository Update
- Open your
helm-chartsrepository in GitHub. - Navigate to
helmchart-twotierapp/aws-values.yaml. - Confirm:
- The
frontendandbackendimage tags are updated to the latestbuild-<run_number>. - Commit message shows
🚀 Update images to build-XX
- The
Step: Deploy Using ArgoCD After Helm Chart Update
Once the GitHub Actions workflow updates the Helm chart repository with new image tags, ArgoCD takes over to deploy the updated application to the Kubernetes cluster.
Step: Configure ArgoCD to Access Private Helm Chart Repo (SSH Key)
Since your Helm chart repository is private under your organization, ArgoCD must authenticate using SSH keys to pull the chart for deployments.
1.Generate SSH Key
ssh-keygen -t ed25519 -C "argocd-helm-repo" -f ./argocd-helm-key
2.Add Public Key to GitHub User Account
- Go to GitHub → Profile → Settings → SSH and GPG keys → New SSH key
- Paste the public key (
argocd-helm-key.pub) here. - Ensure the GitHub account used has read access to the
helm-chartsprivate repo in your organization.
- Add Private Key to ArgoCD
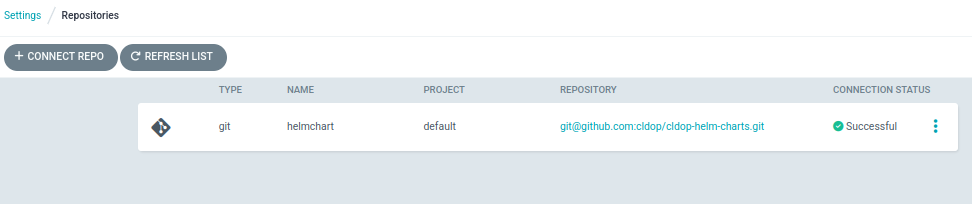
- Open ArgoCD UI → Settings → Repositories → Connect Repo.
- Select SSH as the connection method.
- Enter:
- . Name (mandatory for Helm):
Give any friendly name, e.g.,helm-repo(you already did this). - Project:
Leave asdefault(unless you’re using a custom ArgoCD project). - Repository URL:
- Use the SSH format for your private org repo-
git@github.com:<org>/helm-charts.git - SSH Private Key Data: Paste the contents of the private key you generated earlier:(
argocd-helm-key).
Save and verify the connection (status should show Successful).
Create ArgoCD Application (Using Helm Chart)
Once your Helm chart repo is connected in ArgoCD via SSH, follow these steps to create the application and deploy it:
1. Create New Application
- Click New App.
- Fill in details:
- Application Name:
flask-app(or any name). - Project:
default(unless using custom project). - Sync Policy: Automatic
- Application Name:
2. Configure Source (Helm Chart Repo)
- Repository URL:
git@github.com:<org>/helm-charts.git - Revision:
main(or branch you use for deployment) - Path:
helmchart-twotierapp(path of chart inside repo) - Value Files:
aws-values.yaml(file updated by GitHub Actions)
3. Configure Destination
- Cluster URL:
https://kubernetes.default.svc(default in-cluster URL) - Namespace:
default(or your target namespace)
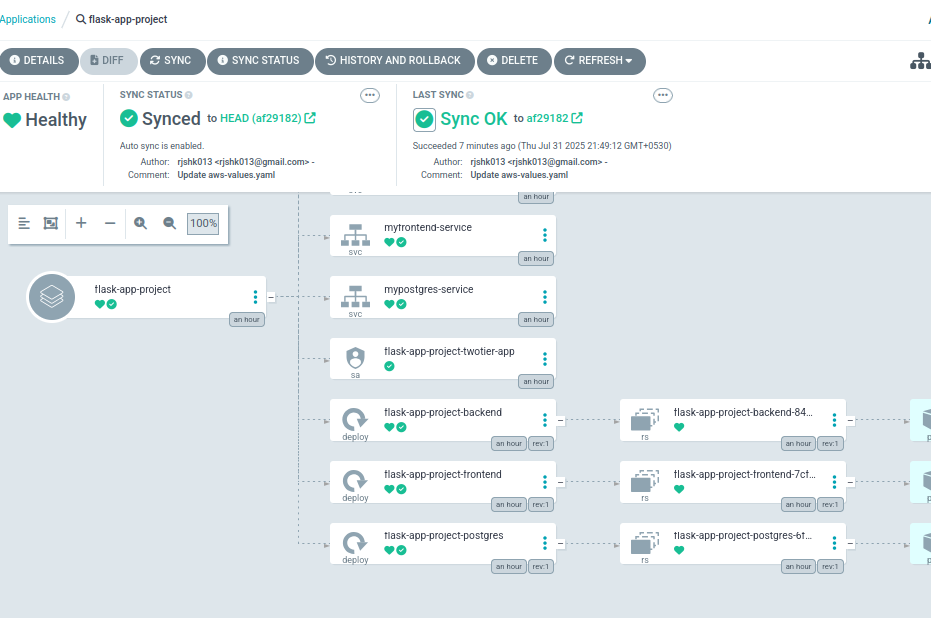
4. Create & Sync
- Click Create to register the application.
- ArgoCD will detect the chart and show app status (OutOfSync initially).
- Click Sync → ArgoCD will pull images (tags updated by GitHub Actions) and deploy to Kubernetes.
Conclusion
With this setup, we have successfully transformed our simple React + Flask application into a production-grade GitOps workflow by integrating Amazon ECR for secure image storage, GitHub Actions for automated CI, and ArgoCD for seamless CD. By separating application code and Helm charts into private organization repositories and leveraging OIDC and SSH for secure access, our pipeline is now fully automated, scalable, and secure—every code push triggers image builds, updates Helm values, and ArgoCD deploys the changes to Kubernetes in real time. This mirrors real-world enterprise practices and forms a strong foundation for future enhancements like multi-environment deployments, monitoring with Prometheus/Grafana, and advanced security hardening.

This guide is a goldmine for diving into live dealer games! For those juggling numbers, the AI Accounting Assistant could be a game-changer too-streamlining tasks while you focus on the thrill.