Part 2: Deploying a MERN Stack on AWS using Terraform Infrastructure Modules
🚀 CLDOP DevOps Learning Series : Part-2
Welcome to the CLDOP Real-World DevOps Project Series! Learn enterprise DevOps practices by building real applications that mirror professional environments.
In this second part of our MERN Stack DevOps journey, we shift focus from the application layer to the cloud infrastructure. Using Terraform, we’ll provision a production-ready environment on AWS using modular, reusable components.
💡 Goal: Automate the provisioning of secure, scalable infrastructure to deploy your MERN stack apps using AWS resources and Terraform public modules.
🛠️ What We’re Going to Build
In this Terraform-powered AWS infrastructure setup, we’ll create a production-ready environment to host our secure, containerized MERN stack application. Here’s a high-level breakdown of what we’ll provision step-by-step:
We are using official AWS Terraform modules to follow best practices and ensure maintainability, scalability, and security across all environments.
🌐 1. VPC Setup (Virtual Private Cloud)
We’ll create a custom VPC with both public and private subnets to isolate and secure resources.
🧳 2. EC2 Instances – Public & Private
- 🔐 VPN Server (Pritunl)
- Launched in the public subnet
- Hardened using User Data script
- Includes NGINX + Let’s Encrypt SSL
- Exposed via custom domain using Route 53
- 🚀 App Server (MERN Stack)
- Deployed in the private subnet
- Runs our Dockerized MERN app securely
- Accessible only via the VPN
🛡️ 3. Security Groups (Firewalls)
We’ll configure dedicated security groups for:
- VPN server (allowing HTTPS, OpenVPN, SSH from admin IPs)
- Private app server (restricted access via VPN or internal CIDR)
🌍 4. Route 53 DNS Record
A custom DNS record (vpn.ninz.store) will be created using Route 53 to point to our VPN server’s public IP.
🧾 5. Server Hardening & Automation
We’ll use User Data and null_resource remote scripts to:
- Harden SSH access (e.g., change port, disable root)
- Install and configure Pritunl + NGINX + SSL
- Ensure automation with secure access and minimal manual effort
✅ Remote Backend (S3) for storing Terraform state securely with versioning and encryption
✅ Terraform Workspaces for managing multiple environments like dev, stage, and prod
🧰 Prerequisites to Follow This Terraform Project
Before diving into the Terraform configuration for deploying the MERN stack on AWS, make sure the following prerequisites are in place.
1️⃣🖥️ Local Machine with Ubuntu 22.04 (Recommended)
All Terraform commands and automation will be executed from a local development machine running Ubuntu 22.04 LTS for consistency and compatibility.
2️⃣ SSH Key Pair for EC2 Access
You should have an SSH key pair created using the following command:
ssh-keygen -t rsa -b 4096 -f ~/.ssh/devserver_key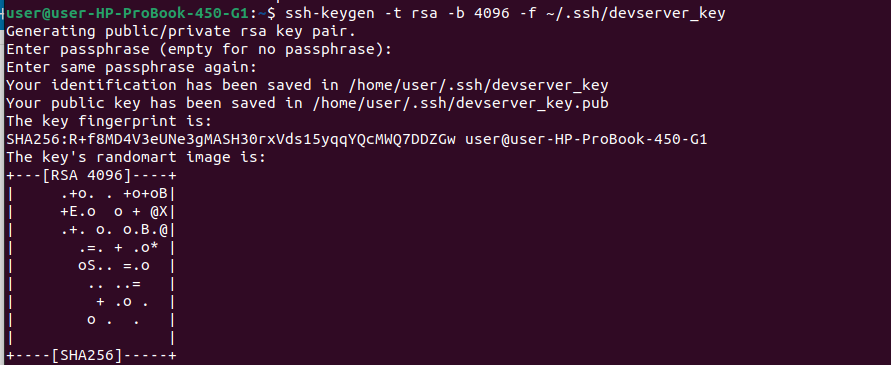
✅ This key will be referenced in your Terraform key_name variable and used for accessing your EC2 instances.
🔐 Why Use Your Own EC2 Key Pair (Production Best Practice)
Creating your own SSH key pair (instead of using AWS-generated .pem files) is a secure and scalable approach for production deployments.
✅ Key Advantages:
- Better Security: Your private key stays on your machine; only the public key is shared with AWS.
- Infra as Code: Key pairs are managed in Terraform, making setups reproducible and version-controlled.
- Operational Flexibility: Use the same key across regions and accounts without downloading multiple
.pemfiles. - Team-Friendly: Each user has their own key—no shared credentials or access confusion.
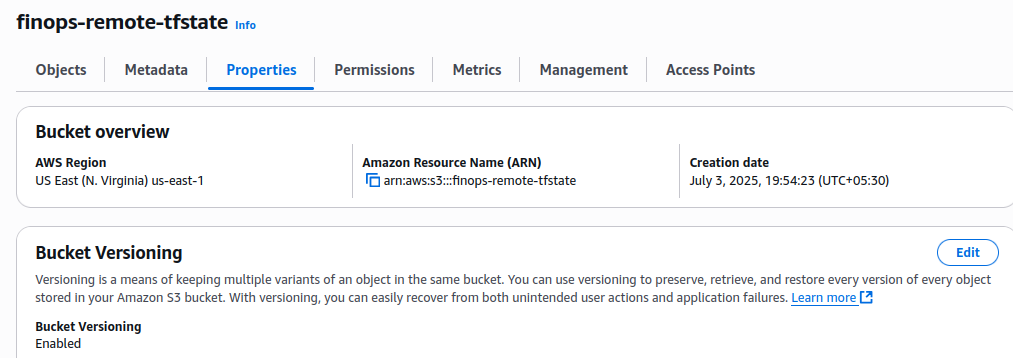
3️⃣ S3 Bucket for Remote Terraform State
Terraform will use an S3 bucket to store the state file remotely, which helps in:
- Collaboration across team members
- Preventing state conflicts
- Enabling workspace usage for multiple environments (
dev,stage,prod)
To align with production best practices, make sure your S3 bucket is:
🔒 Secured and Auditable:
- ✅ Versioning Enabled: Helps rollback to a previous state in case of corruption or accidental changes.
- ✅ Server-Side Encryption (SSE): Use AES-256 or AWS KMS for encrypting the state file at rest.
- ✅ Access Policies: Restrict access only to authorized IAM roles or users.
- ✅ Logging (Optional): Enable S3 access logs to monitor any access to the bucket.
You should have a bucket (like finops-remote-tfstate) already created in your selected AWS region — in this case, I used us-east-1
4️⃣ AWS CLI Configured with a Named Profile
Your local system should have the AWS CLI configured properly with credentials:
aws configure --profile defaultThe profile default should have enough IAM permissions to:
- Create and manage VPC, EC2,s3, Route 53, and Security Groups
❓ Why Did We Use a Named Profile for AWS Authentication?
We chose named profiles for authenticating Terraform with AWS because it’s a secure and flexible method, especially for local development.
🔐 Key Advantages:
- ✅ Supports multiple accounts using
~/.aws/credentials(e.g.,dev,prod) - 🔁 Easily switch environments with
aws_profile = "dev"in Terraform - 🔒 No hardcoded secrets in Terraform files or Git repositories
- 💻 Works offline after initial configuration — great for local development
- 🛡️ Credentials stay encrypted and managed by AWS CLI, not exposed directly
Using named profiles keeps your AWS access secure, modular, and production-ready
🚀 Alternative: IAM Instance Roles
When running Terraform from EC2
- No credential management – automatic authentication
- Temporary credentials with automatic rotation
- Fine-grained permissions via IAM policies
- No secrets in files – completely credential-less
5️⃣ Terraform Installed with Required Version
Ensure Terraform is installed and matches the version constraints in your required_version block:
terraform {
  # Terraform version requirement
  required_version = ">== 1.6.0"
You can check your version using:
terraform version
6️⃣ Valid Domain Name Registered for DNS Management
✔️ You must have a domain name purchased from providers like GoDaddy, Hostinger, or Namecheap.
📌 In this project, we’re using ninz.store (registered via Hostinger) to manage DNS using Route 53.
🚀 How to Start
Ready to launch your own secure, production-ready MERN stack infrastructure on AWS using Terraform? Follow these steps to get started 👇
📦 1️⃣ Clone the Project Repository
Start by cloning the complete project setup from GitHub:
git clone https://github.com/rjshk013/cldop-projecthub.git
cd cldop-projecthub/ecommerce-terraform
🔍 This folder contains all Terraform configurations you need to spin up infrastructure across environments.
📁 2️⃣ Understand the Folder Structure
Once inside the ecommerce-terraform folder, you’ll find:
🔹 environments/
This folder contains environment-specific configurations:
dev/— your development environmentstage/— staging setupprod/— production-ready configuration
Each of these will maintain its own remote state and can have specific overrides (like instance types, CIDRs, etc).
🔹 modules/
This folder already includes cloned official AWS Terraform modules used for:
- VPC
- EC2 Instances
- Security Groups
- Route53 Zones & Records
✅ No need to download modules separately — everything is bundled!
🗂️ 3️⃣ Terraform Folder Structure & Required Files for Infra Creation
Before diving into terraform apply, it’s important to understand the folder structure and purpose of each Terraform file in the dev/ environment directory.
📁 Path: ecommerce-terrafrom/environment/dev/
.
├── terraform.tf        # ✅ Combined file for backend, provider, version constraints
├── local.tf            # 🏷️ Local variables specific to this environment (naming, tags)
├── variables.tf        # 📥 All input variables with default or overridable values
├── data.tf             # 📡 Data sources (e.g., AMIs, existing VPC lookups)
├── main.tf             # 🏗️ Core infrastructure resources (VPC, EC2, SGs, Route53, etc.)
├── output.tf           # 📤 Outputs like instance IPs, hosted zone IDs, etc.
├── scripts/            # 📜 Bash scripts for EC2 hardening, Pritunl setup, Nginx/SSL
1.terrafrom.tf
terraform {
  # Terraform version requirement
  required_version = ">= 1.6.0"

  # Backend configuration for remote state
  backend "s3" {
    encrypt      = true
    bucket       = "finops-remote-tfstate"
    key          = "envs/dev/state.tfstate"
    region       = "us-east-1"
    use_lockfile = true


  }

  # Required providers
  required_providers {
    aws = {
      source  = "hashicorp/aws"
      version = "~> 6.0"
    }
  }
}

# AWS Provider configuration
provider "aws" {
  region  = var.aws_region
  profile = var.aws_profile

}
✅ 1. Terraform Version Locking
required_version = ">= 1.6.0"
- Why it’s good: Ensures consistency across developer machines and CI/CD environments.
- Best practice: Prevents unexpected behavior due to breaking changes in Terraform versions.
✅ 2. Remote State Management with S3
backend "s3" {
  bucket       = "finops-remote-tfstate"
  key          = "envs/dev/state.tfstate"
  region       = "us-east-1"
  encrypt      = true
  use_lockfile = true
}
Why it’s good:
- Centralized state file: Collaborators can access the same state.
encrypt = true: Enables encryption at rest for added security.use_lockfile = true: Prevents race conditions duringplan/apply.
✅ Production Best Practices Implemented:
- Uses an environment-based folder structure for the state file (
envs/dev/…) - Can scale easily across
dev,stage, andprodworkspaces
✅ 3. Provider Version Pinning
required_providers {
  aws = {
    source  = "hashicorp/aws"
    version = "~> 6.0"
  }
}
Why it’s good:
- Ensures compatibility with AWS resource types.
- Protects against untested upgrades that may break infrastructure.
✅ 4. Named AWS Profile for Secure Local Auth
provider "aws" {
  region  = var.aws_region
  profile = var.aws_profile
}
Why it’s good:
- Avoids hardcoding credentials in code.
- Supports multiple account access via AWS CLI (
~/.aws/credentials). - Works seamlessly with CI/CD environments and assumes roles when needed.
🧩 local.tf — Local Values in Terraform
This file defines reusable and centralized values that improve readability, reduce duplication, and make infrastructure more maintainable.
✅ What’s Inside and Why It’s a Best Practice
locals {
  azs = slice(data.aws_availability_zones.available.names, 0, var.az_count)
  name_prefix = "${var.project_name}-${var.environment}"

  common_tags = {
    Project     = var.project_name
    Environment = var.environment
    # Service     = var.service_name
    ManagedBy   = "terraform"
    Region      = var.aws_region
  }
}
1️⃣ Availability Zones (AZs) Selection
azs = slice(data.aws_availability_zones.available.names, 0, var.az_count)What it does: Dynamically selects var.az_count number of AZs from available ones in the region.
Why it’s good:
- Makes your code adaptable to different regions with varying numbers of AZs.
- Avoids hardcoding AZ names like
us-east-1a,us-east-1b, etc. - Scales easily across dev/stage/prod with different HA needs.
2️⃣ Naming Convention with name_prefix
name_prefix = "${var.project_name}-${var.environment}"
What it does: Combines project and environment to generate a consistent prefix (e.g., ecom-dev).
Why it’s good:
- Consistent naming across resources.
- Easier to identify resources per environment in AWS Console.
- Helps in tagging, monitoring, and billing.
3️⃣ Common Tags Block
common_tags = {
  Project     = var.project_name
  Environment = var.environment
  ManagedBy   = "terraform"
  Region      = var.aws_region
}
What it does: Defines a set of standard tags applied to all resources.
Why it’s good:
- Simplifies billing analysis (by project, environment, region).
- Enforces consistent resource labeling.
- Useful for compliance and cost tracking.
- The tag
ManagedBy = "terraform"indicates it’s managed via IaC.
📁 3. data.tf — Dynamic Data Sources in Terraform
Data sources allow Terraform to query existing information from AWS rather than hardcoding it — making your infrastructure more reliable, portable, and flexible.
data "aws_availability_zones" "available" {
  state = "available"
}

data "aws_ami" "ubuntu" {
  most_recent = true
  owners      = ["099720109477"]  # Canonical

  filter {
    name   = "name"
    values = ["ubuntu/images/hvm-ssd/ubuntu-jammy-22.04-amd64-server-*"]
  }

  filter {
    name   = "virtualization-type"
    values = ["hvm"]
  }

  filter {
    name   = "state"
    values = ["available"]
  }
}

data "aws_ami" "amazon_linux_2023" {
  most_recent = true
  owners      = ["amazon"]

  filter {
    name   = "name"
    values = ["al2023-ami-*-x86_64"]
  }

  filter {
    name   = "architecture"
    values = ["x86_64"]
  }
}
1️⃣ aws_availability_zones.available
data "aws_availability_zones" "available" {
  state = "available"
}
Why it’s good:
- Ensures your AZ selections are region-aware and up-to-date.
- Avoids hardcoding availability zones, which improves portability.
- Used in your
locals.tffor dynamic AZ slicing based onvar.az_count.
2️⃣ aws_ami.ubuntu — Ubuntu AMI Lookup
data "aws_ami" "ubuntu" {
  most_recent = true
  owners      = ["099720109477"]  # Canonical

  filter {
    name   = "name"
    values = ["ubuntu/images/hvm-ssd/ubuntu-jammy-22.04-amd64-server-*"]
  }

  ...
}
Why it’s a best practice:
- Selects the latest official Ubuntu 22.04 AMI from Canonical.
- No need to manually update AMI IDs.
- Filters ensure it’s an HVM SSD-backed instance — compatible with most EC2 types.
3️⃣ aws_ami.amazon_linux_2023 — Amazon Linux 2023 Lookup
data "aws_ami" "amazon_linux_2023" {
  most_recent = true
  owners      = ["amazon"]

  ...
}
Best Practice Highlight:
- Fetches the most recent Amazon-maintained AMI.
- Useful when you’re using hardened, minimal OS for services like Pritunl.
- Architecture-specific filtering ensures compatibility.
🧠 Why Use Data Sources Instead of Hardcoding?
- No AMI ID maintenance needed when AWS updates images.
- Region-independent logic – works across
dev,stage,prod. - Helps keep your infrastructure automated, up-to-date, and secure.
📄 variables.tf — Centralized Config & Easy Customization
This file defines all the input variables required by our Terraform configuration. Keeping all variables in one place makes your setup clean, maintainable, and portable.
variable "aws_region" {
  description = "AWS Region"
  type        = string
  default     = "us-east-1"
}

variable "aws_profile" {
  description = "The AWS CLI profile to use"
  type        = string
  default     = "default"
}
variable "az_count" {
  description = "Number of availability zones to use"
  type        = number
  default     = 2

  validation {
    condition     = var.az_count >= 1 && var.az_count <= 6
    error_message = "AZ count must be between 1 and 6."
  }
}
#####naming convention##################
variable "project_name" {
  description = "project name."
  type        = string
  default     = "finops"
}

variable "environment" {
  description = "Environment"
  type        = string
  default     = "dev"

  validation {
    condition     = contains(["dev", "staging", "prod"], var.environment)
    error_message = "Environment must be dev, staging, or prod."
  }
}

variable "stage" {
  description = "Stage of the deployment."
  type        = string
  default     = "dev"
}


##network ######
variable "vpc_cidr" {
  description = "(Optional) The IPv4 CIDR block for the VPC. CIDR can be explicitly set or it can be derived from IPAM using `ipv4_netmask_length` & `ipv4_ipam_pool_id`"
  type        = string
  default     = "10.0.0.0/16"
}
variable "enable_nat_gateway" {
  description = "Enable NAT Gateway"
  type        = bool
  default     = true
}

variable "single_nat_gateway" {
  description = "Use single NAT Gateway (cost optimization)"
  type        = bool
  default     = true
}

variable "enable_vpn_gateway" {
  description = "Enable VPN Gateway"
  type        = bool
  default     = false
}

variable "enable_dns_hostnames" {
  description = "Enable DNS hostnames"
  type        = bool
  default     = true
}

variable "enable_dns_support" {
  description = "Enable DNS support"
  type        = bool
  default     = true
}


# variables.tf - Add VPN specific variables
variable "vpn_instance_type" {
  description = "Instance type for VPN server"
  type        = string
  default     = "t3.small"

  validation {
    condition = contains(["t3.micro", "t3.small", "t3.medium"], var.vpn_instance_type)
    error_message = "VPN instance type must be t3.micro, t3.small, or t3.medium."
  }
}

variable "vpn_port" {
  description = "Port for VPN connections"
  type        = number
  default     = 1194
}

variable "ssh_port" {
  description = "Custom SSH port for security"
  type        = number
  default     = 22
}

variable "admin_allowed_ips" {
  description = "List of IP addresses allowed admin access"
  type        = list(string)
  default     = [
    "103.175.88.98/32",  # Replace with your office IP
    "103.175.88.75/32"   # Replace with your home IP
  ]

  validation {
    condition = length(var.admin_allowed_ips) > 0
    error_message = "At least one admin IP must be specified for security."
  }
}

variable "vpn_client_cidr" {
  description = "CIDR block for VPN clients (configure this in Pritunl)"
  type        = string
  default     = "10.0.4.0/24"
}

variable "public_key_path" {
  description = "Path to your local public key file"
  type        = string
  default     = "~/.ssh/devserver_key.pub"
}
####R53  ##############

variable "domain_name" {
  description = "Domain name for the hosted zone"
  type        = string
  default     = "ninz.store"
}
✅ Highlights of Good Practices
- Validations: Ensures values like AZ count and environment are within acceptable ranges.
- Defaults: Reasonable defaults like
us-east-1,t3.small, anddevmake it beginner-friendly. - Tagging Logic: Combined with
locals.tf, naming conventions and tagging are automated.
| Variable | What You Should Update |
|---|---|
aws_profile | Your AWS CLI named profile (default, prod, etc.) |
project_name | Your unique project name (e.g., ecom, crm) |
admin_allowed_ips | Add your own static IPs for secure SSH & VPN access(you will get it from what is my ip) |
public_key_path | Path to your SSH public key (used in EC2 key pair creation).In my case it is ~/.ssh/devserver_key.pub |
domain_name | Your purchased domain (e.g., ninz.store) for Route 53 |
keep the rest of the variables as it is for the easy implementation
🧱 main.tf — Terraform’s Core Blueprint for Infra Creation
This is the most critical file in your project. It defines the actual AWS infrastructure we’re going to provision using modular, production-grade practices. Here’s a breakdown of what it includes and how it works 👇
✅ What Are We Doing in main.tf?
We are:
- Spinning up a VPC with public and private subnets across multiple AZs.
- Launching two EC2 instances:
- A Pritunl VPN Server in the public subnet.
- An App Server (for MERN stack) in the private subnet.
- Creating security groups with least privilege rules.
- Registering a Route53 DNS record (like
vpn.ninz.store) for the VPN instance. - Using user data scripts to automatically configure and harden both EC2 servers on launch.
- Following strict security practices (metadata hardening, custom SSH ports, IP whitelisting, etc).
🔍 Detailed Breakdown of main.tf Components
1️⃣ VPC Module
module "vpc" {
  source = "../modules/terraform-aws-vpc"
  ...
}
- Uses the official AWS VPC module.
- Automatically creates public and private subnets using
cidrsubnet()logic. - Respects your
az_countto deploy in multiple AZs. - Enables NAT Gateway (single NAT in non-prod for cost savings).
- Enables DNS support and hostname resolution.
✅ Best Practice: CIDR logic is dynamically generated per AZ — no manual subnetting needed.
2️⃣ Security Groups
We define two security groups:
- VPN Server SG:
- Allows OpenVPN (UDP 1194)
- Allows HTTPS access for the Pritunl UI
- SSH access is limited to your
admin_allowed_ips - Open HTTP for bootstrapping (can be closed later)
- Private Resources SG:
- Allows full access only from VPN clients or VPN server
- Ensures app server is isolated from public internet
✅ Best Practice: Granular, least-privilege SG rules instead of blanket 0.0.0.0/0
✅ Note: We’ve temporarily allowed wide access on port 80 (HTTP) to facilitate Let’s Encrypt SSL certificate verification. Once the certificate is issued, we’ll restrict this access to maintain tight security.
3️⃣ Key Pair Resource
resource "aws_key_pair" "devserver" { ... }
- Reads your local public SSH key and uploads it to AWS as a key pair.
- Ensures idempotency with
create_before_destroy. - No need to manage
.pemfiles from AWS — use your own!
✅ Best Practice: Local SSH key ensures better operational control and avoids sharing AWS-generated credentials.
4️⃣ EC2 – VPN Server (Pritunl)
module "vpn_server" { ... }
- Launched in public subnet
- Uses Amazon Linux 2023
- Exposes OpenVPN, SSH (custom port), and HTTPS admin UI
- Uses
user_datato:- Harden SSH (disable root, change SSH port, etc.)
- Install & configure Pritunl VPN server
- Tags, metadata, block device encryption all set
✅ Best Practice: Hardened SSH config, private key control, encrypted volume, and minimal IAM permissions.
5️⃣ EC2 – App Server (Private)
module “private_instance” { … }
- Launched in private subnet
- Uses Ubuntu 22.04 (via official Canonical AMI)
- No public IP
- Access only through VPN
- Configured with
user_datascript to harden instance and prepare it for app deployment
✅ Best Practice: No public exposure, uses secured metadata, preps for Dockerized app.
6️⃣ Route53 DNS Record
resource "aws_route53_record" "vpn_server_a_record" { ... }
- Automatically creates a DNS A record like
vpn.ninz.storepointing to the public IP of your VPN instance.
✅ Best Practice: Clean, branded domain access to your VPN instead of managing IPs manually.
| Section | What to Change |
|---|---|
var.public_key_path | Your actual public key path (e.g., ~/.ssh/mykey.pub) |
var.admin_allowed_ips | Replace with your own static IPs to allow SSH/VPN admin access |
var.domain_name | Your actual registered domain (e.g., yourdomain.com) |
source paths for modules | Update if using different folder structure or repo |
vpn_server_a_record.name | Change subdomain (vpn) if you prefer something else |
🧠 Why This is Production-Ready
- Modular, reusable code using Terraform Registry’s verified modules
- Designed for multi-environment deployments (
dev,stage,prod) - Follows best practices for:
- Networking
- Access control
- Server hardening
- Tagging
- DNS management
- Easy to extend — you can plug in RDS, ALB, EFS, or other AWS resources later
📤 Terraform Output Configuration
Your outputs.tf file consolidates and exposes critical infrastructure details after deployment — perfect for validations, CI/CD, or downstream modules. Here’s a breakdown of what’s covered and why it’s useful in production setups.
What’s Inside outputs.tf
output "infrastructure_summary" {
  description = "Complete infrastructure summary"
  value = {
    # Environment Information
    environment     = var.environment
    project_name    = var.project_name
    region          = var.aws_region

    # VPC Information
    vpc = {
      id   = module.vpc.vpc_id
      cidr = module.vpc.vpc_cidr_block
    }

    # Subnet Information
    subnets = {
      private = {
        ids   = module.vpc.private_subnets
        cidrs = module.vpc.private_subnets_cidr_blocks
        count = length(module.vpc.private_subnets)
      }
      public = {
        ids   = module.vpc.public_subnets
        cidrs = module.vpc.public_subnets_cidr_blocks
        count = length(module.vpc.public_subnets)
      }
    }

    # NAT Gateway Information
    nat_gateways = {
      ids           = module.vpc.natgw_ids
      elastic_ips   = module.vpc.nat_public_ips
      count         = length(module.vpc.natgw_ids)
      configuration = var.environment == "prod" ? "multi-az" : "single"
    }

    # Network Gateways
    gateways = {
      internet_gateway = module.vpc.igw_id
      nat_gateways     = module.vpc.natgw_ids
    }
  }
}

output "security_group_info" {
  description = "Security group information"
  value = {
    # VPN Server Security Group
    vpn_server_sg_id = module.vpn_server_sg.security_group_id
    vpn_server_sg_arn = module.vpn_server_sg.security_group_arn
    vpn_server_sg_name = module.vpn_server_sg.security_group_name

    # Private Resources Security Group
    private_resources_sg_id = module.private_resources_sg.security_group_id
    private_resources_sg_arn = module.private_resources_sg.security_group_arn
    private_resources_sg_name = module.private_resources_sg.security_group_name
  }
}

output "vpn_server_info" {
  description = "VPN server information with security group details"
  value = {
    # Instance Information
    public_ip    = module.vpn_server.public_ip
    private_ip   = module.vpn_server.private_ip
    instance_id  = module.vpn_server.id

    # Access Information
    #admin_url    = "https://${module.vpn_server.public_ip}"
    ssh_command  = "ssh -p ${var.ssh_port} -i your-key.pem ec2-user@${module.vpn_server.public_ip}"

    # Security Group Information
    security_group_id   = module.vpn_server_sg.security_group_id
    security_group_name = module.vpn_server_sg.security_group_name

    # Network Configuration
    ssh_port = var.ssh_port
    vpn_port = var.vpn_port
    admin_allowed_ips = var.admin_allowed_ips
    vpn_client_cidr = var.vpn_client_cidr
  }
}

output "private_instance_id" {
  description = "ID of the private EC2 instance"
  value       = module.private_instance.id
}

output "private_instance_private_ip" {
  description = "Private IP address of the private instance"
  value       = module.private_instance.private_ip
}

output "private_instance_sg_id" {
  description = "Security group ID for private instance"
  value       = module.vpn_server_sg.security_group_id
}

output "ninzstore_zone_name_servers" {
  description = "Route53 NS records for ninz.store"
  value       = module.ninzstore_zone.route53_zone_name_servers["ninz.store"]
}
output "ninzstore_zone_id" {
  description = "Hosted Zone ID for ninz.store"
  value       = module.ninzstore_zone.route53_zone_zone_id["ninz.store"]
}
✅ infrastructure_summary
Provides a complete snapshot of the deployed VPC setup, including:
- Environment & region
- VPC ID & CIDR block
- Public/private subnet IDs and CIDRs
- NAT Gateway setup (
singlefor cost-efficiency in non-prod,multi-azfor HA in prod) - Gateway details (Internet/NAT)
👉 Why it’s useful: Helps you understand the network topology at a glance. Ideal for quick verification or sharing infra details with team members.
✅ security_group_info
Outputs both VPN and private instance security group metadata:
- Group IDs, names, and ARNs for better traceability and documentation.
👉 Best Practice: Referencing outputs like this makes it easy to use these SG IDs in future modules or external systems like monitoring and alerting.
✅ vpn_server_info
Includes:
- Public & private IPs
- Instance ID
- A ready-to-copy SSH command
- VPN and SSH port config
- Admin IPs and VPN client subnet
👉 Best Practice: Exposing SSH command this way enhances user experience during provisioning. You can instantly copy & connect without memorizing config.
✅ Private EC2 Instance Outputs
- Instance ID, Private IP, and Security Group ID
👉 Useful for:
- Debugging
- Internal connectivity testing
- Integrations with CI/CD or monitoring agents
✅ Route53 DNS Outputs
ninz.storeName Servers- Hosted Zone ID
👉 Helps automate domain delegation and updates at your domain provider (e.g., Hostinger). You can plug these into your DNS portal without manual digging.
✅ Conclusion: You’re All Set for the Next Step!
In this part of the project, we laid a solid foundation for building a production-ready AWS infrastructure using Terraform. We:
- Defined all required Terraform files (
main.tf,variables.tf,outputs.tf, etc.) - Followed best practices for security, modularity, and scalability
- Configured remote state backend with versioned and encrypted S3 bucket
- Integrated custom key pairs, secure SSH access, multiple environments, and custom Route53 DNS records
- Prepared everything with clean structure and reusable code blocks using Terraform official modules
🔧 Your environment is now fully prepped for implementation!
📦 What’s Next?
In Part 3, we’ll:
- Create and manage Terraform workspaces for different environments (
dev,stage,prod) - Run Terraform commands to provision the actual infrastructure
- Verify and access your VPN & App servers securely
So, until then, make sure:
- All required values are updated in your configuration
- You’ve cloned the repo and reviewed the folder structure
- Your system is ready to run Terraform with your configured AWS credentials
🚀 Stay tuned — the real deployment magic begins in the next part!


Great article! It’s refreshing to see such a clear breakdown of how AI can simplify decision-making. If you’re diving deeper into AI-powered tools, check out AI powered solutions-they’re a game-changer for productivity.