Part 3: Deploying a MERN Stack on AWS using Terraform Infrastructure
🔄 Update
- Added a post-verification script to ensure all configurations (including Pritunl setup and hardening) are correctly applied after provisioning.
- Modified the VPN server’s public IP to use an Elastic IP to retain the IP address even after stopping and starting the instance.
Welcome to Part 3 of our real-world DevOps project series! 👋
In the previous Part 2, we built a production-ready AWS infrastructure for a secure MERN stack application using reusable Terraform modules and best practices.
But building infra is just the beginning…
In this part, we’ll take things a step further by introducing one of Terraform’s most powerful features — Workspaces 🧠.
✅ Want to deploy to multiple environments like dev, stage, and prod — without duplicating code?
✅ Need clean state management and environment isolation with the same .tf files?
✅ Looking to switch between environments with just a single command?
🎯 This is where Terraform Workspaces shine.
In this part, you’ll learn:
- 🛠️ How to use Terraform Workspaces with environment-specific backends
- 📁 How our folder structure enables clean separation of
dev,stage, andprod - 🔄 How to switch environments dynamically and deploy confidently
- 🔒 How our secure and hardened VPN setup (Pritunl) fits into this multi-env model
By the end of this guide, you’ll be able to spin up multiple isolated environments using the same Terraform codebase — a must-have skill for production-grade deployments.
🔐 Server Configuration & Hardening Scripts
To ensure our infrastructure is secure and production-ready from Day 1, we use custom shell scripts passed as user_data to the EC2 instances via Terraform. Below are the two key scripts:
🧩 1. pritunl-config-harden.sh (VPN Server)
This script is executed on the VPN EC2 instance to:
- ✅ Install and configure MongoDB 8.0 and Pritunl on Amazon Linux 2023
- 🔒 Secure MongoDB with a dedicated root user, and update
pritunl.confwith encoded credentials - 🧰 Enable NGINX reverse proxy compatibility
- 🔐 Apply SSH hardening:
- Change default ssh port from 22 to custom 22022
- Disable root login and password auth
- 🔥 Configure strict firewall rules (allow only required ports)
- 🚫 Disable IPv6 and set kernel-level sysctl parameters to block spoofing and ICMP floods
✅ This ensures our VPN server is both functional and hardened for production use
🛠️ 2. ubuntu_hardening.sh (Private App Server)
This script is used for Ubuntu-based private EC2 instances:
- 🧱 Updates the system and installs latest packages
- 🐳 Installs Docker CE along with its dependencies
- 🔐 Applies essential server hardening:
- Disables root login, password auth, and empty passwords
- 🔒 Enables UFW firewall with only SSH (22), HTTP (80), and HTTPS (443) allowed
✅ This prepares the app server for Docker-based deployments in a secured environment
💡 Note: These scripts are passed to EC2 instances via Terraform’s user_data parameter using templatefile() for dynamic values like port, hostname, and admin IPs.
Clone the Project Repository
Start by cloning the complete project setup from GitHub:
git clone https://github.com/rjshk013/cldop-projecthub.git
cd cldop-projecthub/ecommerce-terraform
This folder contains all Terraform configurations you need to spin up infrastructure across environments.
🧪 Running Terraform Workspaces & Commands
Now that our reusable Terraform modules and environment-agnostic variables are in place, it’s time to create environment-specific infrastructure using Terraform workspaces.
🗂️ Why Workspaces?
Terraform workspaces allow us to manage multiple environments (like dev, stage, prod) from the same codebase, but with separate remote state files, ensuring clean separation of resources.
🔧 Step-by-Step Commands
Here’s how to get started:
1. Initialize Terraform
terraform initThis command sets up the backend, installs required providers, and prepares your working directory.
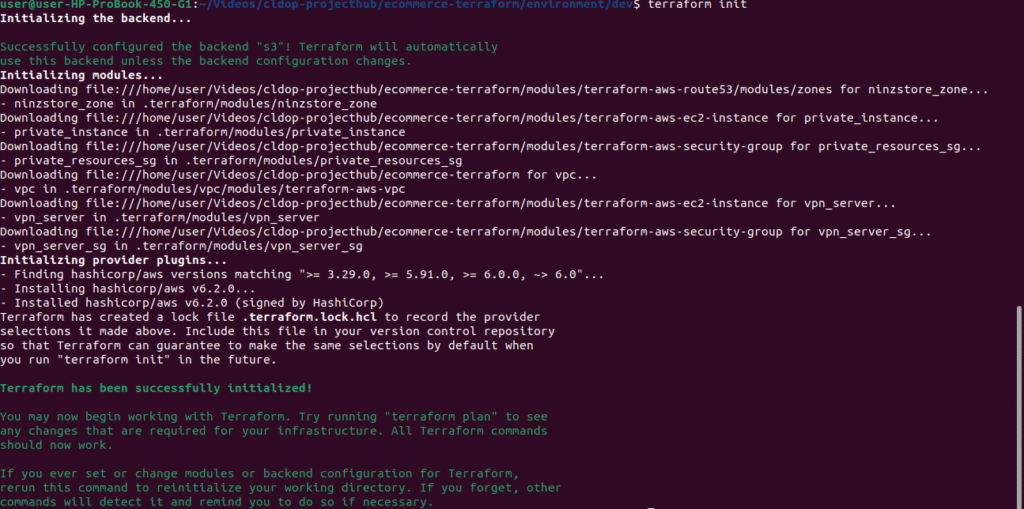
✅ What Just Happened?
- 📦 Module Sources: Terraform successfully downloaded all required modules from local paths.
- 🔐 Backend Configured: Remote state backend (S3) was configured properly.
- 📄 Lock File Created:
.terraform.lock.hclensures consistent provider versions across all environments. - 🟢 Ready to Proceed: You’re all set to move on to the
terraform workspace,plan, andapplycommands for provisioning your cloud infrastructure.
In the next step, we’ll create and select workspaces to deploy isolated environments like dev, prod, etc.
2. Create a New Workspace
Let’s create a dev workspace:
terraform workspace new dev
You can verify the active workspace:
terraform workspace show

You can also create stage, prod, etc., later. This creates a separate state for each environment.
terraform workspace new stage
terraform workspace new prod
3 .Switch to the Workspace (dev in our case)
terraform workspace select dev
Why Use Workspaces?
- Isolates environment-specific states (
dev.tfstate,prod.tfstate, etc.) - Uses the same Terraform code for all environments
- Keeps infrastructure modular and scalable
✅ Now that your workspace is set, you’re ready to run terraform plan and terraform apply to provision resources for the selected environment.
🔍 Verifying Terraform Workspaces in Remote S3 Backend
When using S3 as a remote backend, Terraform automatically manages separate state files for each workspace. You can verify this by checking your S3 bucket.
✅ Step 1: Go to Your S3 Bucket
Navigate to the AWS S3 Console and open the bucket defined in your backend config (e.g., mern-ecommerce-terraform-state).
✅ Step 2: Check the Path Structure
Terraform stores each workspace’s state under a folder path like:
<bucket-name>/<key>/<workspace-name>/terraform.tfstateFor example, if your key is set like this in backend.tf:
key = “terraform.tfstate”
Then the actual S3 structure will look like:
env/dev/terraform.tfstate
env/prod/terraform.tfstate
⚠️ Terraform dynamically injects the workspace name (e.g., dev, prod) between env/ and terraform.tfstate
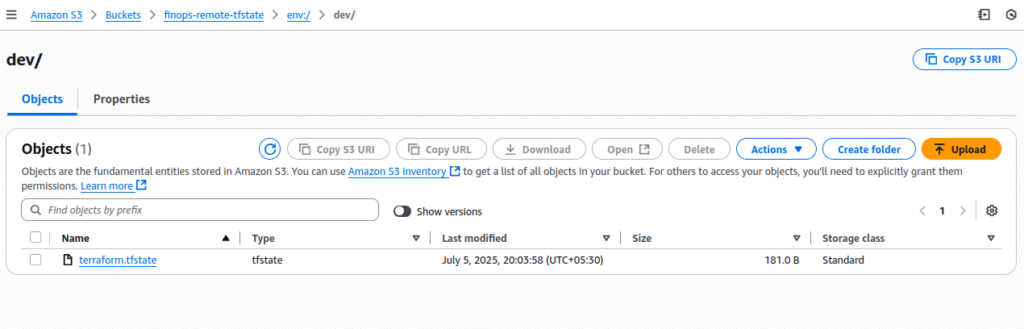
Even before running
terraform apply, Terraform creates a minimal remote state file duringinitand workspace creation — isolating state per workspace likedev/terraform.tfstate,prod/terraform.tfstate, etc.
2. Run Terraform Plan
This step shows what Terraform will create, update, or destroy — without actually applying changes.
terraform plan -out=tfplanThis command:
- Validates the config
- Shows resource actions (Create / Modify / Destroy)
- Saves the plan in
tfplanfile for reproducibility
🚀 3. Apply the Plan
Now provision the infrastructure:
terraform apply This will:
- Create the VPC, Subnets, Internet/NAT Gateways
- Launch the hardened EC2 instances (Pritunl server + App server)
- Configure Security Groups
- Register Route53 domain + records
- Upload and store state to S3 under
dev/terraform.tfstate
Always make sure you have selected the correct workspace & enter yes
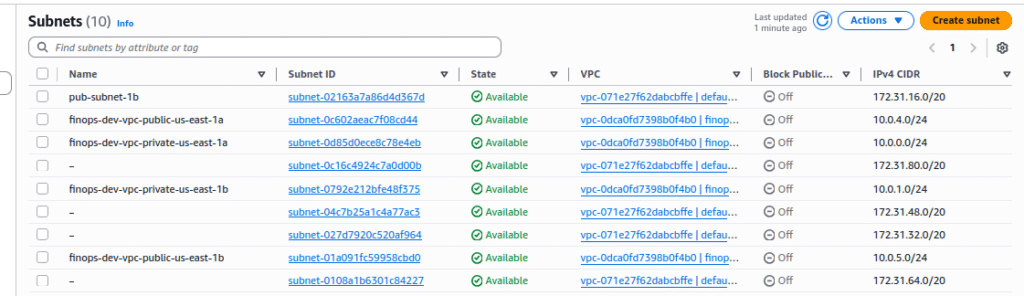
✅ Step: Verifying Terraform-Created Resources
After running terraform apply, always validate the resources to ensure:
- They exist
- They match the intended configuration
- They are connected properly (VPC, EC2, Security Groups, etc.)
🌐 2. Confirm in AWS Console
EC2 Instances:
VPN server (Amazon Linux) with public IP
Private instance (Ubuntu) without public IP

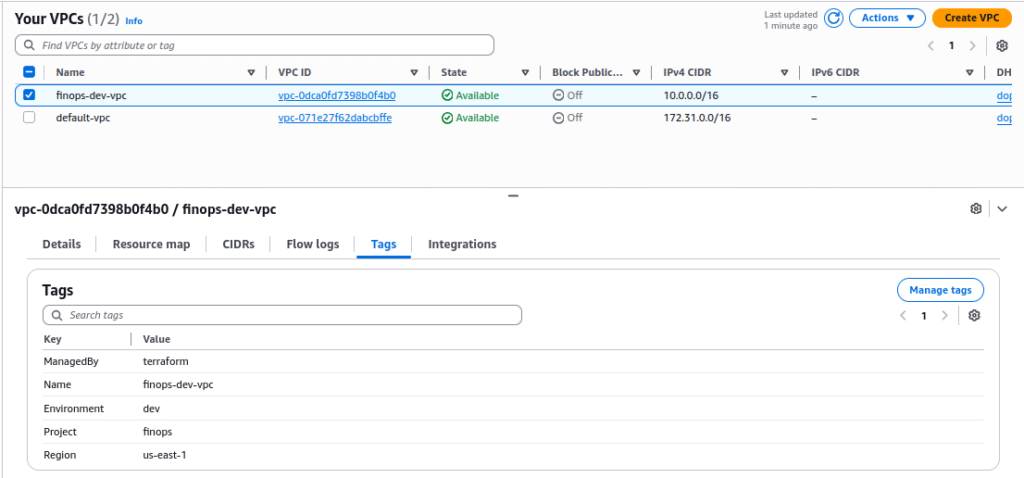
VPC:
- Named as
finops-dev(based on your prefix) - Should have 2 public & 2 private subnets
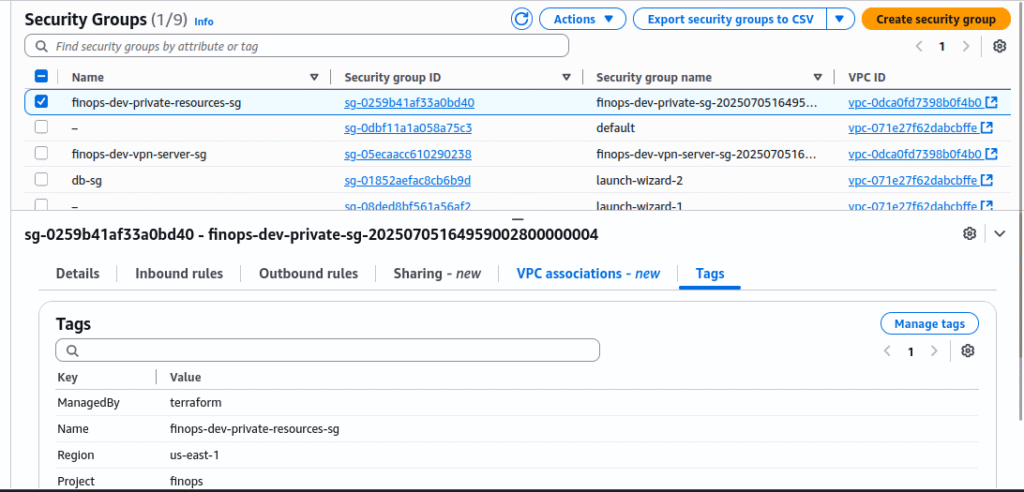
Security Groups:
- One for VPN (
pritunl) - One for internal/private resources
Route 53:
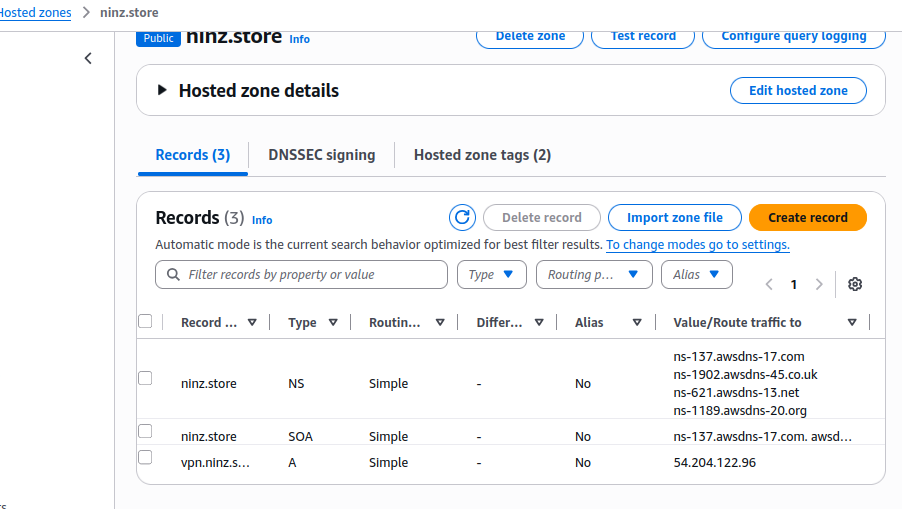
- Hosted zone for
ninz.store - NS records pointing to the right nameservers
Update Your Domain’s Name Servers with Route 53
Before your vpn.ninz.store subdomain can point to your AWS resources, you need to configure your domain provider (e.g., GoDaddy, Namecheap, Google Domains) to use the Route 53 hosted zone for DNS resolution.
🔎 1. Retrieve Route 53 Name Servers
terraform output ninzstore_zone_name_serversYou’ll get output similar to:

These are the NS records you need to set at your domain registrar.
you can retrieve the same from the aws console also
2. Go to Your Domain Registrar and Update NS Records
Steps (generic for most registrars):
- Log in to your domain provider (e.g., GoDaddy)
- Navigate to DNS Settings or Manage Domain
- Find the Nameserver section
- Choose Custom nameservers (instead of default)
- Add all 4 nameservers exactly as shown in the
terraform output - Save or confirm the changes
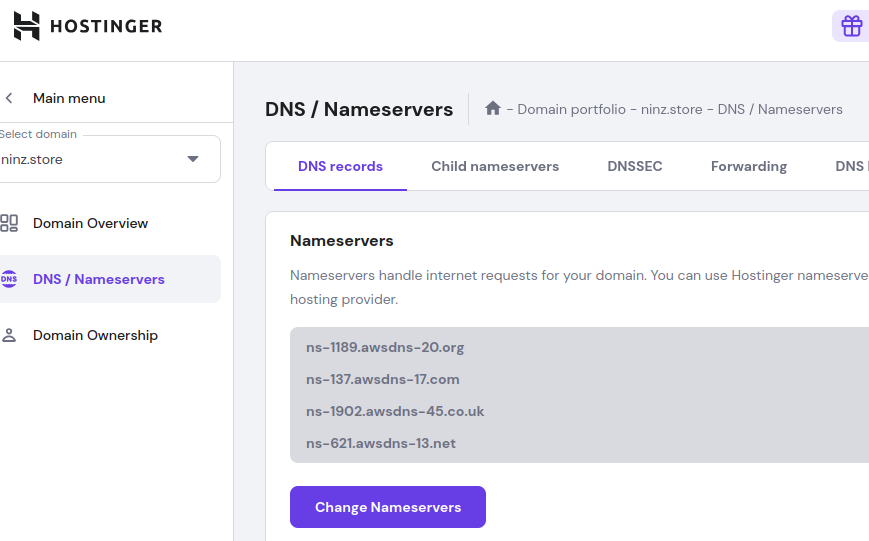
🕒 Propagation Time: It can take anywhere from a few minutes to a few hours for DNS changes to propagate globally.
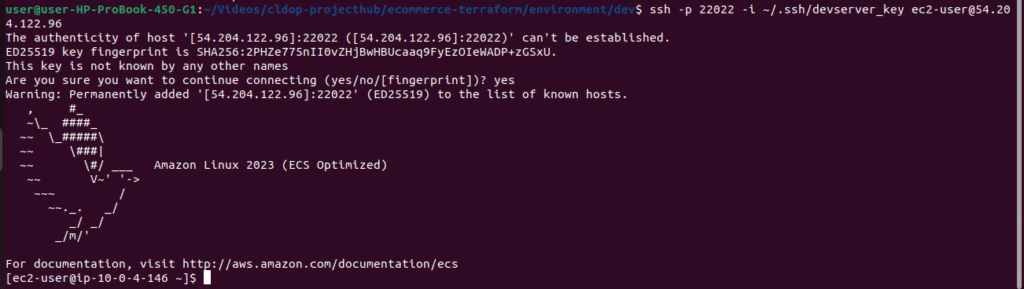
🔐 3. Test SSH Connectivity
VPN Server:
ssh -p 22022 -i ~/.ssh/devserver_key.pem ec2-user@public ip
Private EC2:
- Should not be directly reachable unless connected via VPN tunnel
Note:Will configure pritunl in next steps so that we can connect private ec2 from pritunl client installed on our local machine
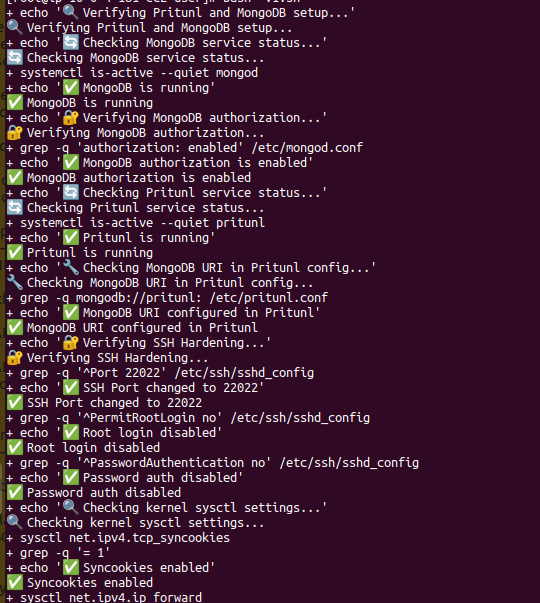
Note: Although we included the Pritunl configuration and hardening script during the Terraform provisioning, it’s essential to verify that the script executed successfully. To ensure this, I created a post-verification script that checks whether all the configurations have been properly applied on the VPN server.
Switch to root user
sudo su
run the verify script
bash post-verify.sh

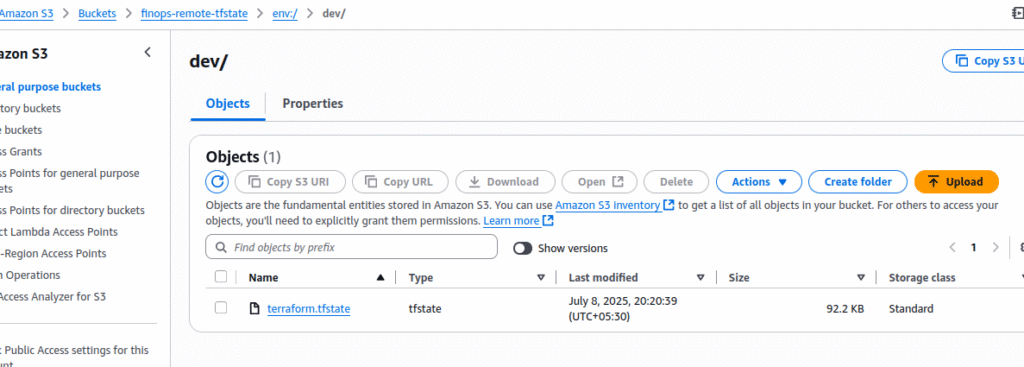
4. Verify S3 Backend State File
Check the terraform.tfstate file in the S3 bucket:
- Path:
env:/dev/terraform.tfstate - Should now contain all resources and outputs
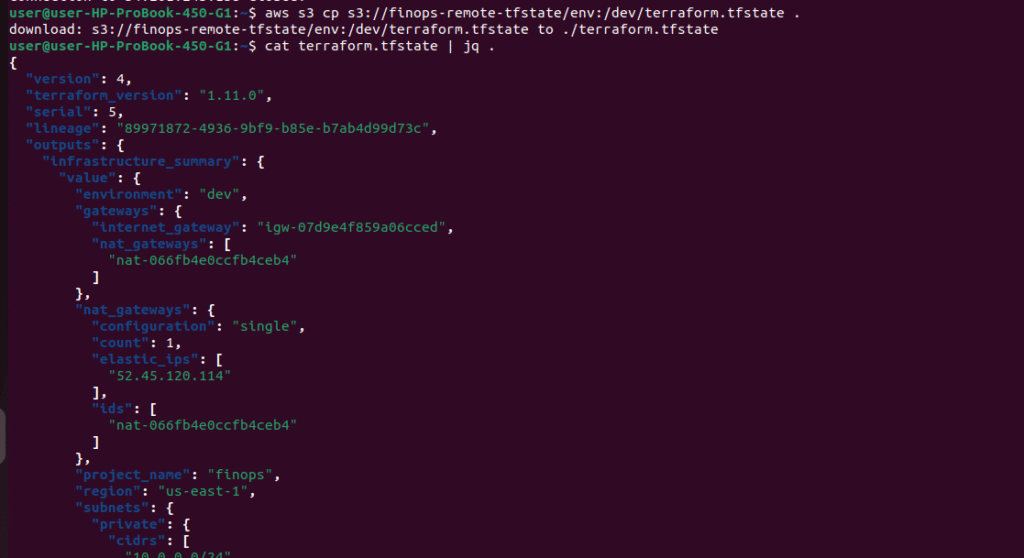
You can download and inspect it manually or run:
aws s3 cp s3://<your-bucket-name>/env:/dev/terraform.tfstate .
cat terraform.tfstate | jq .
🧼 Optional: Clean Listing of All Resources
terraform state list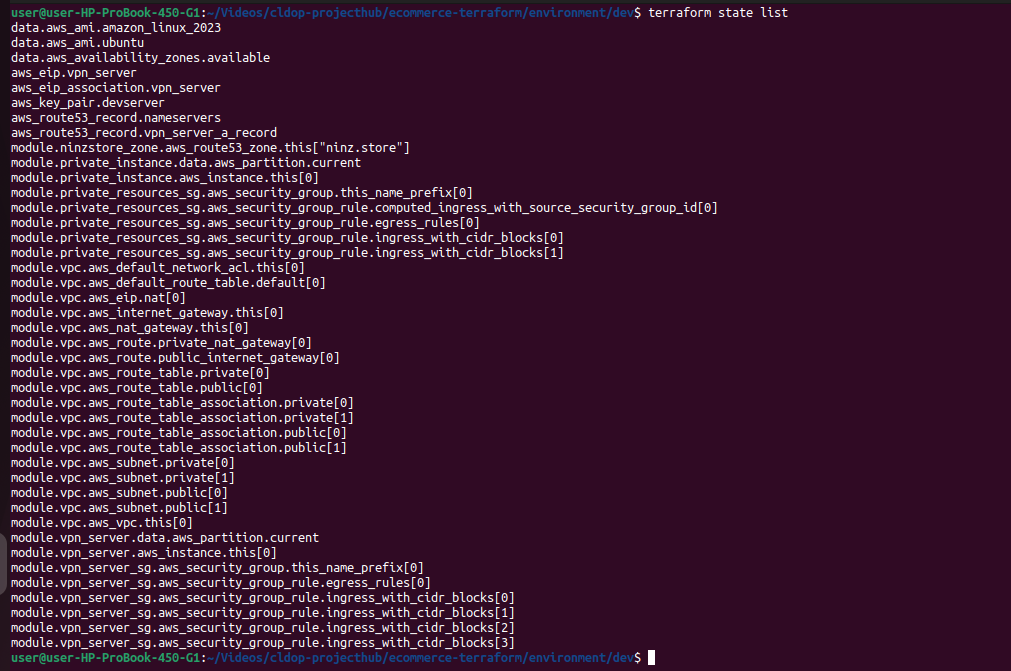
This gives a concise view of every resource Terraform is tracking, such as:
Secure Your Pritunl Server with HTTPS and Custom Domain
After provisioning the infrastructure, we need to configure Pritunl for :
- Access it using a friendly domain like
vpn.ninz.store - Use a valid SSL certificate via Let’s Encrypt
- Ensure the HTTPS access is enforced through NGINX reverse proxy
🌐 Step:
✅ 1. Validate DNS Resolution
⚠️ Important Note:
Even if you’ve set the TTL to 300 seconds (5 minutes) for your domain’s nameservers, DNS propagation may still take 10–20 minutes or more depending on your domain provider and global DNS caching.
👉 Before moving to the next steps, make sure your domain is fully updated with the AWS Route 53 nameservers.
Otherwise, Let’s Encrypt will fail to verify the domain, and the SSL certificate setup will not work.
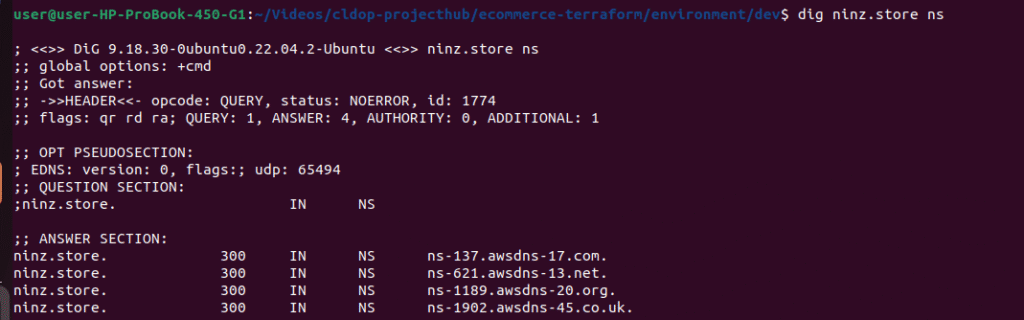
After some time, verify that DNS is resolving using:
nslookup vpn.ninz.store
If the output shows the public IP of your VPN EC2 instance, your domain is correctly linked to Route 53.
also check name servers are properly updated with your domain registrar
dig ninz.store nsIt should show the NS server records same as we got from terraform output.Other wise we need to wait till the propagation done
🚀 Step 2: Configure Pritunl Reverse Proxy & SSL using null_resource
Once your domain (vpn.ninz.store) points to the EC2 instance, we’ll:
- Install NGINX on the Pritunl server
- Get a Let’s Encrypt SSL certificate via Certbot
- Set up a secure reverse proxy for Pritunl
- Restart services to reflect changes
This will be triggered from a Terraform null_resource using a remote user_data script.
🛠️ Terraform Automation Logic
Here’s what your null_resource "vpn_post_dns_nginx_ssl" does:
resource "null_resource" "vpn_post_dns_nginx_ssl" {
  triggers = {
    # Only run when specific things change
    vpn_server_ip = module.vpn_server.public_ip
    domain_name   = var.domain_name
    vpn_fqdn     = aws_route53_record.vpn_server_a_record.fqdn
  }

  depends_on = [aws_route53_record.vpn_server_a_record]

  connection {
    type        = "ssh"
    user        = "ec2-user"
    private_key = file(var.private_key_path)
    host        = module.vpn_server.public_ip
  }

  provisioner "file" {
    source      = "${path.module}/scripts/nginx-ssl.sh"
    destination = "/tmp/nginx-ssl.sh"
  }

  provisioner "remote-exec" {
    inline = [
      "chmod +x /tmp/nginx-ssl.sh",
      "bash /tmp/nginx-ssl.sh"
    ]
  }
}| Action | Description |
|---|---|
✅ file provisioner | Uploads the NGINX + SSL setup script to the Pritunl EC2 instance. |
✅ remote-exec provisioner | Executes the uploaded script securely over SSH. |
✅ depends_on | Ensures this only runs after the Route53 A record has been created. |
✅ triggers | Dynamically reruns if IP, domain, or FQDN changes (safe re-run logic). |
🔄 Rerun Terraform Commands After Adding null_resource Provisioner
In the main.tf file, we initially commented out the null_resource.vpn_post_dns_nginx_ssl block to prevent premature execution while DNS propagation was still in progress.
Now that we’ve added the null_resource.vpn_post_dns_nginx_ssl to automate Pritunl reverse proxy configuration and Let’s Encrypt SSL setup, it’s time to apply the updated configuration.
✅ 1. Re-initialize Terraform
since we have added new resource block need to run:
terraform init
This ensures everything is properly initialized, especially after modifying main.tf.
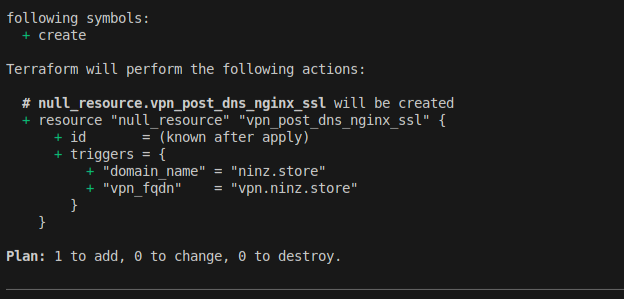
View the Execution Plan
terraform plan
This will show Terraform intends to:
- Create or update the
null_resource.vpn_post_dns_nginx_ssl.
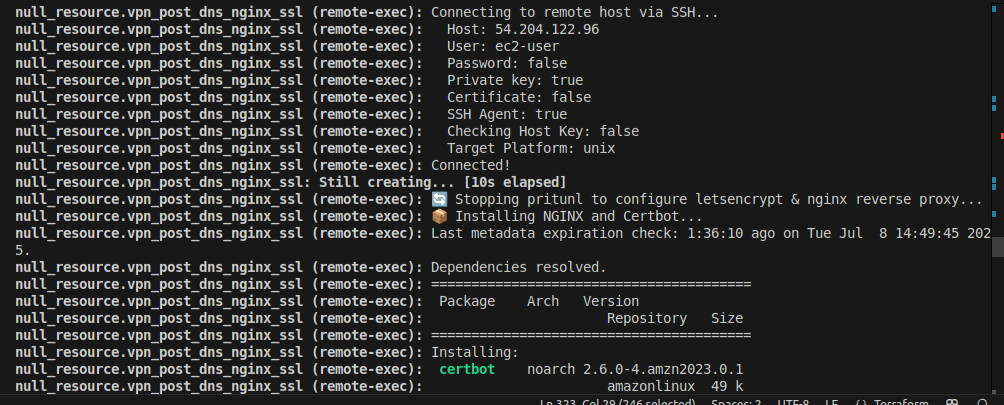
🚀 3. Apply the Configuration
terraform apply
Confirm the apply by typing yes when prompted.
Terraform will:
- Detect changes to the
null_resource - Upload the script to the EC2 instance
- Remotely execute the provisioning steps via SSH
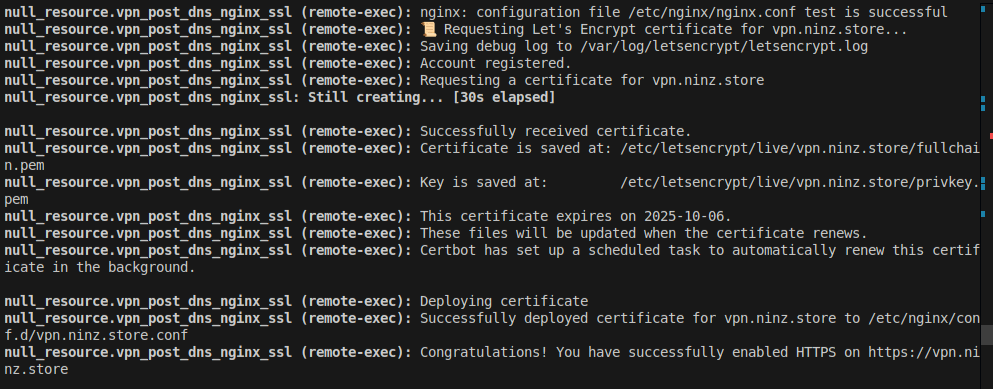
🧪 Post-Apply Verification
After successful provisioning:
- Visit
https://vpn.<your-domain>in the browser. - You should see the Pritunl Web UI securely served over HTTPS.
- Use the generated admin password (from logs or console) to login.
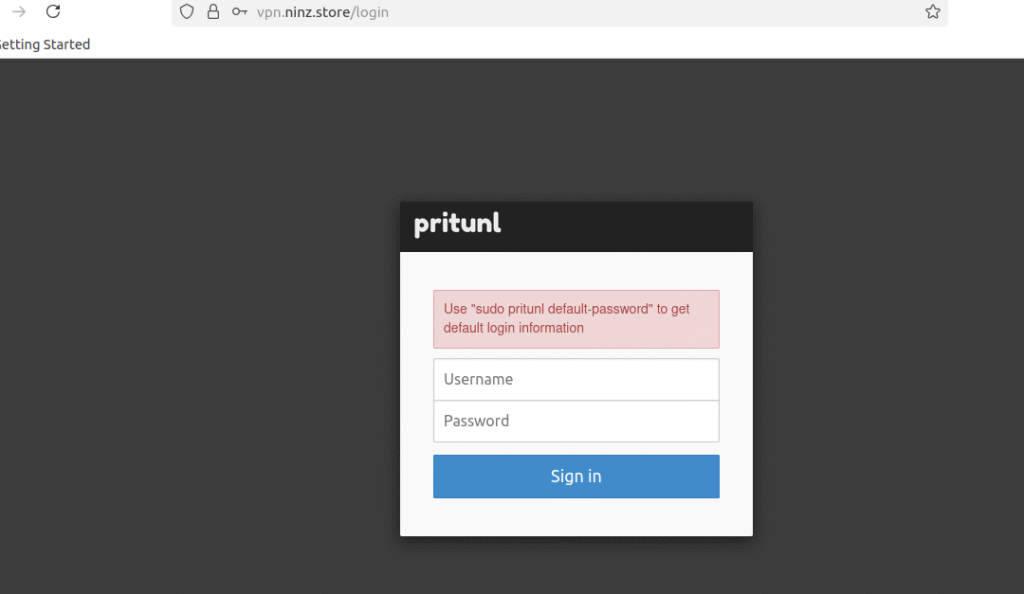
To view the username and password, execute the command on vpn server
ssh -p 22022 -i ~/.ssh/devserver_key ec2-user@54.204.122.9sudo pritunl default-password
Copy the credentials from the output and sign in to the online interface
After that, you’ll be sent to the setup screen.

Click the Save button after changing
| New Password | Your strong password |
| Public Address | vpn.ninz.store |
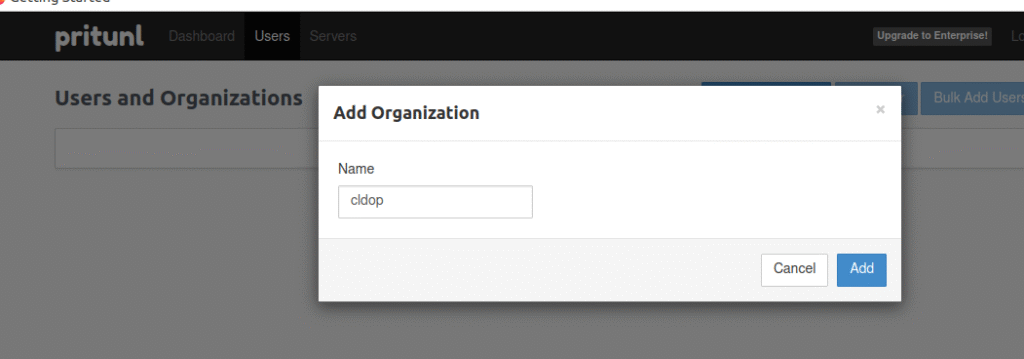
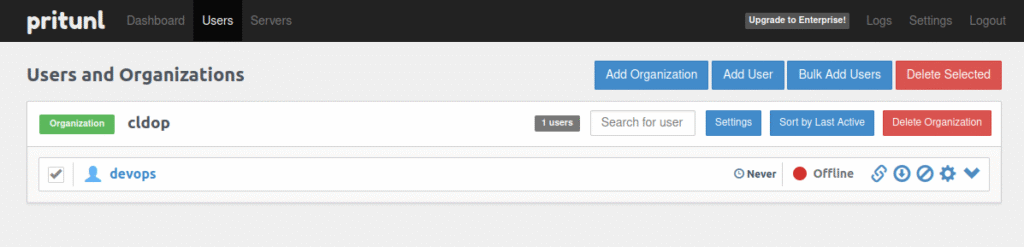
Step 1: Add Organization
- Click on the “Add Organization” button in the user section.
Enter the organization name and press Add.
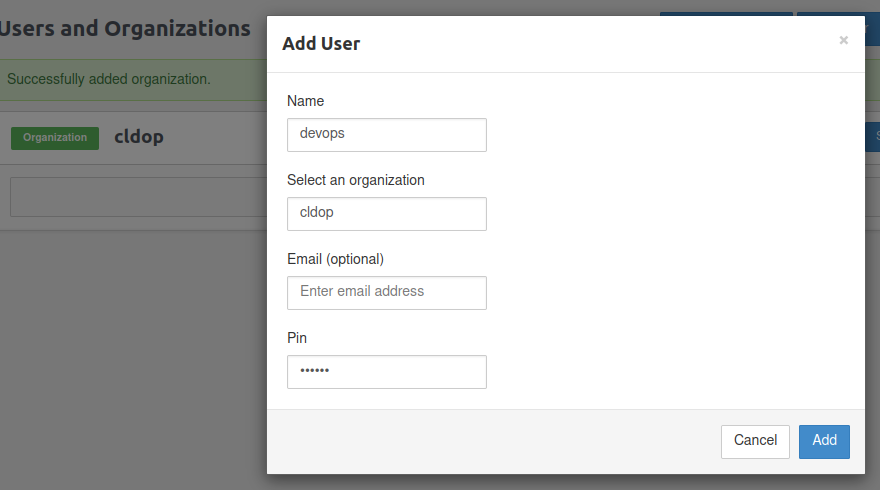
Step 2: Add User
- Select the “Add User” option.
Enter username, select PIN(give 6 digit) and press Add.
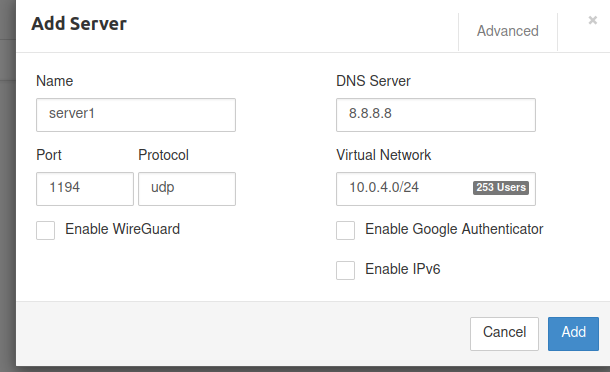
Step 3: Setup Server
- Select the Servers tab.
The page you should view is this one:
Name: server1 (or your choice)
Port: 1194
Protocol: udp
DNS: 8.8.8.8
Virtual Network: 10.0.4.0/24 (your VPN client CIDR)
Then click Add
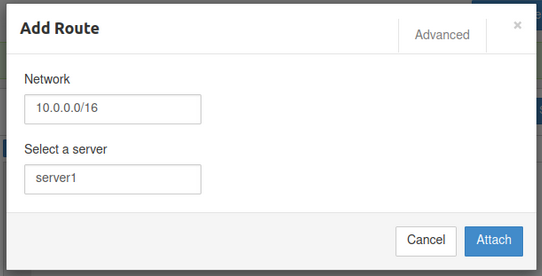
How to Add the VPC Route in Pritunl
In the Routes section, add your VPC CIDR block.
- Example:
10.0.0.0/16
Click Attach
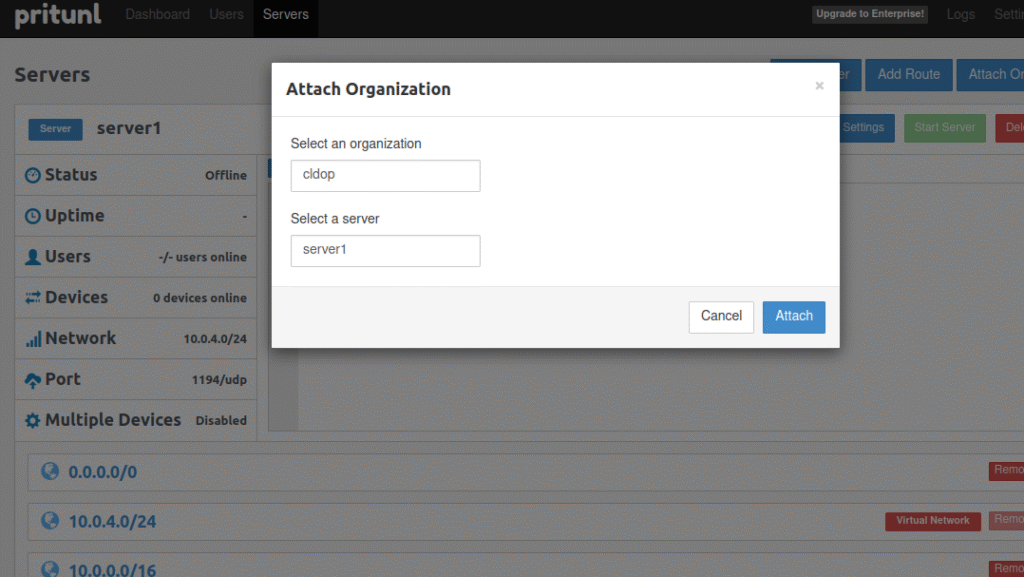
Step 4: Attach Organisation
The page you should view is this one:
- Click on the “Attach Organization” option to connect the organization to the server.
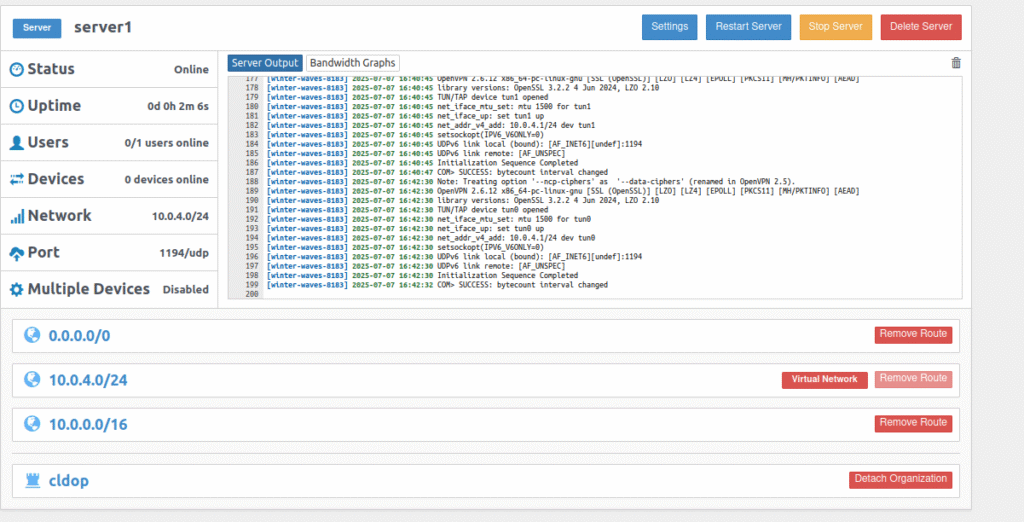
Step 5: Start Server
The page you should view is this one:
- Click on the “Start Server” button to launch the VPN server.
🔗 Download Pritunl VPN Client & Test Private Access
✅ 1. Download & Install Pritunl VPN Client
Visit the official link based on your OS:
echo "deb https://repo.pritunl.com/stable/apt jammy main" | sudo tee /etc/apt/sources.list.d/pritunl.list
sudo apt install gnupg
curl https://repo.pritunl.com/stable/apt/key.gpg | sudo apt-key add -
sudo apt update
sudo apt install pritunl-client-electron
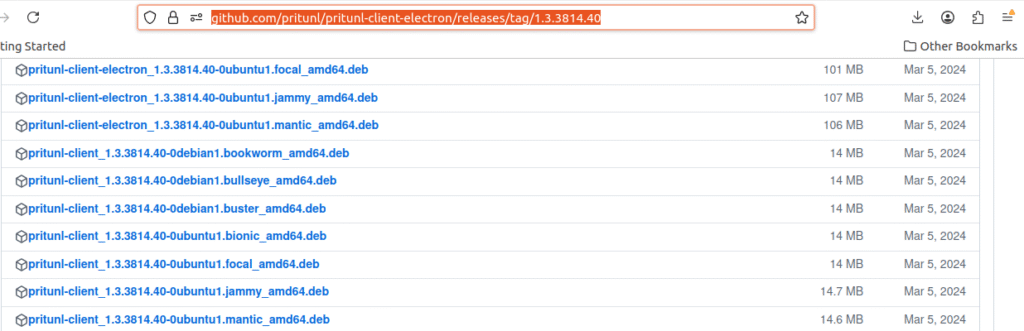
if it is not working direct download the .deb package & install from the below link.Select the package depends on your OS.here mine is Jammy
https://github.com/pritunl/pritunl-client-electron/releases/tag/1.3.3814.40
🔐 2. Get VPN Profile from Pritunl Web Console
- Open https://vpn.ninz.store in your browser.
- Login with pritunl user credentials.
- Go to Users → Download Profile.
- Import the
.tarprofile file into your VPN client.
🔌 3. Connect to the VPN
- Open the Pritunl client.
- Click “Import Profile” and select the downloaded
.tarfile. - Click “Connect” – the status should turn green ✅.

🔁 Test Connectivity to Private Instance via VPN
Now that your VPN setup is complete and connected successfully using the Pritunl client, it’s time to validate our private network access.
➡️ Try SSH-ing into the private instance using its private IP address (e.g., 10.0.x.x). You should be able to connect without any public IP or bastion host.
ssh -p 22022 -i ~/.ssh/devserver_key ubuntu@10.0.0.127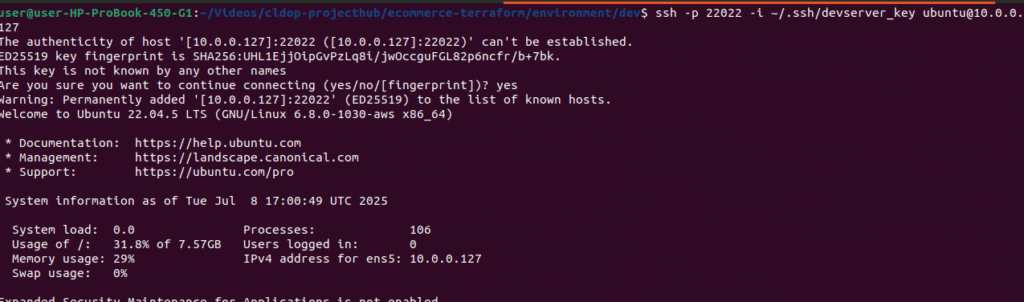
✅ Part 3 Complete – Full VPN Access & Connectivity Achieved!
We’ve reached a major milestone! 🚀 In this part, we didn’t just build infrastructure—we created a secure, production-ready private networking foundation with full VPN access. Here’s what we accomplished:
🔧 Terraform-Powered Infra Setup:
- VPC, Subnets, Route Tables
- Public VPN Server & Private Ubuntu Instance
- Secure Security Groups for fine-grained access
🌐 Domain & SSL Automation:
- Configured
vpn.ninz.storewith Route 53 - Issued SSL certificates using Let’s Encrypt
- Enabled full HTTPS reverse proxy with NGINX
🔐 Hardening & Security:
- MongoDB user authentication enabled
- Pritunl reverse proxy and firewall configured
- SSH & system-level hardening automatically applied
🧪 VPN Setup, Testing & Connectivity:
- Deployed Pritunl VPN server
- Installed Pritunl Client
- Verified connectivity to the private EC2 instance
- Ensured stable and secure internet routing via VPN
🔜 Coming Up in Part 4 – MERN Stack Deployment Behind the VPN
Now that we have secure access to our private server, it’s time to shift gears. In Part 4, we’ll:
📦 Create an S3 bucket for static file storage
🌍 Deploy a full MERN stack application using Docker Compose
🔒 Keep the app safely hidden in the private subnet, only accessible via VPN
🔁 Test app deployment and connectivity end-to-end
We’ve built the tunnel — next, we send the data through it!
Stay tuned for the ultimate deployment phase in Part 4. It’s going to be 🔥!